TAP GitOps Install Prep
According the the documentation, these are the key components of implementing GitOps2:
Git as the single source of truth: The desired state is stored in a Git repository. To change the cluster state, you must change it in the Git repository instead of modifying it directly on the cluster.
Declarative configuration: GitOps follows a declarative approach, where the desired state is defined in the declarative configuration files.
Pull-based synchronization: GitOps follows a pull-based model. Kubernetes cluster periodically pulls the desired state from the Git repository. This approach ensures that the cluster is always in sync with the desired configuration.
In this chapter we're going to go over all the things we need before we can install TAP via GitOps principles, using the TAP GitOps Reference Implementation 2.
TAP Package Relocation
Wether you want to do an offline install, or reduce the reliance on external systems or any other reason, you probably want to relocate the TAP packages and the associated container images.
In this guide we focus on the GitOps installation, so please refer to the documentation on the steps required1.
Or go directly to the GitOps SOPS install guide's section on relocating images, to start with the relocation 3.
We'll take a look at the following:
- Retrieving the reference implementation scripts
- Initiate a profile install folder
- Setup SOPS
- Other generic steps to repeat for each Profile
Retrieve Reference Implementation Scripts
The TAP resources on Tanzu Network contain the scripts for the TAP GitOps installation4.
First, ensure you are logged in (as you also need to accept the EULA's). Then, select the appropriate release from the dropdown, for example Release 1.5.6 as shown belown.
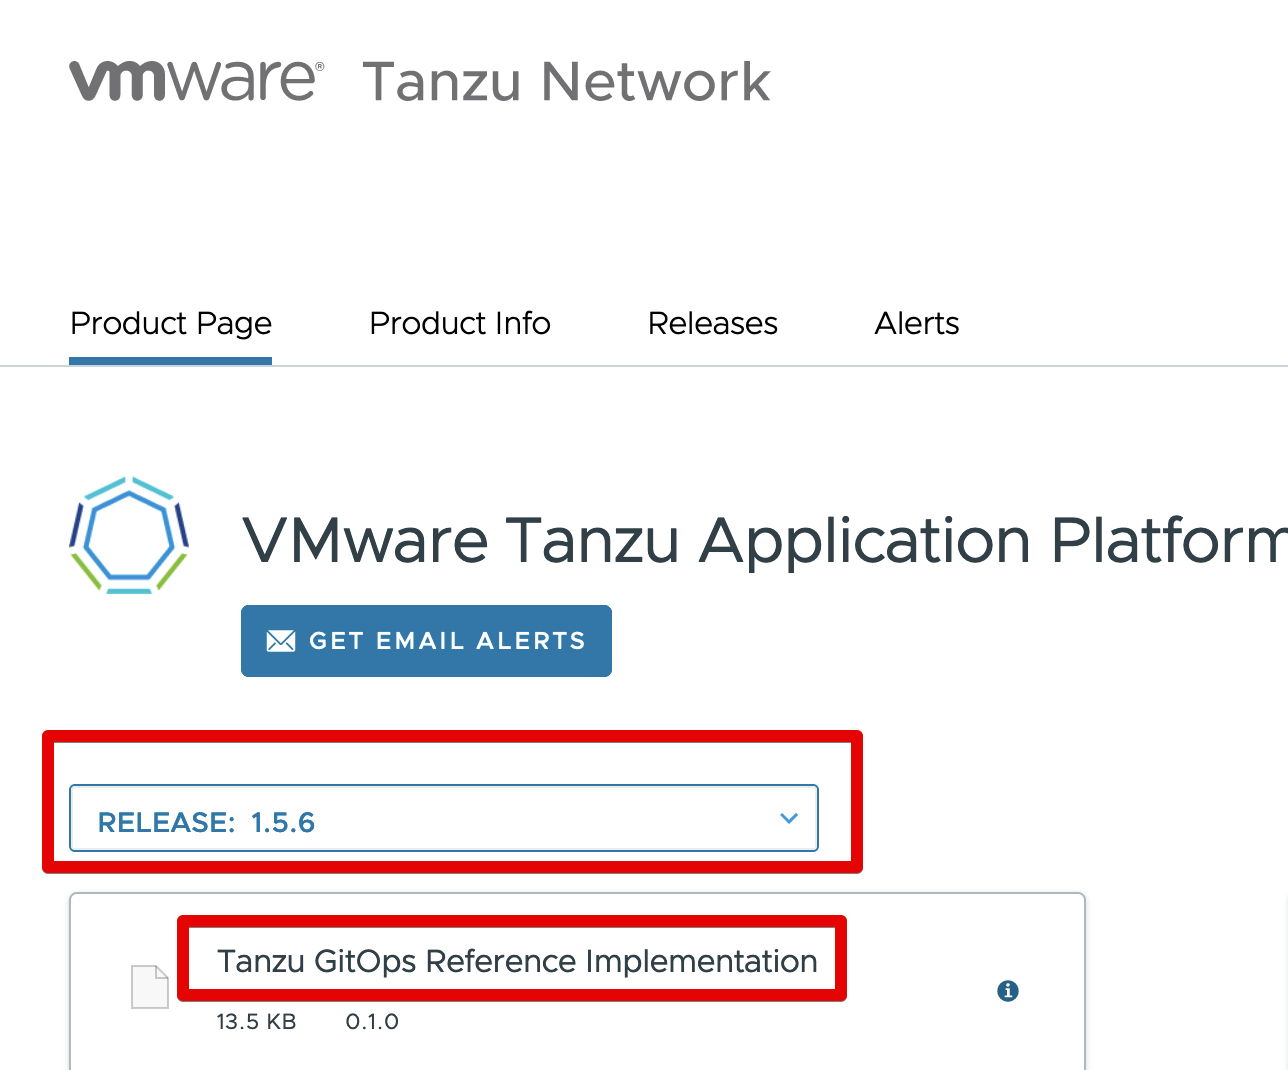
One of the items in the list, is the Tanzu GitOps Reference Implementation, download this archive and extract it to a useful folder5. You need these for configuring your installation folder for bootstrapping.
Hint for downloading
It isn't always clear, hovering over an item shows a little cloud icon.
Clicking on this icon starts the download.
If the download does not start, verify you are logged in!
Initiate a profile install folder
The repository preperation script is setup-repo.sh.
It takes two arguments, the cluster name and the tool for managing secrets.
In my case, those are build-01 and sops respectively:
As I want to structure my folders slightly differently from the default (e.g., adding the platforms folder), I move the end result into my desired Git repository.
Folderwise, it now looks like this:
platforms
└── clusters
    ├── build-01
    │   ├── cluster-config
    │   │   ├── config
    │   │   └── values
    │   └── tanzu-sync
    │       ├── app
    │       │   ├── config
    │       │   └── values
    │       ├── bootstrap
    │       └── scripts
    ├── other clusters ...
Where other cluster ... is where other cluster's folders will be placed.
As you can see, we have two main folders, cluster-config and tanzu-sync.
Each has a distinct role to play.
- cluster-config: contains the configuration of what goes into the cluster.
- cluster-config/config: folder is synchronized into the cluster directly
- cluster-config/values: folder is used to configure the TAP installation. And contains similar content as the
tap-values.yamlused with a traditional installation (i.e.,tanzu package available install ...)
- tanzu-sync: contains the configuration for managing the "GitOps" configuration.
- tanzu-sync/scripts: the scripts to prepare the configuration
- tanzu-sync/app: is a Carvel App, with a
configdirectory containing the templates, and avaluesfolder used to configure these templates. This file gets generated by the scripts.
As we go along, we update the repository and get it ready for installing a TAP profile.
Setup SOPS
Some TAP installation values are secrets.
If we're going to store them in a Git repository, we need to encrypt them first.
For this, we use SOPS with Age, as discussed in the introduction. Let's setup the sensitive values6.
We start with setting the environment variables, including the name of the cluster (the folder name).
export SOPS_AGE_RECIPIENTS=$(cat key.txt | grep "# public key: " | sed 's/# public key: //')
export TAP_CLUSTER=build-01
I suggest using a "staging" folder with these unencrypted files that you do not commit.
Use a .gitignore
To ensure you do not commit this staging folder, it is recommended to add it to a .gitignore file.
The initial contents of the file are as follows:
We then encrypt this using SOPS:
sops --encrypt --in-place "${TAP_CLUSTER}-tap-sensitive-values.yaml" \
   > "${TAP_CLUSTER}-tap-sensitive-values.sops.yaml"
Followed by moving the file to the appropriate folder in the GitOps repository:
mv "${TAP_CLUSTER}-tap-sensitive-values.sops.yaml" \
  "platforms/clusters/${TAP_CLUSTER}/cluster-config/values/tap-sensitive-values.sops.yaml"
Update, Encrypt, Move everytime
When you need to update or add a sensitive value, we need to do this set of steps again.
Yes, unfortunately, we need to do the edit, encrypt, and move everytime we need to change a value.
These files are unique per cluster, so we end up with a bunch of these files. Hence, we add the cluster name to the file name in the staging folder.
Generic steps for each Profile
Beyond the sensitive values file that we encrypt, there are a few more steps we repeat for each cluster:
- A non-sensitive values file, for all the other TAP installation values
- Additional Kubernetes resources that we want in the cluster, that are tied to the TAP install
- Namespace Provisioner configuration
- including the main sources
- and the additional source
- Share Secrets (Optional)
- extending the Additional Kubernetes resources
- FluxCD resources (optional)
Let's look at each.
Non-Sensitive Values File
The folder cluster-config/values/ is read in its entirety.
So any file in there, with content that is valid for the TAP installation values schema is read and used.
Ah yes, the schema files. There is one for all values, and one specifically for the sensitive values we addressed earlier.
cluster-config/config/tap-install/.tanzu-managed/schema.yamlcluster-config/config/tap-install/.tanzu-managed/schema--tap-sensitive-values.yaml
If you're not clear on YTT schema files, take a look at the documentation on how to write a schema7.
All the installation files, schema files, and your values are given to YTT to process the resulting YAML files that get applied to the cluster (by KAPP Controller). If you're curious as to how this process goes, you can take a look at the YTT docs8, or the KAPP Controller docs9.
For the values that go into the non-sensitive values file, you have two main sources of information.
- The TAP installation documentation, having an example for each profile10
- You can request the values schema from the package, when made available via a package repository
The second is a bit difficult to do if you are using the GitOps installation, as you are creating the profile before the package repository is installed.
A possible solution here, is to install the TAP package repository in temporary namespace and use it to query the packages.
Retrieving Package Schemas
Because this is not always clear to people how to do this, let's explore the steps.
First, you need to have a Package Repository installed in your cluster.
For this specific purpose, I recommend making a (Kubernetes) namespace dedicated for this purpose.
Then install the package repository for the TAP version you want to explore:
tanzu package repository add tanzu-tap-repository-1-5-6 \
  --url registry.tanzu.vmware.com/tanzu-application-platform/tap-packages:1.5.6 \
  --namespace tap-package-repository-1-5-6
As I'm not going to install the packages from there, I'm using the direct URL of the Tanzu Registry. If you cannot use that due environment restrictions, replace it with your internal URL (requires relocation).
Verify the package repository is successfully reconciled:
If successful, the response looks like this:
NAME:          tanzu-tap-repository-1-5-6
VERSION:       36742796
REPOSITORY:    registry.tanzu.vmware.com/tanzu-application-platform/tap-packages
TAG:           1.5.6
STATUS:        Reconcile succeeded
REASON:
When can now list the packages made available in the namespace:
Which should give you a list of all the packages like this (edited to fit this page):
NAME                              DISPLAY-NAME               SHORT-DESCRIPTION   LATEST-VERSION
accelerator.apps.tanzu.vmware.com Application Accelerator..  Used to create...   1.5.3
api-portal.tanzu.vmware.com       API portal                 A unified user...   1.3.9
...
tap.tanzu.vmware.com              Tanzu Application Platform Package to inst..   1.5.6
We can then use the combination of the package name and version to retrieve its schema.
For example, for the main TAP install, we use tap.tanzu.vmware.com and 1.5.6:
tanzu package available -n tap-package-repository-1-5-6\
  get tap.tanzu.vmware.com/1.5.6\
  --values-schema
Which returns to us a decent portion of all the values we can set (abbreviated to fit the page):
KEY                       DEFAULT    TYPE    DESCRIPTION
namespace_provisioner     <nil>      object  Namespace Provisioner configuration
services_toolkit          <nil>      object  Services Toolkit configuration
I say portion, because not all values of every package installed by TAP is returned to us.
If you want to know each package's total set of possible values, you need to query them individually.
Additional Kubernetes Resources
There are likely other Kubernetes resources you want to apply to the cluster, that are related to the TAP installation but not covered by it.
I recommend seperating these into three categories:
- Resources that are required for each TAP workload
- Resources that need to exist only once, and are strongly tied to TAP
- Resources that need to exist only once, and are loosely tied to TAP
The first category are resources you want to cover with the Namespace Provisioner, addressed in the next section.
The second and third, are more complicated.
You might be wondering what the complications are. Let's take a look:
- TAP is synchronized with KAPP Controller, this is not a full-featured GitOps solution
- the main problem is its limited options for ordering and ability to convey dependencies
- TAP includes the base installation of FluxCD, but not its Kustomize or Helm controllers
- Some of the resources require secrets in the cluster
- Some of the resources use CRDs that are lazily installed during the TAP install
Hopefully that paints a sufficient picture of the situation at hand.
We have some choices to make on how to proceed.
My goal is to have the TAP installation to be the initiate of everything. That does not mean it needs to handle everything by itself.
To be more precise, I will include the Helm and Kustomize controllers for FluxCD.
First, as a generic step, we add a custom (YTT) Schema file.
We create it in a subfolder of cluster-config/config, so that it is included in the initial Tanzu Sync synchronization.
Let's create it as custom/00-custom-schema.yaml.
In this, we create the most basic schema file we can:
#@data/values-schema
#@overlay/match-child-defaults missing_ok=True
---
custom:
Before we make use of this schema, let's first examine the Namespace Provisioner.
Namespace Provisioner
The Namespace Provisioner has two modes.
- Controller Mode
- GitOps Mode18
The Controller mode is the continuation of how TAP provisions namespaces (for TAP Workloads) so far. Meaning, it watches for a Label on the Namespace, and applies a set of resources to that Namespace.
The GitOps mode gives us the option to point it to a Git repository for its configuration.
As the goal of this guide is to do everything through a singular installation via GitOps, we'll take this route.
To change from Controller mode (the default) to GitOps mode, we disable the controller11:
The Namespace Provisioner splits its configuration into two:
- The main sources, which is how the provisioner creates the namespace
- Additional sources, which are, as the name implies, additional Kubernetes resources it applies to each namespace it creates
TAP 1.5 secrets issue
A headsup when using TAP 1.5 (and possibly later versions as well), there is a bug when using the additional sources.
Assuming that you need to use a secret for the Git repository for both the sources and additional_sources, you need two secrets. One for each configuration item.
Unfortunately, both resources result in a SecretExport and SecretImport resource with the name of secret in the corresponding namespaces. So when the secret has the same name, there is a conflict and the KAPP Controller stops the reconciliation.
The solution is to ensure each entry has a unique secret.
You can, for example, create a secret via the Kubernetes resources (see previous section) and create two secrets with the same input. And then let the Namespace Provisioner installation copy both to the correct namespace (it does so via the SecretGen Controller12).
In terms of configuring the Namespace Provisioner, we get something like the following YAML file:
namespace_provisioner:
  controller: false
gitops_install:
ref: origin/main
subPath: platforms/clusters/build-01/ns-provisioner/install
url: git@github.com:joostvdg/tap-gitops-example.git
secretRef:
name: github-ssh
namespace: shared
create_export: false
additional_sources:
- git:
ref: origin/main
subPath: platforms/clusters/build-01/ns-provisioner/additional-sources
url: git@github.com:joostvdg/tap-gitops-example.git
secretRef:
name: github-ssh-1
namespace: shared
create_export: false
path: _ytt_lib/my-resources
The gitops_install refers to the main resources, and the additional_sources takes a list of Git configurations following the spec from the App CR of Carvel13. Which is the same as the namespace_provisioner.gitops_install property.
In my case, I've put both of these sets of files in the same Git repository, in their respective subfolder. Which is parallel to the cluster-config of the relevants clusters.
The secret reference is pointing to a secret in another namespace, and creates a SecretExport (in the mentioned namespace) and a SecretImport (in the Namespace Provisioner's namespace) CRs12. This is why the secrets cannot have the same name, else these resources conflict. We can disable the export with create_export in case you use a secret that is already exported.
The Namespace Provisioner expects that the main folder contains the files desired-namespaces.yaml and namespaces.yaml. This gives us the following folder structure (limited to relevant folders/files):
platforms/clusters/build-01
├── README.md
├── cluster-config
│   ├── config
│   └── values
├── ns-provisioner
│   ├── install
│   │   ├── desired-namespaces.yaml
│   │   └── namespaces.yaml
|   └── additional-sources
└── tanzu-sync
Let's take a look at the content of these two mandatory files.
desired-namespaces.yaml
This file contains a list of the namespaces we want the Namespace Provisioner to manage for us:
#@data/values
---
namespaces:
#! The only required parameter is the name of the namespace. All additional values provided here
#! for a namespace will be available under data.values for templating additional sources
- name: dev
- name: qa
- name: orange
- name: apps
- name: teal
- name: green
- name: cyan
- name: demo1
The namespaces file contains more details.
namespaces.yaml
In this file, we can affect how the Namespace Provisioner creates the namespaces.
The file is included in the YTT processing, and thus we have access to some variables, like the namespace name.
In my example, I ensure we create the namespace, and through an overlay append additional secrets to the default ServiceAccount.
For example, for the Build profile you might want to ensure the ServiceAccount has access to a Git credential for Tekton, and a encryption secret for Cosign (see Supply Chain Security Tools - Sign19).
#@ load("@ytt:data", "data")
#@ load("@ytt:overlay", "overlay")
#! This for loop will loop over the namespace list in desired-namespaces.yaml and will create those namespaces.
#! NOTE: if you have another tool like Tanzu Mission Control or some other process that is taking care of creating namespaces for you,
#! and you don’t want namespace provisioner to create the namespaces, you can delete this file from your GitOps install repository.
#@ for ns in data.values.namespaces:
---
apiVersion: v1
kind: Namespace
metadata:
  name: #@ ns.name
---
#@overlay/match by=overlay.subset({"kind":"ServiceAccount", "metadata":{ "name": "default"}}),expects="1+"
---
secrets:
  #@overlay/append
  - name: github-ssh
#@ end
Share Secrets
Combining the Namespace Provisioner configuration and the additional resources configuration (the custom Schema we added), we can address adding additional secrets.
The way to do this, is as follows:
- Ensure that the custom Schema has a property for sensitive values
- Manage the secret input in the same sensitive values file that you encrypt with SOPS as you do for the TAP Install
- Create Secret manifests with the YTT templating in the
cluster-config/configfolder
If the secret needs to exist in more than one namespace, we recommend creating a shared Namespace for this.
Then create SecretExport and SecretImport as appropriate.
Let us use the Namespace Provisioner as the example.
In the custom schema file, we add the property custom.sensitive_values as follows:
#@data/values-schema
#@overlay/match-child-defaults missing_ok=True
---
custom:

  #@schema/title "Other Values (sensitive)"
  #@schema/desc "Sensitive portion of the non TAP Install configuration values."
  #@schema/type any=True
  sensitive_values: {}
Then, in the senstive input file, before SOPS encryption, we set our values as follows:
custom:
  sensitive_values:
    github:
      ssh:
        private_key: |
          -----BEGIN OPENSSH PRIVATE KEY-----
          ...
          -----END OPENSSH PRIVATE KEY-----
        known_hosts: |
          ...
As you can see, we add them add the top level, as we put our custom schema in parallel to the one for TAP Install. Encrypt the file as you've done before.
export SOPS_AGE_RECIPIENTS=$(cat key.txt | grep "# public key: " | sed 's/# public key: //')
sops --encrypt tap-full-01-sensitive-values.yaml  > tap-full-01-sensitive-values-sops.yaml
Now we create the Kubernetes Secret's to share in the custom folder, alongside the Schema.
As I want to communicate what the file does, I'll name 01-shared.yaml. This way it is also clear that is should be the first non-schema file to be used/handled, containing resources intended to be shared.
The files in my cluster-config folder are now as follows:
cluster-config/
├── config
│   ├── custom
│   │   ├── 00-custom-schema.yaml
│   │   └── 01-shared.yaml
│   └── tap-install
└── values
    ├── non-sensitive-values.yaml
    ├── tap-install-values.yaml
    └── tap-sensitive-values.sops.yaml
As the example below is quite large, it is collapsed. You can open it to view the file and its explanation.
Shared Config
My 01-shared.yaml file is represented below.
We first load the appropriate YTT libraries, and then define the Namespace.
This way, we can guarantee the other resources can be created there.
I then create the secrets as they should be for Tekton, so I do not have to worry about that later.
You can choose to make the Git server URL a property or just define it as a hardcoded value like this.
In addition, I want to share the secrets. They should be copied to the appropriate places.
So each secret that needs to be shared, has an accompanying SecretExport.
For the Namespace Provisioner GitOps and Additional Resources configuration, I create the github-ssh secret twice. This way each segment has its own key.
In my case, the sensitive values are the same, but you can choose to use different values for different keys/purposes.
#@ load("@ytt:data", "data")
#@ load("@ytt:base64", "base64")
#@ load("@ytt:yaml", "yaml")

---
apiVersion: v1
kind: Namespace
metadata:
  name: shared
---
apiVersion: v1
kind: Secret
metadata:
  name: gitlab-https
  namespace: shared
  annotations:
    tekton.dev/git-0: http://gitlab.services.my-domain.com
type: kubernetes.io/basic-auth
stringData:
  caFile: #@ data.values.custom.sensitive_values.gitlab.ca_cert_data
  password: #@ data.values.custom.sensitive_values.gitlab.pat
  username: #@ data.values.custom.sensitive_values.gitlab.username
---
apiVersion: secretgen.carvel.dev/v1alpha1
kind: SecretExport
metadata:
  name: gitlab-https
  namespace: shared
spec:
  toNamespaces:
  - '*'
---
apiVersion: v1
kind: Secret
metadata:
  name: github-ssh-1
  namespace: shared
  annotations:
    tekton.dev/git-0: github.com
type: kubernetes.io/ssh-auth
data:
  ssh-privatekey: #@ base64.encode(data.values.custom.sensitive_values.github.ssh.private_key)
  ssh-knownhosts: #@ base64.encode(data.values.custom.sensitive_values.github.ssh.known_hosts)
---
apiVersion: secretgen.carvel.dev/v1alpha1
kind: SecretExport
metadata:
  name: github-ssh-1
  namespace: shared
spec:
  toNamespaces:
  - '*'

---
apiVersion: v1
kind: Secret
metadata:
  name: github-ssh
  namespace: shared
  annotations:
    tekton.dev/git-0: github.com
type: kubernetes.io/ssh-auth
data:
  ssh-privatekey: #@ base64.encode(data.values.custom.sensitive_values.github.ssh.private_key)
  ssh-knownhosts: #@ base64.encode(data.values.custom.sensitive_values.github.ssh.known_hosts)
---
apiVersion: secretgen.carvel.dev/v1alpha1
kind: SecretExport
metadata:
  name: github-ssh
  namespace: shared
spec:
  toNamespaces:
  - '*'
---
apiVersion: secretgen.carvel.dev/v1alpha1
kind: SecretImport
metadata:
  name: github-ssh
  namespace: tap-install
spec:
  fromNamespace: shared
FluxCD Controllers
Next, we want add the FluxCD Controllers for Kustomizations16 and Helm14 charts. This way we can leverage FluxCD to manage any other resources we want to install into the cluster that are tightly coupled to TAP.
Think of a Tekton Pipeline, or a Cartographer Workload resource.
In order to synchronize these Controllers and their respective resources, we use a Carvel App. Making use of the same Git synchronization as the Tanzu Sync does, we can even re-use its secret.
You might be wondering why we cannot add these directly, like we did with the secrets. Unfortunately, for Kustomization's to work, we need a (Flux) Source. For example, a GitRepository.
The CRD of this CR is installed by the FluxCD Source Controller, which in turn is installed by TAP. This means we need to wait until the CRD exists before we can create the Source.
Which means we need to guarantee the Tanzu Sync is not the one synchronizing these resources, as it will block installing TAP if it finds a resource that the Kubernetes cluster doesn't support (i.e., a CR, of which the CRD does not exist).
First, we create the App CR, which can exist in the cluster-config/config tree. This way, the Tanzu Sync App creates this as a separate synchronizer. It does its reconcillation loop until the required CRDs exist and eventually reconcile successfully.
As a start, we copy the Tanzu Sync App, located at tanzu-sync/app/config/.tanzu-managed/sync.yaml. Assuming we put the Flux configuration files in the same Git repository, you can re-use the Git configuration (located at tanzu-sync/app/values/tanzu-sync.yaml).
The reduce the complexity, we remove the valuesFrom section from the template, and add the values directly.
We keep the paths section, and keep the path as config. Meaning, when we add the FluxCD resources, such as the Controllers, GitRepository and so on, we put them in a sub-folder called config which is a convention of Carvel Apps.
apiVersion: kappctrl.k14s.io/v1alpha1
kind: App
metadata:
  name: flux-initial-content-sync
  namespace: tanzu-sync
  annotations:
    kapp.k14s.io/change-group: tanzu-sync-flux
    kapp.k14s.io/change-rule.0: "upsert after upserting tanzu-tanzu-sync"
    kapp.k14s.io/disable-wait: ""
spec:
  serviceAccountName: sync-sa
  fetch:
    - git:
        url: git@github.com:joostvdg/tap-gitops.git
        ref:  origin/main
        secretRef:
          name: sync-git
        subPath: platforms/clusters/full-tap-cluster/flux
  template:
    - ytt:
        paths:
        - config
  deploy:
    - kapp: {}
Disable Wait
We create resources related to the FluixCD CRDs, the CRDs are yet to be installed when the tanzu-sync App runs for the first time.
To avoid having the tanzu-sync to error and halt, forgoing the installation of TAP, we instruct to not wait on our Flux resources app. This way, the tanzu-sync manages the flux App but doesn't look at its status to reflect its own.
We do this with the KAPP annotation kapp.k14s.io/disable-wait: "".
The flux-initial-content-sync App fails to reconcile until TAP installs FluxCD and its CRDs. It eventually reaches a successfull state.
Our folder now looks like this:
cluster-config/
├── config
│   ├── custom
│   │   ├── 00-custom-schema.yaml
│   │   ├── 01-shared.yaml
│   │   └── 02-flux-sync.yaml
│   └── tap-install
└── values
    ├── non-sensitive-values.yaml
    ├── tap-install-values.yaml
    └── tap-sensitive-values.sops.yaml
And our synchronizations are looking like this:
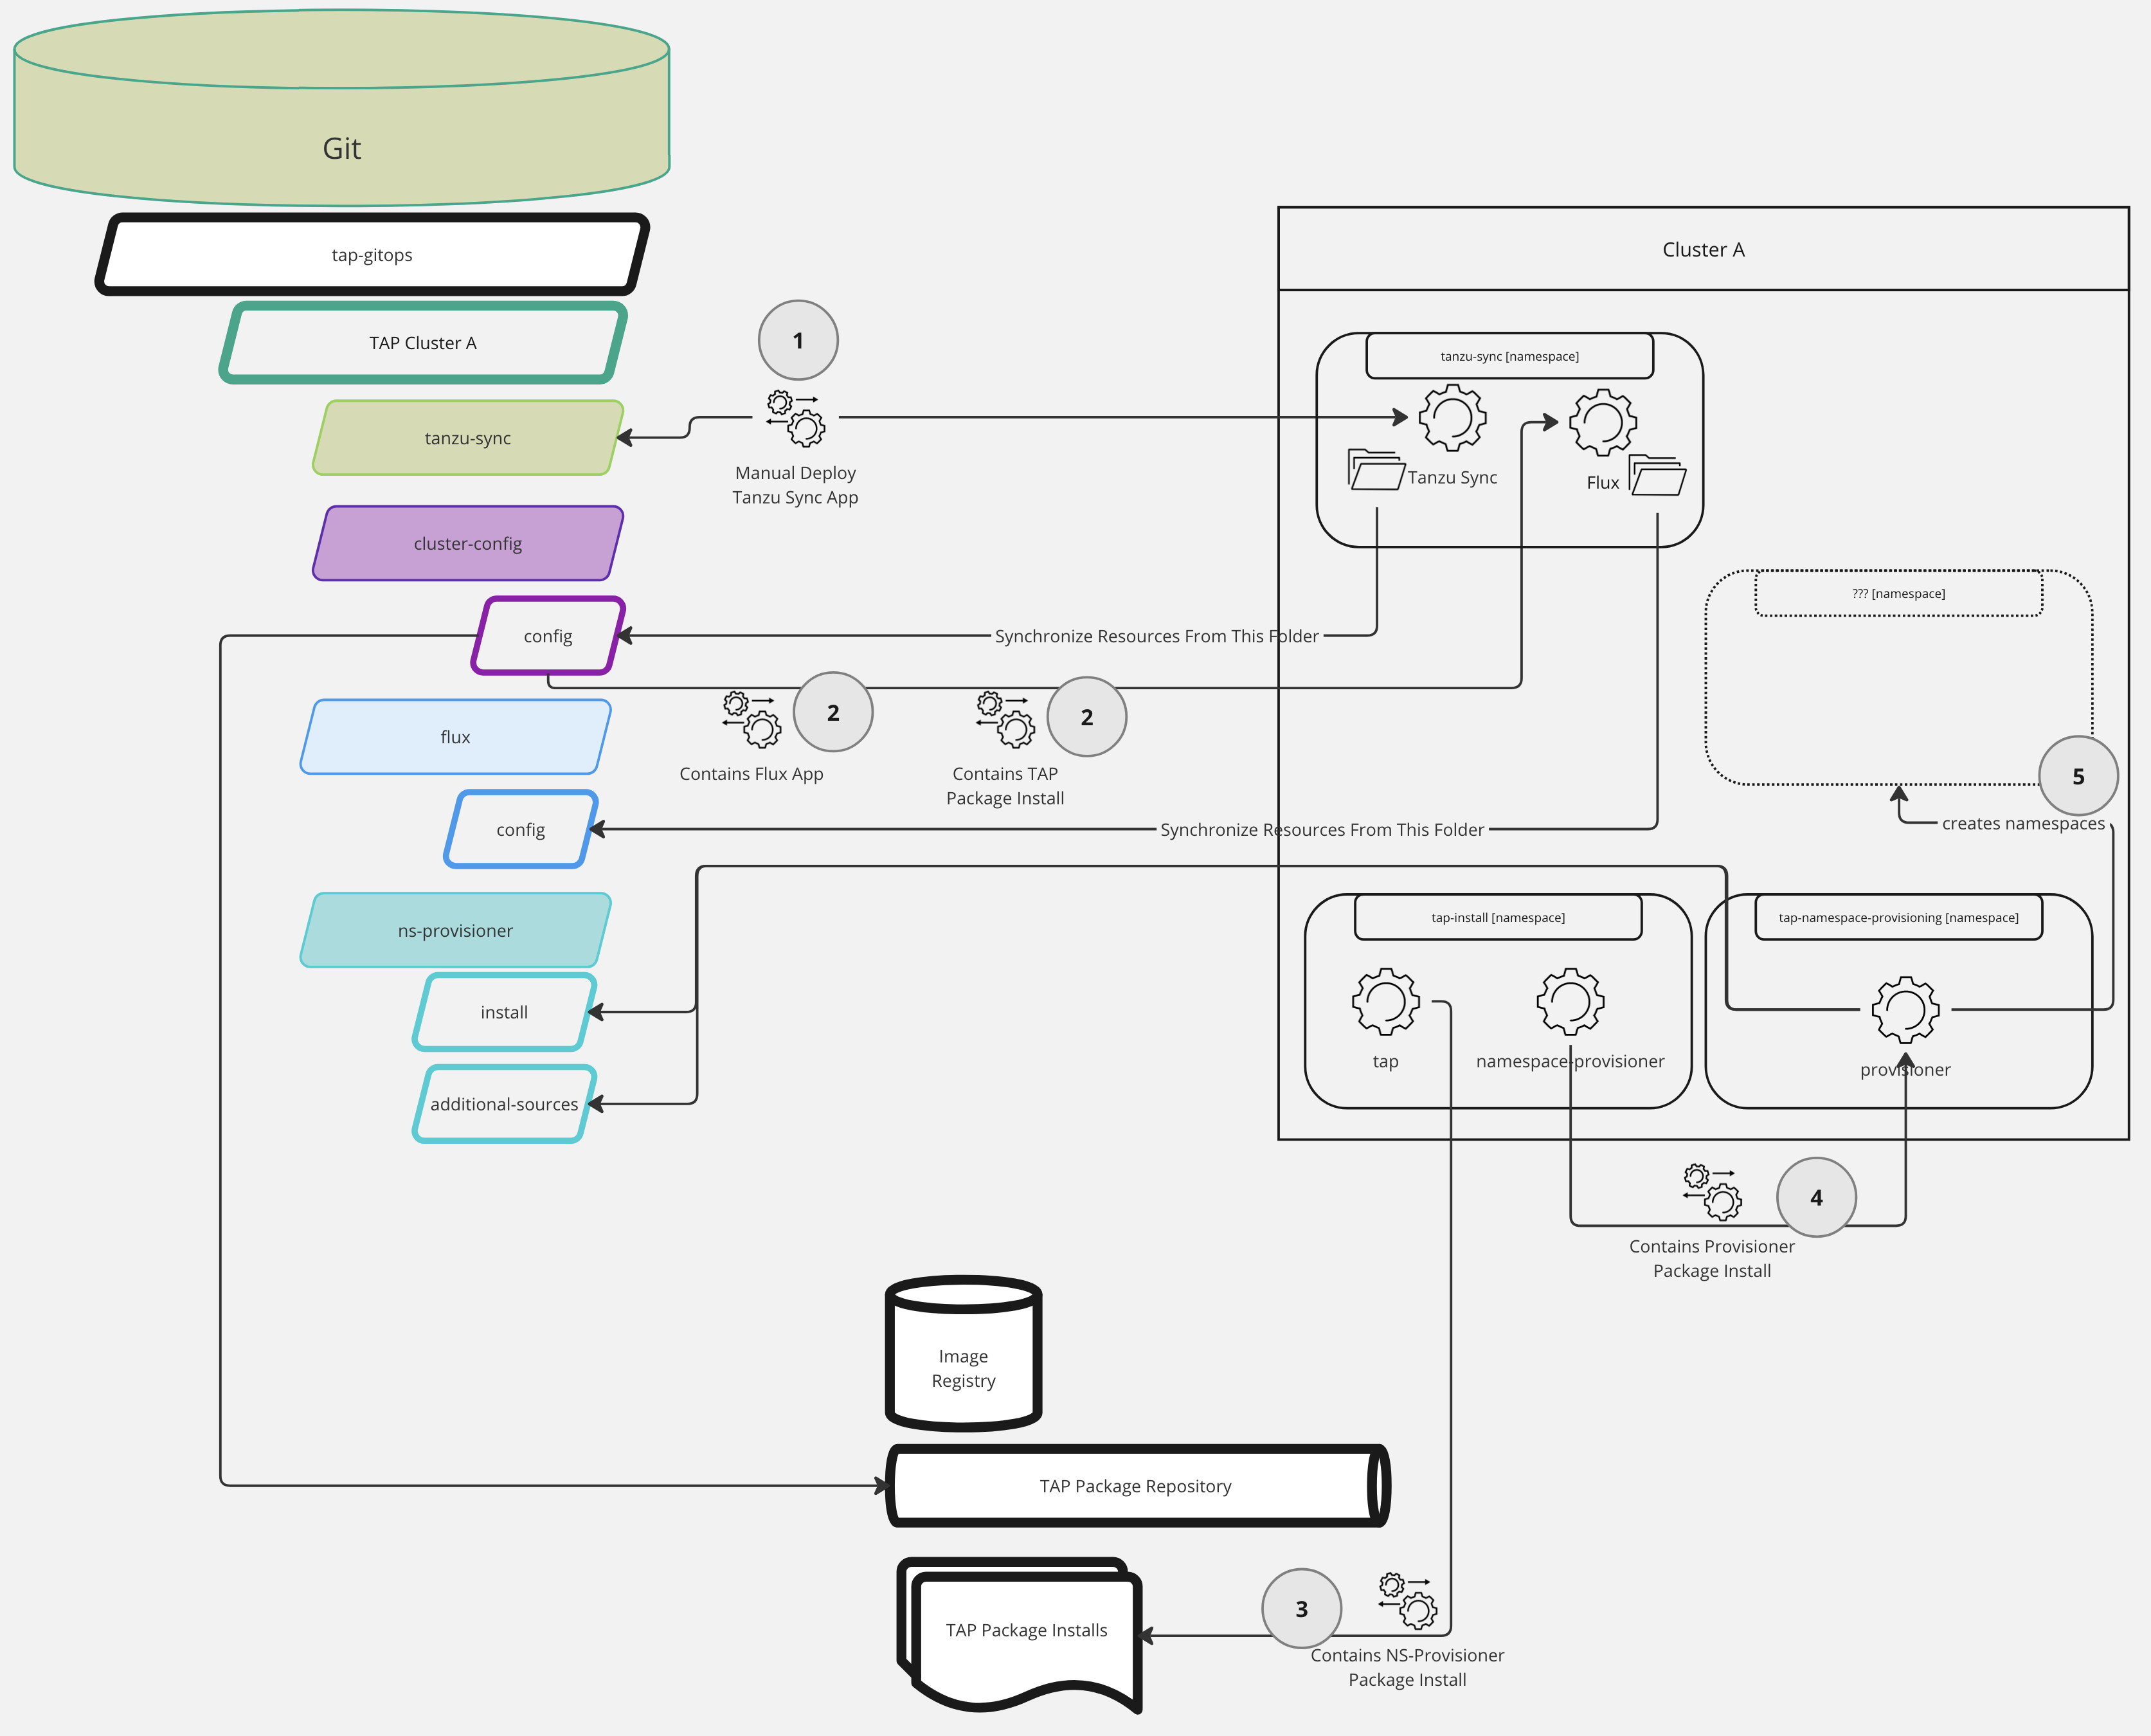
- We run the deploy script of the TAP GitOps Reference Implementation, which installs the
syncApp into thetanzu-syncNamespace - Included in the content that is synchronized to the cluster via the
syncApp, is the TAPPackageInstall, and the FluxAppwe just created - The TAP package installs all the other packages we configure with the TAP install values, generally guided by the
profilewe select - One the packages that TAP installs, is the
namespace-provisioner, and when opting for the GitOps configuration for this package, it installs another package, calledprovisionerin thetap-namespace-provisioningNamespace - The last step in this chain, is the
provisionerApp creating the Namespaces you defined in itsdesired-namespaces.yamlconfig file
I hope the picture and explanation clarify what is going on, and what App is synchronizing what.
Let's create the configuration folders mentioned in the App, we create the following folders:
- The
fluxfolder, as top level folder in parallel to thecluster-configandtanzu-syncfolders - The
configfolder as sub-folder, to house all the files that we synchronize directly to the cluster - In the
configfolder, we create another sub-foldercontrollers, it is here we paste the release files of those Controllers1517.
For safety, we comment out the Namespace manifest in these files.
Namespaces and KAPP Packages
When KAPP Controller installs a Package, it add ownership labels on each resource created via that Package.
If the Package creates a Namespace, it owns it, and other Packages are not allowed to create or update it. When a Package attempts to do so, the KAPP Controller blocks the action and returns an error.
In the current scenario, we create the configuration for the Flux Controllers before Flux is installed via the TAP Install.
In order for the TAP Package to own the flux-system Namespace, the Tanzu Sync Package most not create it.
The best course of action here, is the manually create the Namespace prior to running the Tanzu Sync deploy:
Our folder structure now looks like this:
.
├── cluster-config
│   ├── config
│   └── values
├── flux
│   └── config
│       ├── controllers
│       │   ├── helm.yaml
│       │   └── kustomize.yaml
│       ├── kustomizations
│       └── sources
├── ns-provisioner
└── tanzu-sync
For clarity, I also included the kustomizations and sources folders. It is there where we create the FluxCD content files later.
TAP Install Reconciliation
When adding more configuration to the TAP Install, you run the risk the Tanzu Sync runs into a timeout.
For example, the Namepace Provisioner installs additional packages for each Namespace it creates.
Some of these packages rely on other packages to be completed before they can complete.
This means the Namespace Provisioner waits on those packages, waiting on other packages.
The TAP package installation waits on the Namespace Provisioner.
And in turn, the Tanzu Sync app waits on the TAP package installation.
Expected Time
While we strive for having TAP install go smoothly and fast, due to the reconcilliation loops of each Package Install, wait times increase.
For example, my installation from scratch took about 21 minutes.
This was installing a Full Profile with additional resources such as secrets, Flux Controllers, and several Namspaces via the Namespace Provisioner.