RedHat OpenShift 3.11 on GCP - Medium
Initially, I wrote a guide to get RedHat OpenShift 3.11 running on Google Cloud (GCP) with minimal effort. It is based on the GCP guide from RedHat1, but limiting the configuration options to the bare minimum.
So, why another guide? Well, I wanted to go a few steps further. Creating a separated network to make the cluster more secure. I also want to ensure the Domain Name, IP, and load balancing are automated to improve the OpenShift installation.
I will guide you in creating a secured network, with an automated DNS configuration, and automated TLS for our endpoints.
Note
This guide is written early March 2020, using jx version 2.0.1212 and OpenShift version v3.11.170.
Pre-requisites
What do we need to get started?
- active GCP account with billing enabled
- GCP project
- gcloud tool installed
- terraform
0.12+ installed - active RedHat account
- which hasn't used its 60 day trial license of OpenShift yet
- domain name registration which can forward subdomains to name servers (class
CNAME)
Important
This doc contains a prefix for the VM's created in GCP. This prefix is set to <prefix>. Next to that, the user used, is set to my_user.
You probably want to change that, so please take care with copy-pasting!
Process
- create Terraform configuration for GCP VM's
- create the VM's in GCP with RedHat Enterprise Linux v7
- configure dns
- install OpenShift pre-requisites on each VM
- create OpenShift Ansible configuration
- install OpenShift via Ansible
- create initial users
GCP Terraform
What Do We Need
Having gone through the process of installing RHOS 3.11 once, I ran into an issue. The documentation makes it seems you only need master nodes, compute nodes and VM's for etcd (can be the same as Master). However, you also need at least one infra node.
You can opt for a HA cluster, with three master nodes, or a single master node for a test cluster. I'm going with the latter. The master node will house the Kubernetes Control Plane, the infra node will house the OpenShift infra. As we won't have cluster autoscaling - a bit fancy for a manual test cluster - we have to make sure the machines are beefy to take the entire workload.
Another thing we need for OpenShift, is having DNS that works between the nodes. For example, you should be able to say node1 and end up at the correct machine. Due to GCP networking, this internal DNS works out-of-the-box for any machine with our network/project.
Important
Our machines need to have unique names!
So I ended up with the following:
- 1x
masternode ->n1-standard-8: 8 cores, 30gb mem - 1x
infranode ->n1-standard-8: 8 cores, 30gb mem - 4x
computenode ->n1-standard-4: 4 cores, 15gb mem (each)
VM Image
Of course, if you want to run RedHat OpenShift Enterprise (RHOS), your VM's need to run a RedHat Enterprise Linux distribution(RHEL).
In order to figure out which vm images are currently available, you can issue the following command via gcloud.
Which should give a response like this:
NAME                                                  PROJECT            FAMILY                            DEPRECATED  STATUS
rhel-6-v20200205                                      rhel-cloud         rhel-6                                        READY
rhel-7-v20200205                                      rhel-cloud         rhel-7                                        READY
rhel-8-v20200205                                      rhel-cloud         rhel-8                                        READY
For the VM image in our Terraform configuration, we will use the NAME of the image. For RHOS 3.11, RedHat strongly recommends using RHEL 7, so we use rhel-7-v20200205.
Terraform Configuration
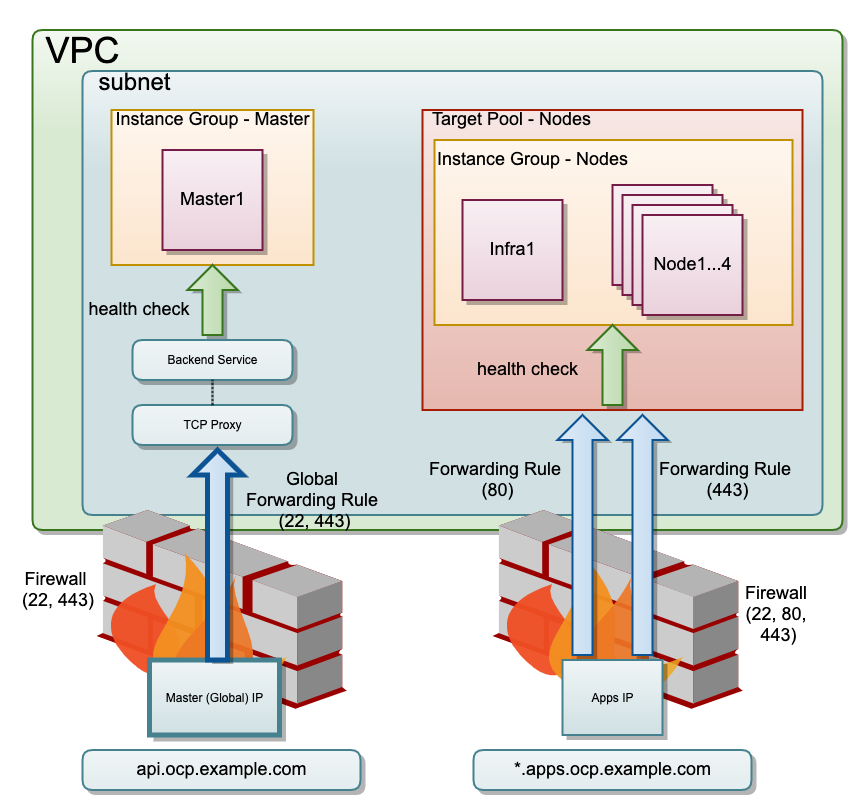
Google Cloud networking can get a bit complicated. In order to make the configuration easier to digest, I've created the Terraform configuration in the form of Terraform Modules2.
There are four modules:
- Instance: VM image definition
- IP: static IP's and CloudDNS configuration
- LB: load balancers, port forwards and health checks
- VPC:
vpc, subnet, and firewalls
There are two main benefits to using the modules;
- the modules means we can reuse the terraform code - especially nice for the instances
- it is easier to port the outcome of one resource - for example an IP address - as input to another
For this case, each module - except IP - will have three files:
- main.tf: contains the resource definitions of this module
- variables.tf: contains the input for the module
- outputs.tf: export values from created resources, to be used by other modules/resources
In the main folder we have:
- main.tf: creating the resources via the modules
- variables.tf: input variables
- storage.tf: Google Bucket3 as backing storage for the OpenShift (Docker) Registry4
Model
Terraform Module IP
main.tf
resource "google_compute_global_address" "master" {
    name = "master"
}

resource "google_compute_address" "nodes" {
    name = "nodes"
}

resource "google_dns_record_set" "ocp" {
    name = "api.${google_dns_managed_zone.my_ocp_domain.dns_name}"
    type = "A"
    ttl  = 300
    managed_zone = google_dns_managed_zone.my_ocp_domain.name
    rrdatas = [google_compute_global_address.master.address]
}

resource "google_dns_record_set" "apps" {
    name = "*.apps.${google_dns_managed_zone.my_ocp_domain.dns_name}"
    type = "A"
    ttl  = 300
    managed_zone = google_dns_managed_zone.my_ocp_domain.name
    rrdatas = [google_compute_address.nodes.address]
}

resource "google_dns_managed_zone" "my_ocp_domain" {
    name     = "my-ocp-domain"
    dns_name = "my.ocp.domain."
}
outputs.tf
Terraform Module VPC
main.tf
resource "google_compute_network" "vpc_network" {
    name                                 =  var.vpc_name
    auto_create_subnetworks = "false"
    routing_mode                   = "GLOBAL"
}

resource "google_compute_subnetwork" "vpc_subnet_int" {
    name                         =  var.network_name_int
    ip_cidr_range            = var.network_name_int_range
    network                     = google_compute_network.vpc_network.self_link
    region                        = var.region
    private_ip_google_access = true
}

resource "google_compute_firewall" "fw_access" {
    name    = "my-rhos311-fw-ext"
    network = google_compute_network.vpc_network.name

    allow {
        protocol = "icmp"
    }

    allow {
        protocol = "tcp"
        ports    = ["22", "80", "443"]
    }
    source_ranges = ["0.0.0.0/0"]
}

resource "google_compute_firewall" "fw_gcp_health_checks" {
    name    = "my-rhos311-fw-gcp-health-checks"
    network = google_compute_network.vpc_network.name

    allow {
        protocol = "tcp"
        ports    = ["0-65535"]
    }

    source_ranges = ["35.191.0.0/16","130.211.0.0/22"]
}

resource "google_compute_firewall" "allow-internal" {
    name    = "my-rhos311-fw-int"
    network = google_compute_network.vpc_network.name

    allow {
        protocol = "icmp"
    }

    allow {
        protocol = "tcp"
        ports    = ["0-65535"]
    }

    allow {
        protocol = "udp"
        ports    = ["0-65535"]
    }
    source_ranges = [
        var.network_name_int_range
    ]
}
variables.tf
outputs.tf
Terraform Module LB
main.tf
resource "google_compute_health_check" "master" {
    name         = "https"
    healthy_threshold = 3
    unhealthy_threshold = 3
    timeout_sec        = 10
    check_interval_sec = 10
    https_health_check {
        request_path = "/healthz"
        port = "443"
    }
}

resource "google_compute_http_health_check" "nodes" {
    name         = "nodes"
    request_path = "/healthz"
    port = 1936
    healthy_threshold = 3
    unhealthy_threshold = 3
    timeout_sec        = 10
    check_interval_sec = 10
}

resource "google_compute_backend_service" "master" {
    name          = "backend-service-master"
    health_checks = [ "${google_compute_health_check.master.self_link}" ]
    # load_balancing_scheme  = "EXTERNAL"
    protocol = "TCP"
    session_affinity =  "CLIENT_IP"
    port_name   = "ocp-api"
    backend {
        group = var.instance_group_master
    }
}

resource "google_compute_target_tcp_proxy" "master_tcp_proxy" {
    name            = "master-tcp-proxy"
    backend_service = google_compute_backend_service.master.self_link
}

resource "google_compute_global_forwarding_rule" "master_forwarding" {
    name                  = "master-forwarding"
    ip_address         = var.master_ip
    target                = google_compute_target_tcp_proxy.master_tcp_proxy.self_link
    port_range            = 443
}

resource "google_compute_target_pool" "nodes" {
    name = "nodes"

    instances = var.instance_group_nodes

    health_checks = [
        google_compute_http_health_check.nodes.name
    ]
}

resource "google_compute_forwarding_rule" "network-load-balancer-http" {
    name                  = "network-load-balancer-http"
    ip_address         = var.nodes_ip
    target                  =   google_compute_target_pool.nodes.self_link
    port_range            = "80"
    ip_protocol           = "TCP"
}

resource "google_compute_forwarding_rule" "network-load-balancer-https" {
    name                  = "network-load-balancer-https"
    ip_address         = var.nodes_ip
    target                =     google_compute_target_pool.nodes.self_link
    port_range            = "443"
    ip_protocol           = "TCP"
}
variables.tf
outputs.tf
Terraform Module Instance
main.tf
resource "google_compute_instance" "instance" {
    name         = "${var.prefix}-${var.instance_name}"
    machine_type = var.machine_type
    zone         = var.zone
    allow_stopping_for_update = true

    boot_disk {
        initialize_params {
            image = var.vm_image
            size = var.disk_size
            type = "pd-ssd"
        }
    }

    network_interface {
        network = var.network
        subnetwork = var.vpc_subnet_int
        access_config  {
            # gives the node an external IP address
            # not sure if this is still required?
        }
    }

    metadata = {
        ssh-keys = var.ssh_key
    }
    service_account {
        scopes = [
            "https://www.googleapis.com/auth/compute",
            "https://www.googleapis.com/auth/devstorage.read_only",
            "https://www.googleapis.com/auth/logging.write",
            "https://www.googleapis.com/auth/monitoring",
            "https://www.googleapis.com/auth/ndev.clouddns.readwrite",
            "https://www.googleapis.com/auth/cloud-platform"
        ]
    }
}
variables.tf
variable "machine_type" {
    default = "n1-standard-4"
}

variable "vm_image" {
    default ="rhel-7-v20200205"
}

variable "disk_size" {
    default = 100
}

variable "ssh_key" {}
variable "prefix" {}
variable "instance_name" { }
variable "zone" {}
variable "network" {}
variable "vpc_subnet_ext" {}
variable "vpc_subnet_int" {}
Terraform Main
main.tf
terraform {
    required_version = "~> 0.12"
}

# https://www.terraform.io/docs/providers/google/index.html
provider "google" {
    version   = "~> 2.18.1"
    project   = var.project
    region    =  var.region
    zone      = "europe-west4-b"
}

module "vpc" {
    source = "./modules/vpc"
    region = var.region
    vpc_name = "vpc-my-rhos311"
    network_name_int = "network-my-rhos311-int"
    network_name_ext = "network-my-rhos311-ext"
}

module "master1" {
    source = "./modules/instance"
    machine_type = "n1-standard-8"
    instance_name = "master1"
    prefix = var.instance_prefix
    network = module.vpc.vpc_link
    vpc_subnet_int = module.vpc.vpc_subnet_int
    vpc_subnet_ext = module.vpc.vpc_subnet_ext
    zone = var.zone
    ssh_key = "my_user:${file("~/.ssh/id_rsa.pub")}"
}

module "infra1" {
    source = "./modules/instance"
    machine_type = "n1-standard-8"
    instance_name = "infra1"
    prefix = var.instance_prefix
    network = module.vpc.vpc_link
    vpc_subnet_int = module.vpc.vpc_subnet_int
    vpc_subnet_ext = module.vpc.vpc_subnet_ext
    zone = var.zone
    ssh_key = "my_user:${file("~/.ssh/id_rsa.pub")}"
}

module "node1" {
    source = "./modules/instance"
    instance_name = "node1"
    prefix = var.instance_prefix
    network = module.vpc.vpc_link
    vpc_subnet_int = module.vpc.vpc_subnet_int
    vpc_subnet_ext = module.vpc.vpc_subnet_ext
    zone = var.zone
    ssh_key = "my_user:${file("~/.ssh/id_rsa.pub")}"
}

module "node2" {
    source = "./modules/instance"
    instance_name = "node2"
    prefix = var.instance_prefix
    network = module.vpc.vpc_link
    vpc_subnet_int = module.vpc.vpc_subnet_int
    vpc_subnet_ext = module.vpc.vpc_subnet_ext
    zone = var.zone
    ssh_key = "my_user:${file("~/.ssh/id_rsa.pub")}"
}

module "node3" {
    source = "./modules/instance"
    instance_name = "node3"
    prefix = var.instance_prefix
    network = module.vpc.vpc_link
    vpc_subnet_int = module.vpc.vpc_subnet_int
    vpc_subnet_ext = module.vpc.vpc_subnet_ext
    zone = var.zone
    ssh_key = "my_user:${file("~/.ssh/id_rsa.pub")}"
}

module "node4" {
    source = "./modules/instance"
    instance_name = "node4"
    prefix = var.instance_prefix
    network = module.vpc.vpc_link
    vpc_subnet_int = module.vpc.vpc_subnet_int
    vpc_subnet_ext = module.vpc.vpc_subnet_ext
    zone = var.zone
    ssh_key = "my_user:${file("~/.ssh/id_rsa.pub")}"
}

resource "google_compute_instance_group" "master" {
    name = "my-rhos311-master"
    zone =  var.master_zone
    instances = [
        module.master1.link,
    ]

    named_port {
        name = "ocp-api"
        port = "443"
    }
}

resource "google_compute_instance_group" "nodes" {
    name = "my-rhos311-nodes"
    zone =  var.master_zone
    instances = [
        module.infra1.link,
        module.node1.link,
        module.node2.link,
        module.node3.link,
        module.node4.link
    ]

    named_port {
        name = "ocp-api"
        port = "1936"
    }
}
module "ips" {
    source = "./modules/ip"
}

module "lb" {
    source = "./modules/lb"
    region = var.region
    instance_group_master = "${google_compute_instance_group.master.self_link}"
    instance_group_nodes = [
    "${var.zone}/${var.instance_prefix}-infra1",
    "${var.zone}/${var.instance_prefix}-node1",
    "${var.zone}/${var.instance_prefix}-node2",
    "${var.zone}/${var.instance_prefix}-node3",
    "${var.zone}/${var.instance_prefix}-node4"
    ]
    master_ip = module.ips.master_ip
    nodes_ip =  module.ips.nodes_ip
}
variables.tf
variable "project" { }

variable "region" {
    default ="europe-west4"
}

variable "name" {
    description = "The name of the cluster (required)"
    default     = "jx-openshift-311"
}

variable "compute_machine_type" {
    default = "n1-standard-4"
}

variable "master_machine_type" {
    default = "n1-standard-8"
}

variable "instance_prefix" {
    default ="my-rhos311"
}

variable "vm_image" {
default ="rhel-7-v20200205"
}

variable "master_zone" {
    description = "Zone in which the Master Node will be created"
    default = "europe-west4-a"
}

variable "zone" {
    default = "europe-west4-a"
}
storage.tf
Create VMs with Terraform
We should end up with six nodes:
<prefix>-master1<prefix>-infra1<prefix>-node1<prefix>-node2<prefix>-node3<prefix>-node4
Verify VMs
Before we can install the OpenShift pre-requisites, we verify if the VMs are ready to use. To verify the VMs, we will do the following:
- confirm we can
sshinto each VM - confirm we can use
sudoin each VM - confirm the infra node can call each VM by name (
<prefix>-infra1,<prefix>-master1,<prefix>-node1,<prefix>-node2,<prefix>-node3,<prefix>-node4) - confirm the infra node can
sshinto all VMs (including itself!)
SSH into VMs
There are several ways to ssh into the VMs. You can do so via ssh installed on your machine, you can do so via the GCP console. I will use another option, using the gcloud CLI, using the ssh key I've configured in Terrafom (ssh-keys = "my_user:${file("~/.ssh/id_rsa.pub")}").
Why am I using this form? Well, it makes it easier to reason about which machine I ssh into, as I can use the VM name.
Confirm you can ssh into each VM by changing the zone/name accordingly.
Confirm Sudo
Our ssh user isn't root - as it should be - so we need to use sudo for some tasks.
Confirm sudo works;
Confirm Local DNS
The OpenShift installation process and later OpenShift itself, relies on local dns. This means, it assumes if there's a node called <prefix>-master1, it can do ssh <prefix>-master1 and it works.
In GCP, DNS works within a Project by default. So assuming all the VMs are within the same project this works out-of-the-box. But, to avoid any surprises later, confirm it.
[my_user@master ~]$ ping <prefix>-master1
PING master.c.MY_PROJECT_ID.internal (10.164.0.49) 56(84) bytes of data.
64 bytes from <prefix>-master1.c.MY_PROJECT_ID.internal (10.164.0.49): icmp_seq=1 ttl=64 time=0.041 ms
64 bytes from <prefix>-master1.c.MY_PROJECT_ID.internal (10.164.0.49): icmp_seq=2 ttl=64 time=0.094 ms
Note
As you might expect, MY_PROJECT_ID will be the Google project Id where your VMs are. I've hidden that as a safety precaution, confirm it looks correct!
Infra Node can SSH into others
For the OpenShift installation, our installation VM has to be able to ssh into every other VM3. This doesn't work out of the box.
Warning
I used my own keys here directly, because this is a temporary project only used by me. If your usecase is different, and you're not sure how to proceed, consult a security professional!
We have to create the ssh public key on every node for our ssh user (in my case, my_user) and the private also for our installation host (for example, <prefix>-infra1).
This might not be a security best practice, but I did this by copying over my ~/.ssh/id_rsa and ~/.ssh/id_rsa.pub to each node's user home (/home/my_user/.ssh/).
Important
Once you've done this, ssh into the infra node, and confirm it can ssh to every other node.
ssh my_user@<prefix>-node1ssh my_user@<prefix>-node2ssh my_user@<prefix>-node3ssh my_user@<prefix>-node4ssh my_user@<prefix>-master1ssh my_user@<prefix>-infra1-> YES, you have to ssh into yourself!
This is important, because through this step, you can accept the prompt so the installation process can run unattended!
Make sure to set the correct permissions to the id_rsa file via sudo chmod 0400 ~/.ssh/id_rsa!
Fix Locale
I kept running into a locale warning, about using one that didn't exist on the VM.
If you want to get rid of this, you can change the /etc/locale.conf file.
Make sure it looks like this.
OpenShift Installation Pre-requisites
Before we can install OpenShift, we have to bring our nodes into a certain state.
We will do the following:
- register our VMs to RedHat
- register our VMs as part of our OpenShift Enterprise license
- configure
yumfor the installation process - install and configure
dockerfor the installation process - login to the RedHat docker registry
Register VMs
Please note, these steps have to be done on every VM!
If you use something like iterm25, you can save yourself some time by having four parallel sessions for each VM. You do this by creating a split window (control + command + D), and once logged in, create a shared cursor via command + shift+ i.
We start by installing the subscription manager.
We then register our instance with our RedHat account.
Find the OpenShift subscription and you should get a single option. Use the id as the --pool in the next command.
Configure Yum Repos
There's commands to disable each individual repository, but I found it easier to disable all, and then add those we need after.
Install Default Packages
As we've disable all of our yum repositories, we first add the once we need.
sudo subscription-manager repos \
    --enable="rhel-7-server-rpms" \
    --enable="rhel-7-server-extras-rpms" \
    --enable="rhel-7-server-ose-3.11-rpms" \
    --enable="rhel-7-server-ansible-2.8-rpms"
Once we have a set of usable yum repositories, we can then install all the packages we need.
sudo yum install wget git net-tools bind-utils yum-utils iptables-services bridge-utils bash-completion kexec-tools sos psacct openshift-ansible atomic python-docker-py docker device-mapper-libs device-mapper-event-libs -y
Note
There have been some bugs in the past, related to docker versions. If, for some reason, you have to downgrade to a known working version of docker, this is a way of doing that.
Once we have all the packages installed, make sure they're updated and then we reboot our machines.
Install Docker
I sneaked the docker packages into the previous installation command already, so we only have to enable/configure docker at this point.
If you want to configure more details, such as where docker stores its volumes/data, please take a look at RedHat's installation guide6.
To confirm docker works:
Make sure that on each node, your default user can use docker.
Setup Registry Authentication
The images for OpenShift come from RedHat's own docker registry. We have to login, before we can use those images7.
So use your RedHat account credentials.
Create Ansible Inventory File
OpenShift comes with two ways of installing, via docker or via Ansible. The fun part, the docker container will use Ansible to install anyway.
So no matter which way you will install OpenShift, you need to create a InventoryFile.
RedHat has a couple of example files8, but these aren't complate - you need infra nodes as well!
Important Configuration Items
Bellow follow some variables I recommend configuring, for information, consult the RedHat documentation^9.
- OSEv3:children: the types of nodes to be configured
- OSEv3:vars: variables for the installation process
- ansible_become: set the
Trueif Ansible can not run as root - ansible_ssh_user: if Ansible cannot run as root, as which user should it ssh into the other nodes
- oreg_url: template for the docker images used by OpenShift, this should be
registry.access.redhat.com/openshift3/ose-${component}:${version}, it will be used by components such as ETCD, Kubelet and so on - oreg_auth_user: your RedHat account username
- oreg_auth_password: your RedHat account password
- openshift_cloudprovider_kind: the kind of cloud provider where RHOS is installed on, in the case of GCP its
gce(don't ask me) - openshift_gcp_project: is required to allow OpenShift the ability to create local disks in GCP for PersistentVolumes, should be your Google Project ID
- openshift_gcp_prefix: prefix used for all the GCP resources, makes it easier to correlate, and reduces the chance of naming conflicts
- openshift_gcp_network_name: the name of the
vpccreated with Terraform - openshift_gcp_multizone: set this to
False, unless you have more than one master, in more than one gcp zone - openshift_master_api_port=443: by default OpenShift uses
8443, but this is not supported by GCP loadbalancers
- ansible_become: set the
- openshift_master_console_port=443: by default OpenShift uses
8443, but this is not supported by GCP loadbalancers- os_firewall_use_firewalld: use
firewalldinstead of iptables, seems to work better and is recommended by the RHOS 3.11 install guide (as of 2018+ I believe - openshift_master_cluster_public_hostname:
- os_firewall_use_firewalld: use
- Node definitions (
etcd,masters,nodes): instructs Ansible which machine should be configured and with what
Info
If you want to use the internal OpenShift (Docker) Registry, you have to configure it here9. You can add these variables under OSEv3:vars.
- openshift_hosted_registry_replicas: how many replicas, docs recommend
1 - openshift_hosted_registry_storage_kind: type of storage, if using the GCP Bucket, set this to
object - openshift_hosted_registry_storage_provider: if using the GCP Bucket, set this to
gcs - openshift_hosted_registry_storage_gcs_bucket: the full name of the GCP Bucket
- openshift_gcp_network_name: the network the GCP Bucket is part of, irrelevant if the Bucket is
Global10
Inventory File
# Create an OSEv3 group that contains the masters, nodes, and etcd groups
[OSEv3:children]
masters
nodes
etcd

# Set variables common for all OSEv3 hosts
[OSEv3:vars]
# SSH user, this user should allow ssh based auth without requiring a password
ansible_ssh_user=my_user

# If ansible_ssh_user is not root, ansible_become must be set to true
ansible_become=true

openshift_deployment_type=openshift-enterprise
oreg_url=registry.access.redhat.com/openshift3/ose-${component}:${version}
oreg_auth_user="YOUR_RED_HAT_USERNAME"
oreg_auth_password="YOUR_RED_HAT_PASSWORD"
openshift_cloudprovider_kind=gce
openshift_gcp_project=YOUR_GOOGLE_PROJECT_ID
openshift_gcp_prefix=YOUR_PREFIX
# If deploying single zone cluster set to "False"
openshift_gcp_multizone="False"
openshift_hosted_registry_replicas=1
openshift_hosted_registry_storage_kind=object
openshift_hosted_registry_storage_provider=gcs
openshift_hosted_registry_storage_gcs_bucket=<prefix>-ocp-registry
openshift_gcp_network_name=vpc-<prefix>

#openshift_master_cluster_hostname=api.ocp.kearos.net
openshift_master_cluster_public_hostname=api.ocp.example.com
openshift_master_default_subdomain=apps.ocp.example.com

openshift_master_api_port=443
openshift_master_console_port=443
os_firewall_use_firewalld=True

# https://docs.openshift.com/container-platform/3.11/install_config/configuring_authentication.html#identity-providers_parameters
openshift_master_identity_providers=[{'name': 'htpasswd_auth', 'login': 'true', 'challenge': 'true', 'kind': 'HTPasswdPasswordIdentityProvider'}]
openshift_master_htpasswd_users={'administrator': 'password'}

# host group for masters
[masters]
<prefix>-master1.c.ps-dev-201405.internal

# host group for etcd
[etcd]
<prefix>-master1.c.ps-dev-201405.internal

# host group for nodes, includes region info
[nodes]
<prefix>-master1.c.ps-dev-201405.internal openshift_node_group_name='node-config-master'
<prefix>-node1.c.ps-dev-201405.internal openshift_node_group_name='node-config-compute'
<prefix>-node2.c.ps-dev-201405.internal openshift_node_group_name='node-config-compute'
<prefix>-node3.c.ps-dev-201405.internal openshift_node_group_name='node-config-compute'
<prefix>-node4.c.ps-dev-201405.internal openshift_node_group_name='node-config-compute'
<prefix>-infra1.c.ps-dev-201405.internal openshift_node_group_name='node-config-infra'
Important
Make sure to replace the YOUR_... placeholder values with your actual values.
oreg_auth_user(YOUR_RED_HAT_USERNAME)oreg_auth_password(YOUR_RED_HAT_PASSWORD)YOUR_GOOGLE_PROJECT_ID
Install RHOS 3.11 with Ansible
There are two ways to install RHOS 3.11. Via Ansible directly8, or via Ansible in a container^9. As our nodes are configured according to what the Ansible installation requires, there's no need to rely on the container.
Additionally, if you want to use the container way, you have to make sure the container can use the same DNS configuration as the nodes can themselves. I've not done this, so this would be on you!
Final Preparations
Ansible creates a fact file. It does so at a location a non-root user doesn't have access to.
So it is best to create this file upfront - on every node - and chown it to the user that will do the ssh/Ansible install.
Install OpenShift
We install OpenShift via two scripts, playbooks/prerequisites.yml and playbooks/deploy_cluster.yml. When we install openshift-ansible atomic via yum, we also get the Ansible playbooks for OpenShift.
Either go into the directory of those files, or use the entire path;
Execute OpenShift Pre-requisites script:
ansible-playbook -i /home/my_user/inventoryFile /usr/share/ansible/openshift-ansible/playbooks/prerequisites.yml
If all is successful, it will end with all actions in green and finished successfully (or similar) . Once this is the case, execute OpenShift Installation:
ansible-playbook -i /home/my_user/inventoryFile /usr/share/ansible/openshift-ansible/playbooks/deploy_cluster.yml
Now you should be able to run oc get nodes on the installation node.
Create Users
In the inventoryFile, I've configured the OpenShift user management as follows:
openshift_master_identity_providers=[{'name': 'htpasswd_auth', 'login': 'true', 'challenge': 'true', 'kind': 'HTPasswdPasswordIdentityProvider'}]
openshift_master_htpasswd_users={'administrator': 'password'}
Caution
You probably do NOT want to do this for a production environment. RedHat has a guide on this10, I suggest you consult it for an overview of the options.
This configuration means that you have to create the users on the <prefix>-master1 node, via htpasswd.
Create user via htpasswd
Mind you, this user does not have any rights yet, nor a token with which they can login to the Kubernetes API!
Give him admin rights
Get Config
First, login with oc login, this will prompt you for a username and then password. Fill in the values for the user you've created above with htpasswd.
Only once you've logged in via oc login, do you get a token. Use the password for the console, but the token for kubeconfig/docker registry.
To view the token, first confirm you're logged in with the right user:
Then retrieve the token as follows:
To retrieve the config file for Kubernetes's API, you can issue the following command.
Login to OpenShift Registry
To retrieve the Registry URL:
Which should give you something like this:
NAME               HOST/PORT                                      PATH   SERVICES           PORT    TERMINATION   WILDCARD
docker-registry    docker-registry-default.apps.ocp.example.com           docker-registry    <all>   passthrough   None
registry-console   registry-console-default.apps.ocp..example.com          registry-console   <all>   passthrough   None
Unless you have configured a proper SSL certificate, docker won't let you login. See the next chapter for more information on that.
If you do have a SSL certificate, this is how you can login:
SSL Via Certmanager
There are many ways to get a valid SSL certificate for your domain.
Here I guide you through the following:
- install old certmanager - the latest requires Kubernetes 1.12+
- Confgure DNS Verification to let Certmanager use CloudDNS12
- generate cert for
*.apps.ocp.kearos.net - add cert to the OpenShift Router and Docker Registry resources
Install Compatible Certmanager
Luckily, Certmanager has documentation on how to install itself on OpenShift 3.1111.
Below are the steps, yes it is that simple.
oc apply --validate=false -f https://github.com/jetstack/cert-manager/releases/download/v0.14.0/cert-manager-legacy.yaml
Confgure DNS Verification
First we need to setup a Google cloud service account13, and retrieve the json key.
Save this file as credentials.json, and then create a kubernetes secret.
Certificate Issuer
apiVersion: cert-manager.io/v1alpha2
kind: Issuer
metadata:
  name: letsencrypt-prod
spec:
  acme:
    email: <INSERT_YOUR_EMAIL>
    privateKeySecretRef:
      name: letsencrypt-prod
    server: https://acme-v02.api.letsencrypt.org/directory
    solvers:
    - dns01:
        clouddns:
          project:  <INSERT_YOUR_GOOGLE_PROJECT_ID>
          serviceAccountSecretRef:
            key: credentials.json
            name: external-dns-gcp-sa
Wildcard Certificate
apiVersion: cert-manager.io/v1alpha2
kind: Certificate
metadata:
  name: acme-crt
spec:
  secretName: acme-crt-secret
  dnsNames:
  - apps.ocp.example.com
  - "*.apps.ocp.example.com"
  issuerRef:
    name: letsencrypt-prod
    # We can reference ClusterIssuers by changing the kind here.
    # The default value is Issuer (i.e. a locally namespaced Issuer)
    kind: Issuer
    group: cert-manager.io
Caution
Don't forget to change the dnsNames!
Configure Certificate In Router
HA Proxy expect a crt file with the key and cert, while the Certmanager secret's tls.crt file only contains the certificate - how unexpected.
So, what we have to do is the following: * get tls.crt raw data (the actual certificate) * get tls.key raw data * add the data from tls.key to a file tls.key * add the data from both tls.key and tls.crt to a file tls.crt * create a new secret * edit the Router to use our new secret * kill the router pod to force it to load our new certificate
Or, if you have jq14 installed, you can do something like this.
Add them both the PEM certificate and the key to the file tls.crt, and the key to the file tls.key.
Create a new secret
And then edit the Route, via the following command:
kubectl edit -n default replicationcontrollers router-1
Change the secret.secretName value of the volume named server-certificate from router-certs to letsencrypt-copy.
It should then look like this:
      volumes:
      - name: metrics-server-certificate
        secret:
          defaultMode: 420
          secretName: router-metrics-tls
      - name: server-certificate
        secret:
          defaultMode: 420
          secretName: letsencrypt-copy
Configure Certificate in Docker Registry
Edit docker registry as well:
Make sure to overide the naming convention of registry.crt and registry.key to the sensible tls.key and tls.crt.
        - name: REGISTRY_HTTP_TLS_KEY
          value: /etc/secrets/tls.key
        - name: OPENSHIFT_DEFAULT_REGISTRY
          value: docker-registry.default.svc:5000
        - name: REGISTRY_CONFIGURATION_PATH
          value: /etc/registry/config.yml
        - name: REGISTRY_OPENSHIFT_SERVER_ADDR
          value: docker-registry.default.svc:5000
        - name: REGISTRY_HTTP_TLS_CERTIFICATE
          value: /etc/secrets/tls.crt
References
-
https://access.redhat.com/documentation/en-us/reference_architectures/2018/html/deploying_and_managing_openshift_3.9_on_google_cloud_platform/ ↩
-
https://docs.openshift.com/container-platform/3.11/install_config/registry/index.html ↩
-
https://access.redhat.com/documentation/en-us/openshift_container_platform/3.11/html/installing_clusters/install-config-install-host-preparation#configuring-docker-storage ↩
-
https://access.redhat.com/documentation/en-us/openshift_container_platform/3.11/html-single/installing_clusters/index#install-config-example-inventories ↩↩
-
https://access.redhat.com/documentation/en-us/openshift_container_platform/3.11/html/installing_clusters/install-config-configuring-inventory-file#advanced-install-registry-storage ↩
-
https://docs.openshift.com/container-platform/3.11/install_config/configuring_authentication.html#identity-providers_parameters ↩↩
-
https://access.redhat.com/documentation/en-us/reference_architectures/2018/html-single/deploying_and_managing_openshift_3.9_on_google_cloud_platform/index#google_cloud_platform_service_account ↩