Azure AD & CloudBees Core
In this article we're going to configure Azure AD as Single-Sign-Solution for CloudBees Core. The configuration rests on three points; 1) Azure AD, 2) Jenkins' SAML plugin, and 3) CloudBees Core's Role Base Access Control or RBAC for short.
Important
Currently there's a discrepency between the TimeToLive (TTL) of the RefreshToken in Azure AD and the default configuration in the SAML plugin.
This creates the problem that you can be logged in, in Azure, but when going to Jenkins you get the Logged Out page. The only way to log back in, is to logout in Azure and back in.
The reason is as follows:
The max lifetime of the Access Token in Azure AD seems to be 24 hours where the refresh token can live for a maximum of 14 days (if the access token expires the refresh token is used to try to obtain a new access token). The Jenkins setting in Configure Global Security > SAML Identity Provider Settings > Maximum Authentication Lifetime is 24 hours (86400 in seconds) upping this to 1209600 (which is 14 days in seconds/the max lifetime of the Refresh Token).
The recommended resolution is to set Maximum Authentication Lifetime to the same value of your RefreshToken TTL. If you haven't changed this in Azure AD, it is 1209600.
Manage Jenkins -> Configure Global Security > SAML Identity Provider Settings > Maximum Authentication Lifetime = 1209600
Prerequisites
Before we start, there are some requirements.
- a running CloudBees Core Operations Center instance
- this instance is accessible via
https.- if you do not have a valid certificate and you're running on Kubernetes take a look at my cert-manager guide
- Let's Encrypt can now also work with nip.io addresses
- active Azure subscription
- have an Azure subscription Administrator on hand
Configure Azure
Warning
We use https://cloudbees-core.example.com as the example URL for CloudBees Core. Please replace the domain to your actual domain in all the examples!
Steps to execute
We do the following steps on the Azure side.
- create the Azure Active Directory
- create users and groups
- create App Registration
- URL:
https://cloudbees-core.example.com/cjoc/securityRealm/finishLogin - replace
example.comwith your domain, https is required!
- URL:
- update manifest (for groups)
- change:
"groupMembershipClaims": null,(usually line 11) - to:
"groupMembershipClaims": "SecurityGroup",
- change:
- create SP ID / App ID URI
- grant admin consent
Info
If you use the Azure AD plugin, you also create a client secret.
Information To Note Down
The following information is unique to your installation, so you need to record them as you go along.
App ID URIObject ID's of Users and Groups you want to give rightsFederation Metadata DocumentEndpoint- Azure AD -> App Registrations ->
-> Endpoints (circular icon on top) - you can use either the URL or the document contents
- make sure the URL contains the Tenant ID of your Azure Active Directory
- URL example:
https://login.microsoftonline.com/${TENANT_ID}/federationmetadata/2007-06/federationmetadata.xml - You can find your Tenant ID in
Azure Active Directory->Properties->Directory ID(different name, same ID)
- Azure AD -> App Registrations ->
Visual Guide
Below is a visual guide with screenshots.
Pay attention to these hints in the screenshots.
- red: this is the main thing
- orange: this is how we got to the current page/view
- blue: while you're in this screen, there might be other things you could do
Create New App Registration
If you have an Azure account, you have an Azure Active Directory (Azure AD) pre-created.
This guide assumes you have an Azure AD ready to use.
That means the next step is to create an Application Registration.
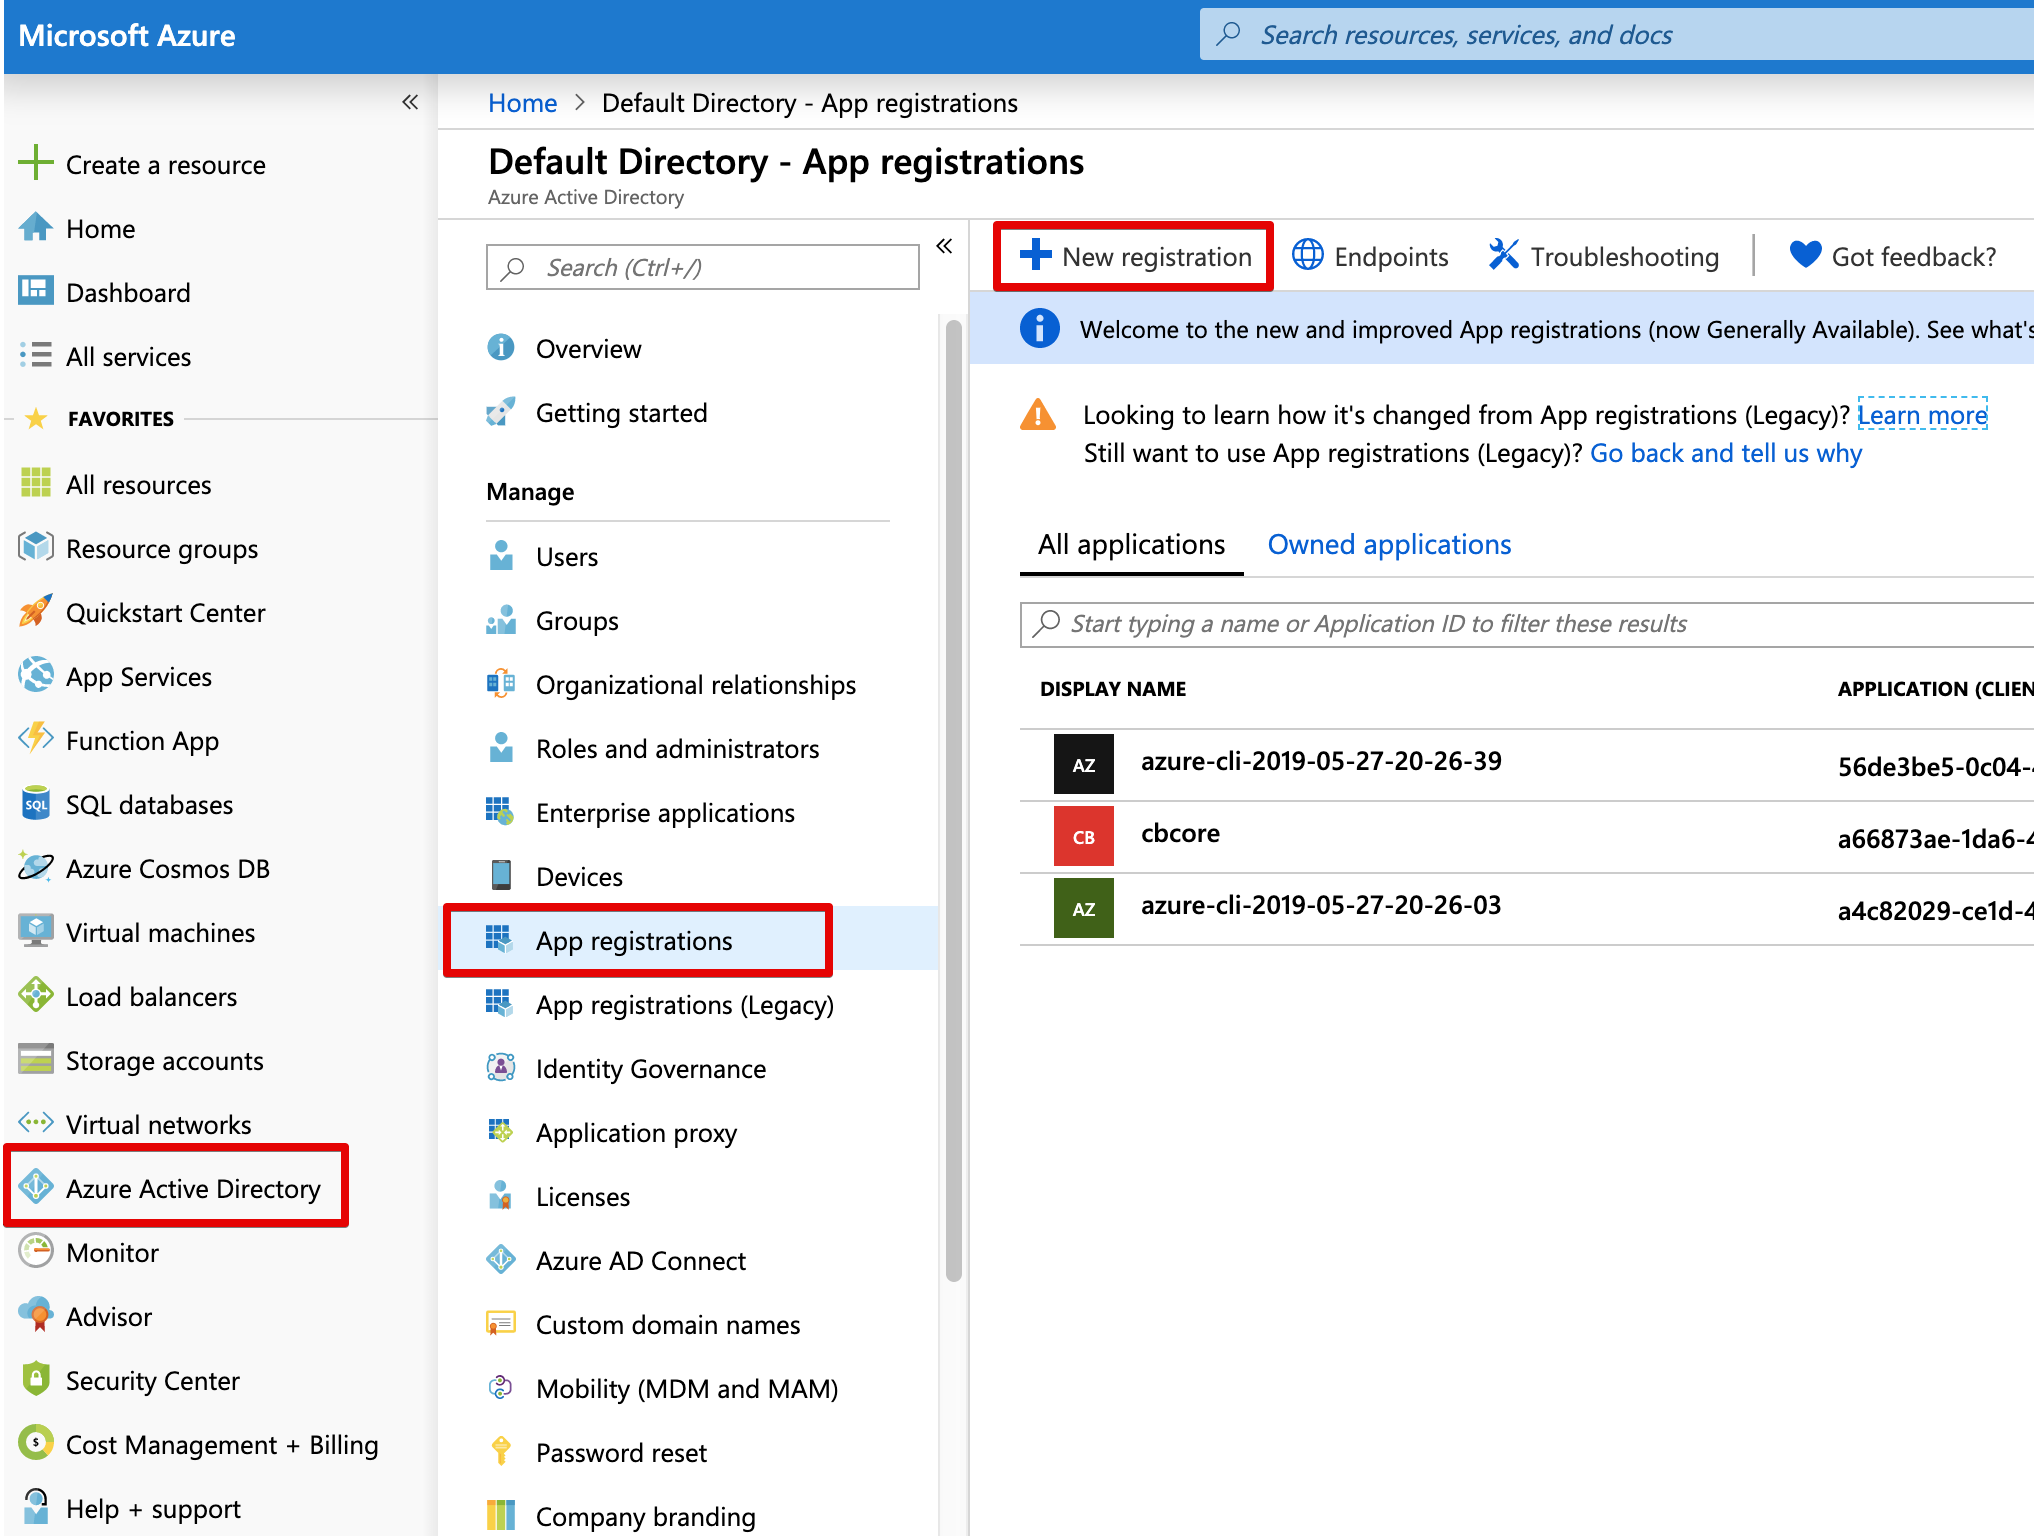
Give the registration a useful name, select who can authenticate and the redirect URL.
This URL needs to be configured and MUST be the actual URL of your CloudBees Core installation.
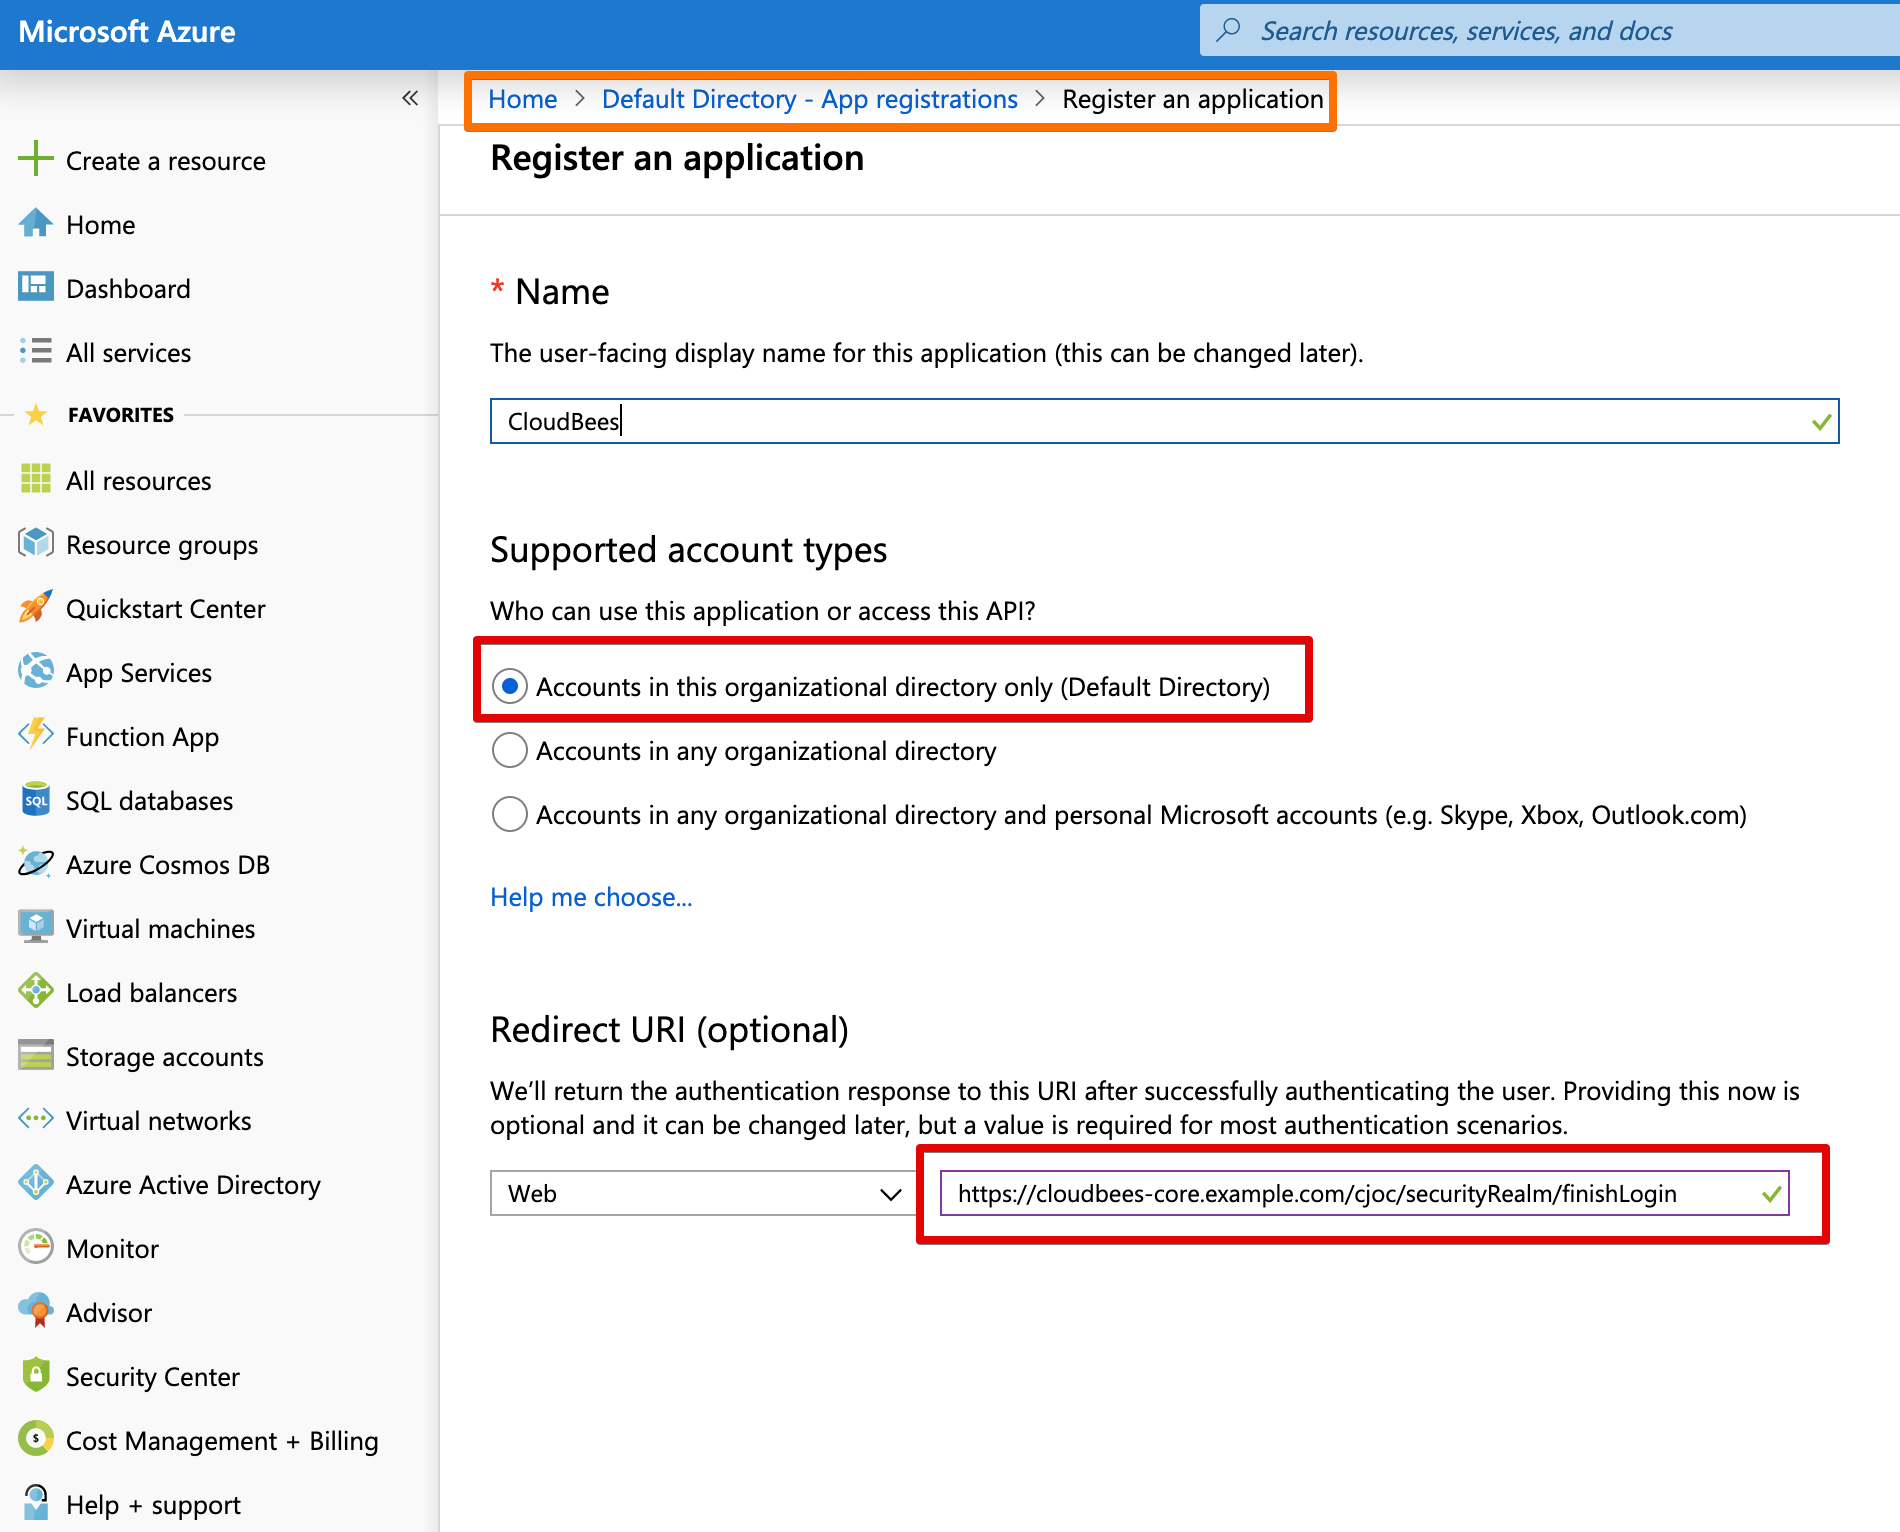
Important
To have Client Masters as a fallback for login, incase Operations Center is down, you have to add another redirect URL for each Master.
Azure AD -> App Registrations -> https://example.com/teams-cat/securityRealm/finishLogin
App Registration Data To Write Down
Depending on the plugin you're going to use (SAML or Azure AD) you need information from your Azure AD / App Registration.
- Tentant ID
- Object ID
- Client ID
- Federation Metadata Document
- you can use the document XML content or the URL
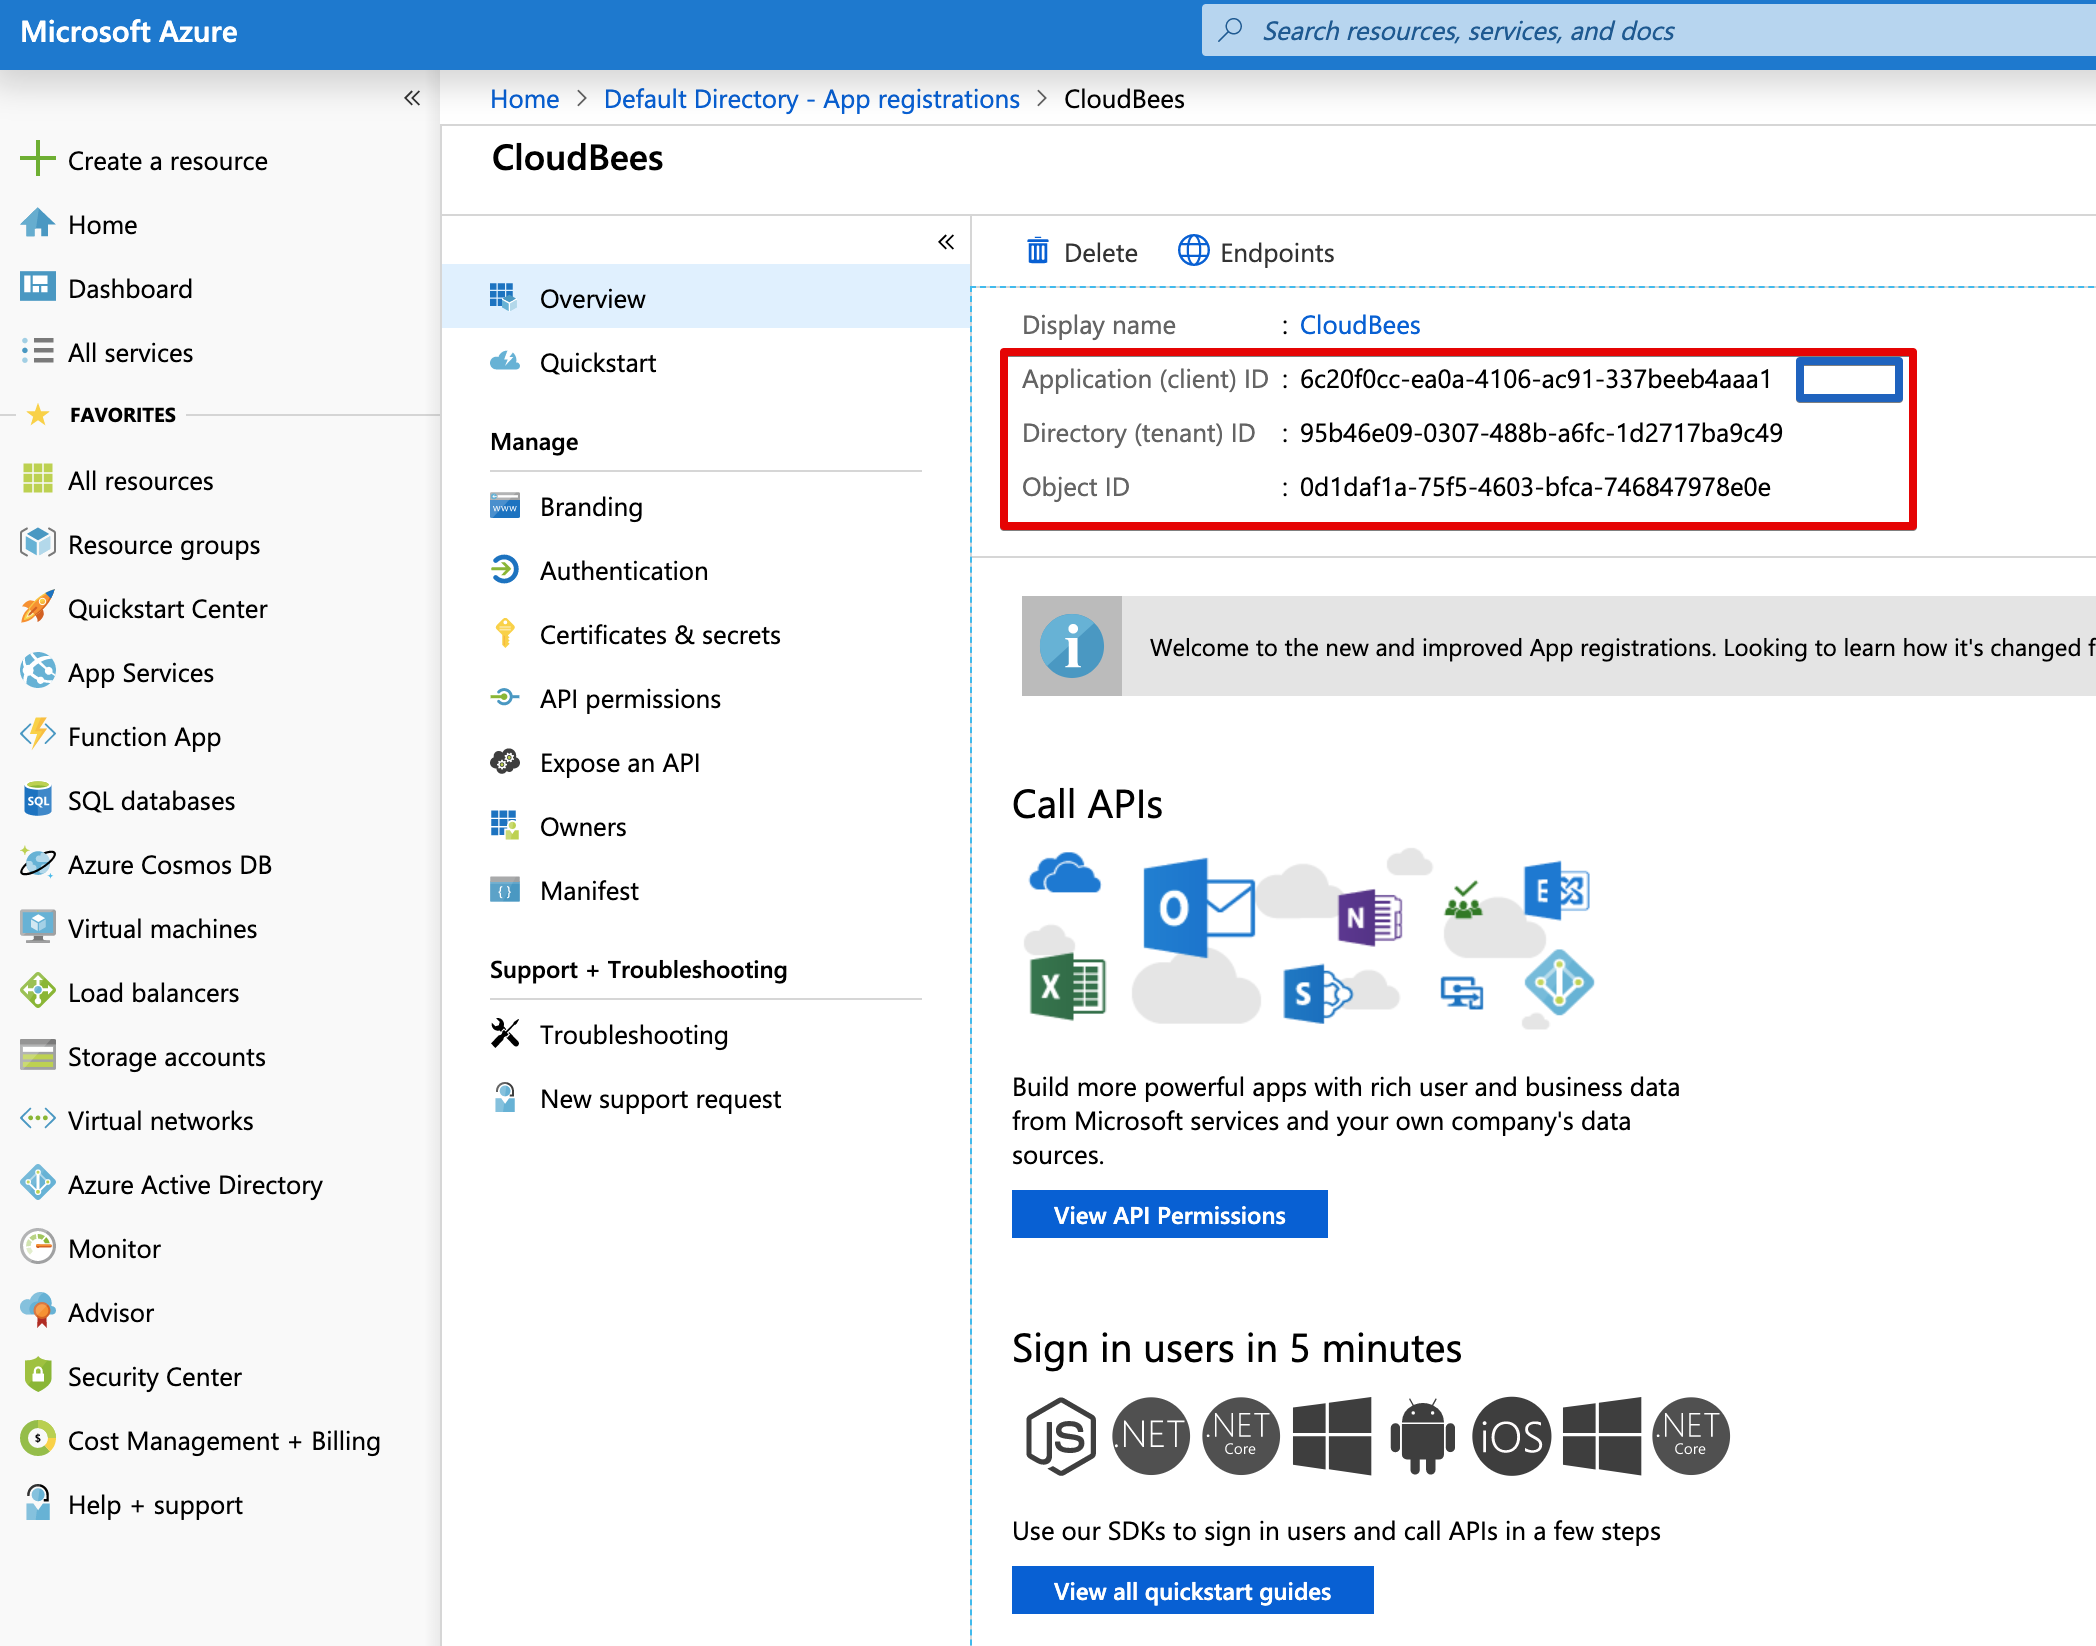
Click on the Endpoints button to open the side-bar with the links.

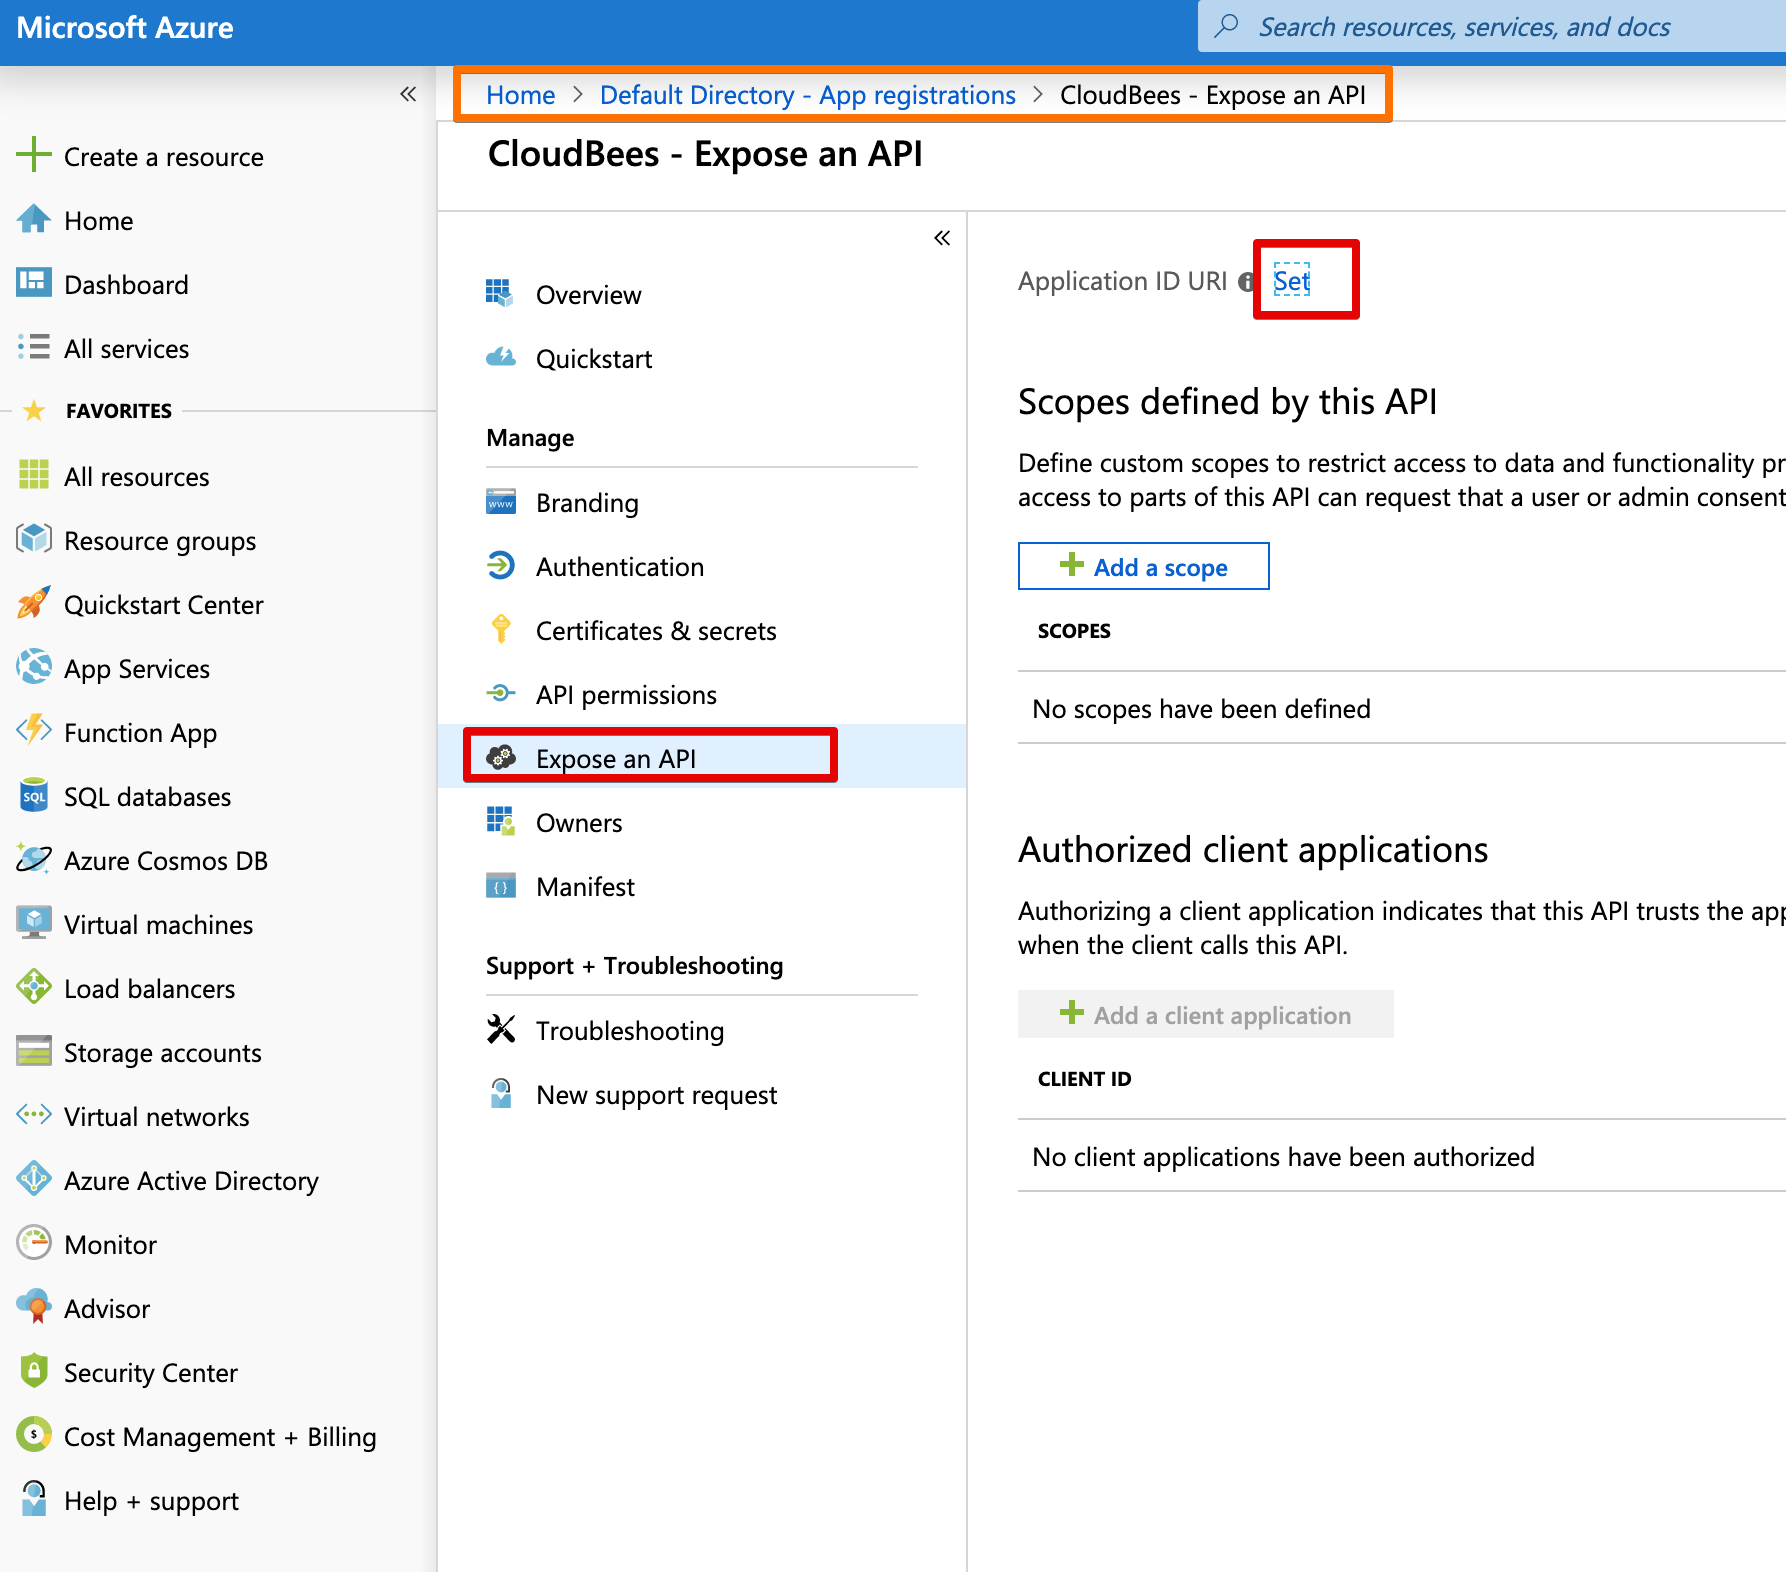
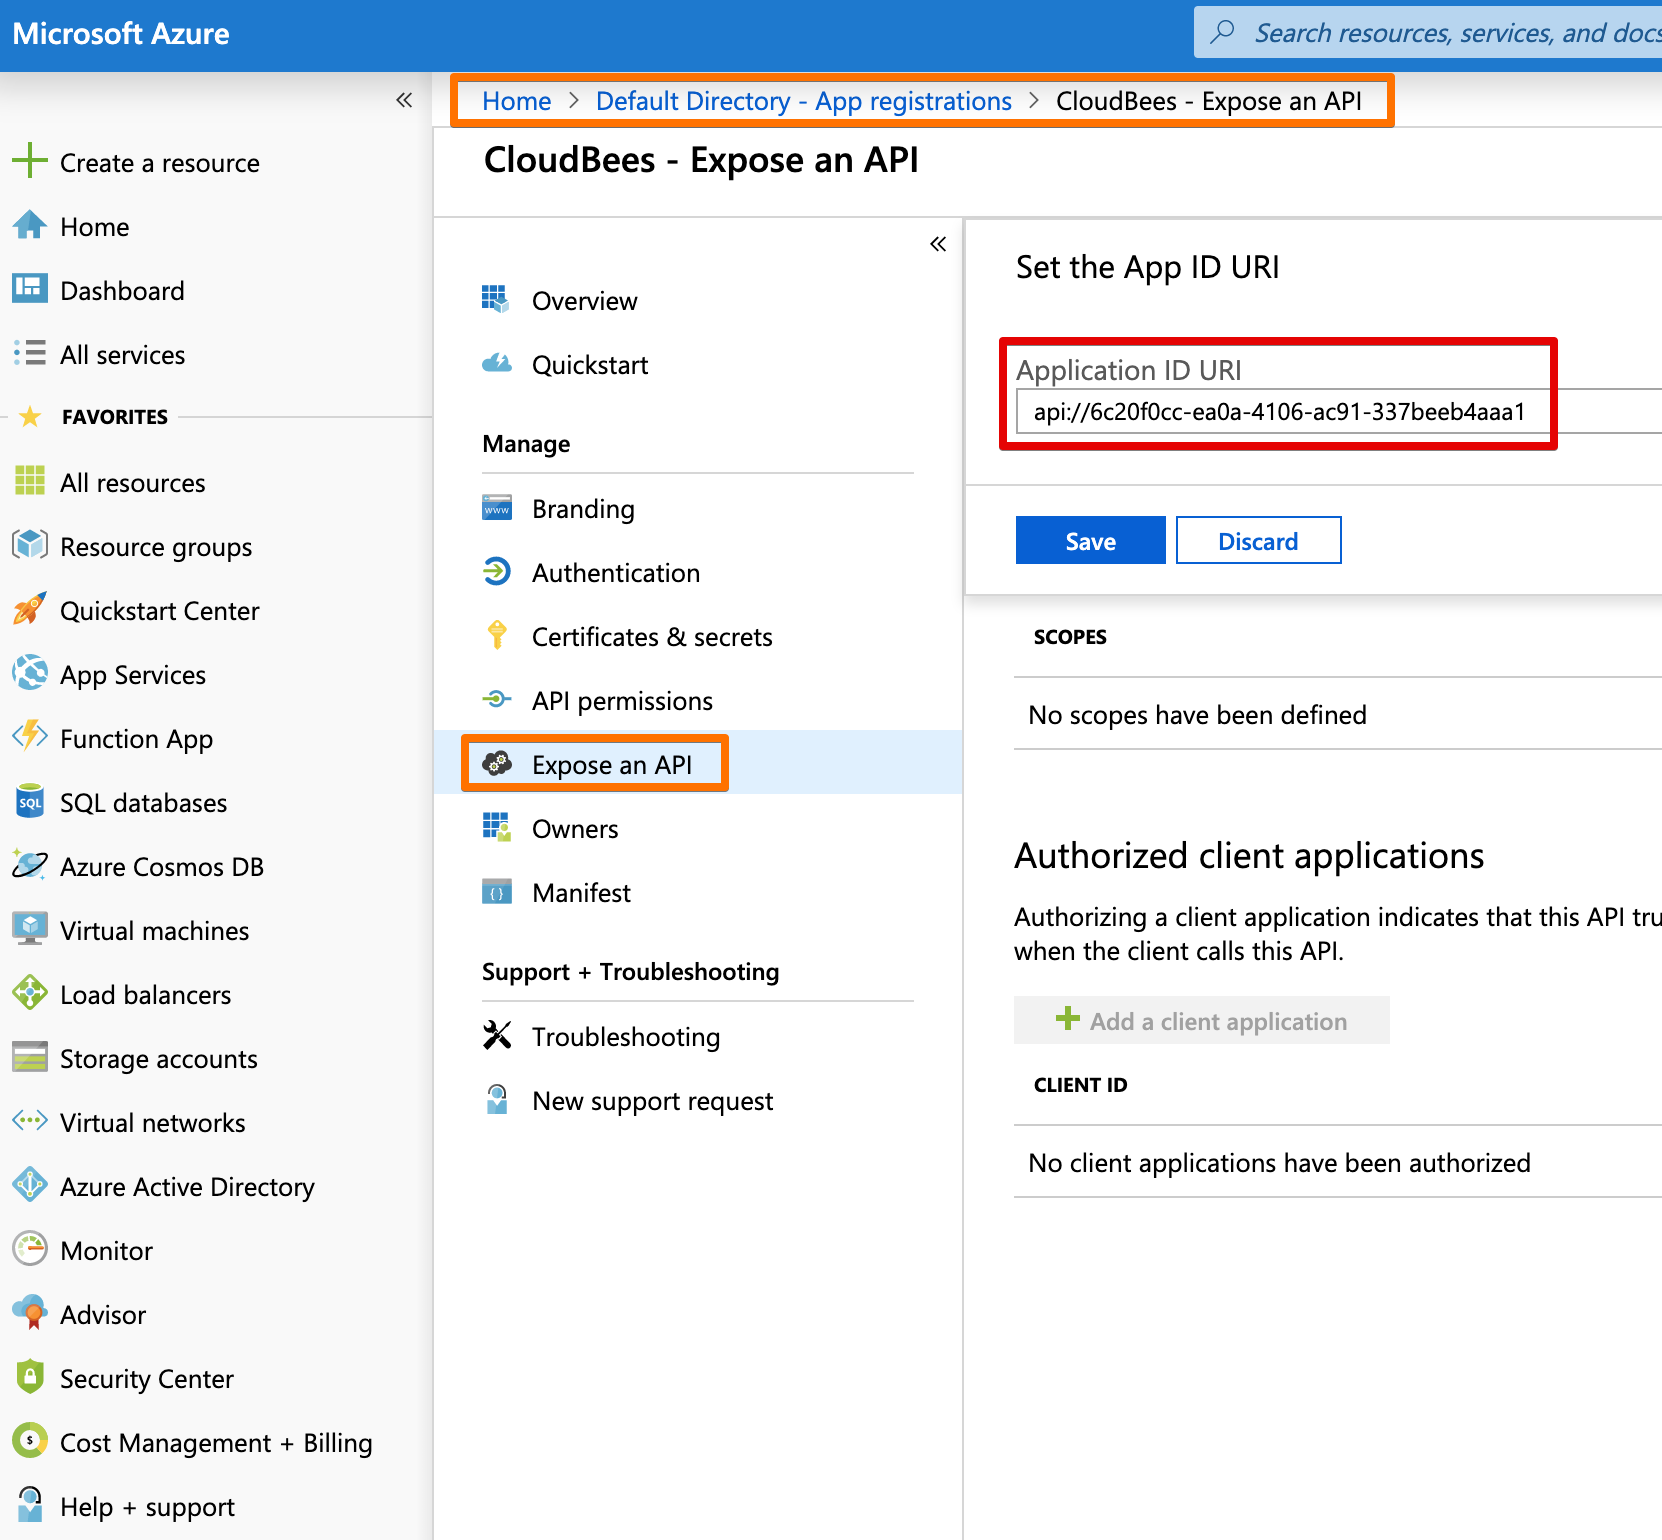
App ID
We need the App ID - even if the SAML plugin doesn't mention it.
Azure generates an APP ID URI for you. You can also use CloudBees Core's URL as the URI. The URI is shown when there is an error, so it recommended to use a value you can recognize.
Info
App ID must match in both Azure AD (set as App ID URI) and the SAML plugin (set as Entity ID) configuration in Jenkins. So write it down.
API Permissions
Of course, things wouldn't be proper IAM/LDAP/AD without giving some permissions.
If we want to retrieve group information and other fields, we need to be able to read the Directory information.
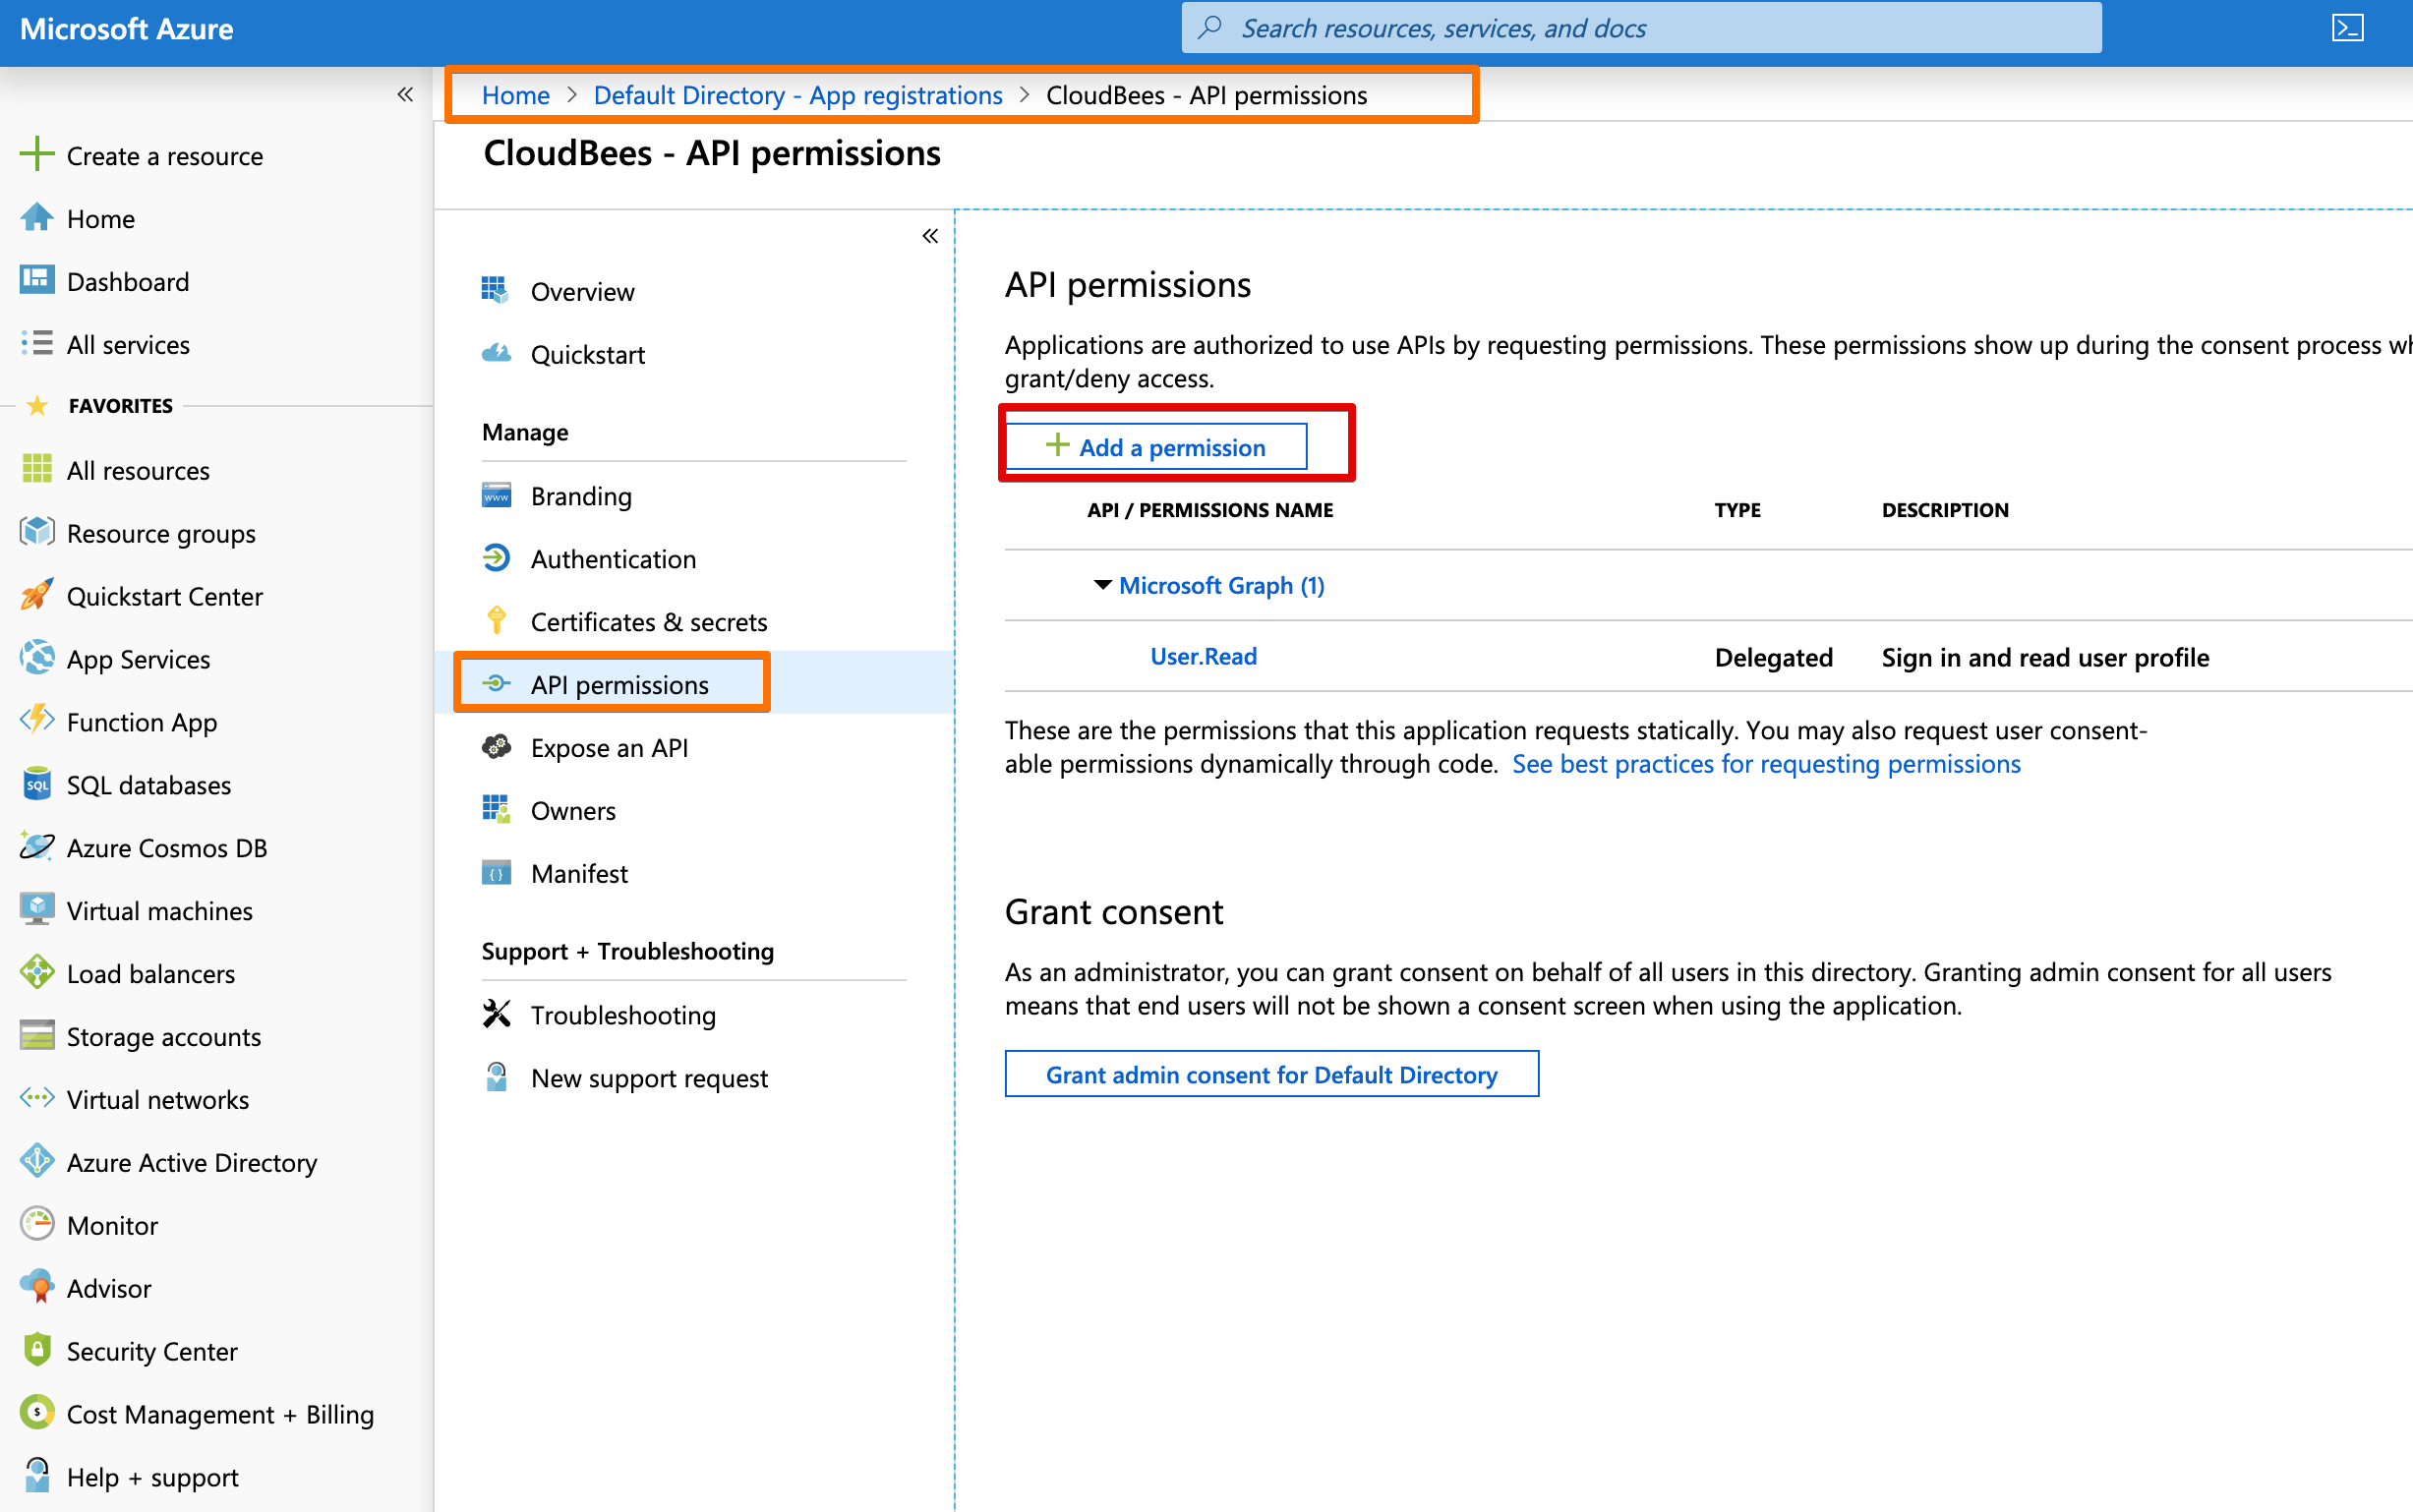
You find the Directory information via the Microsoft Graph api button.
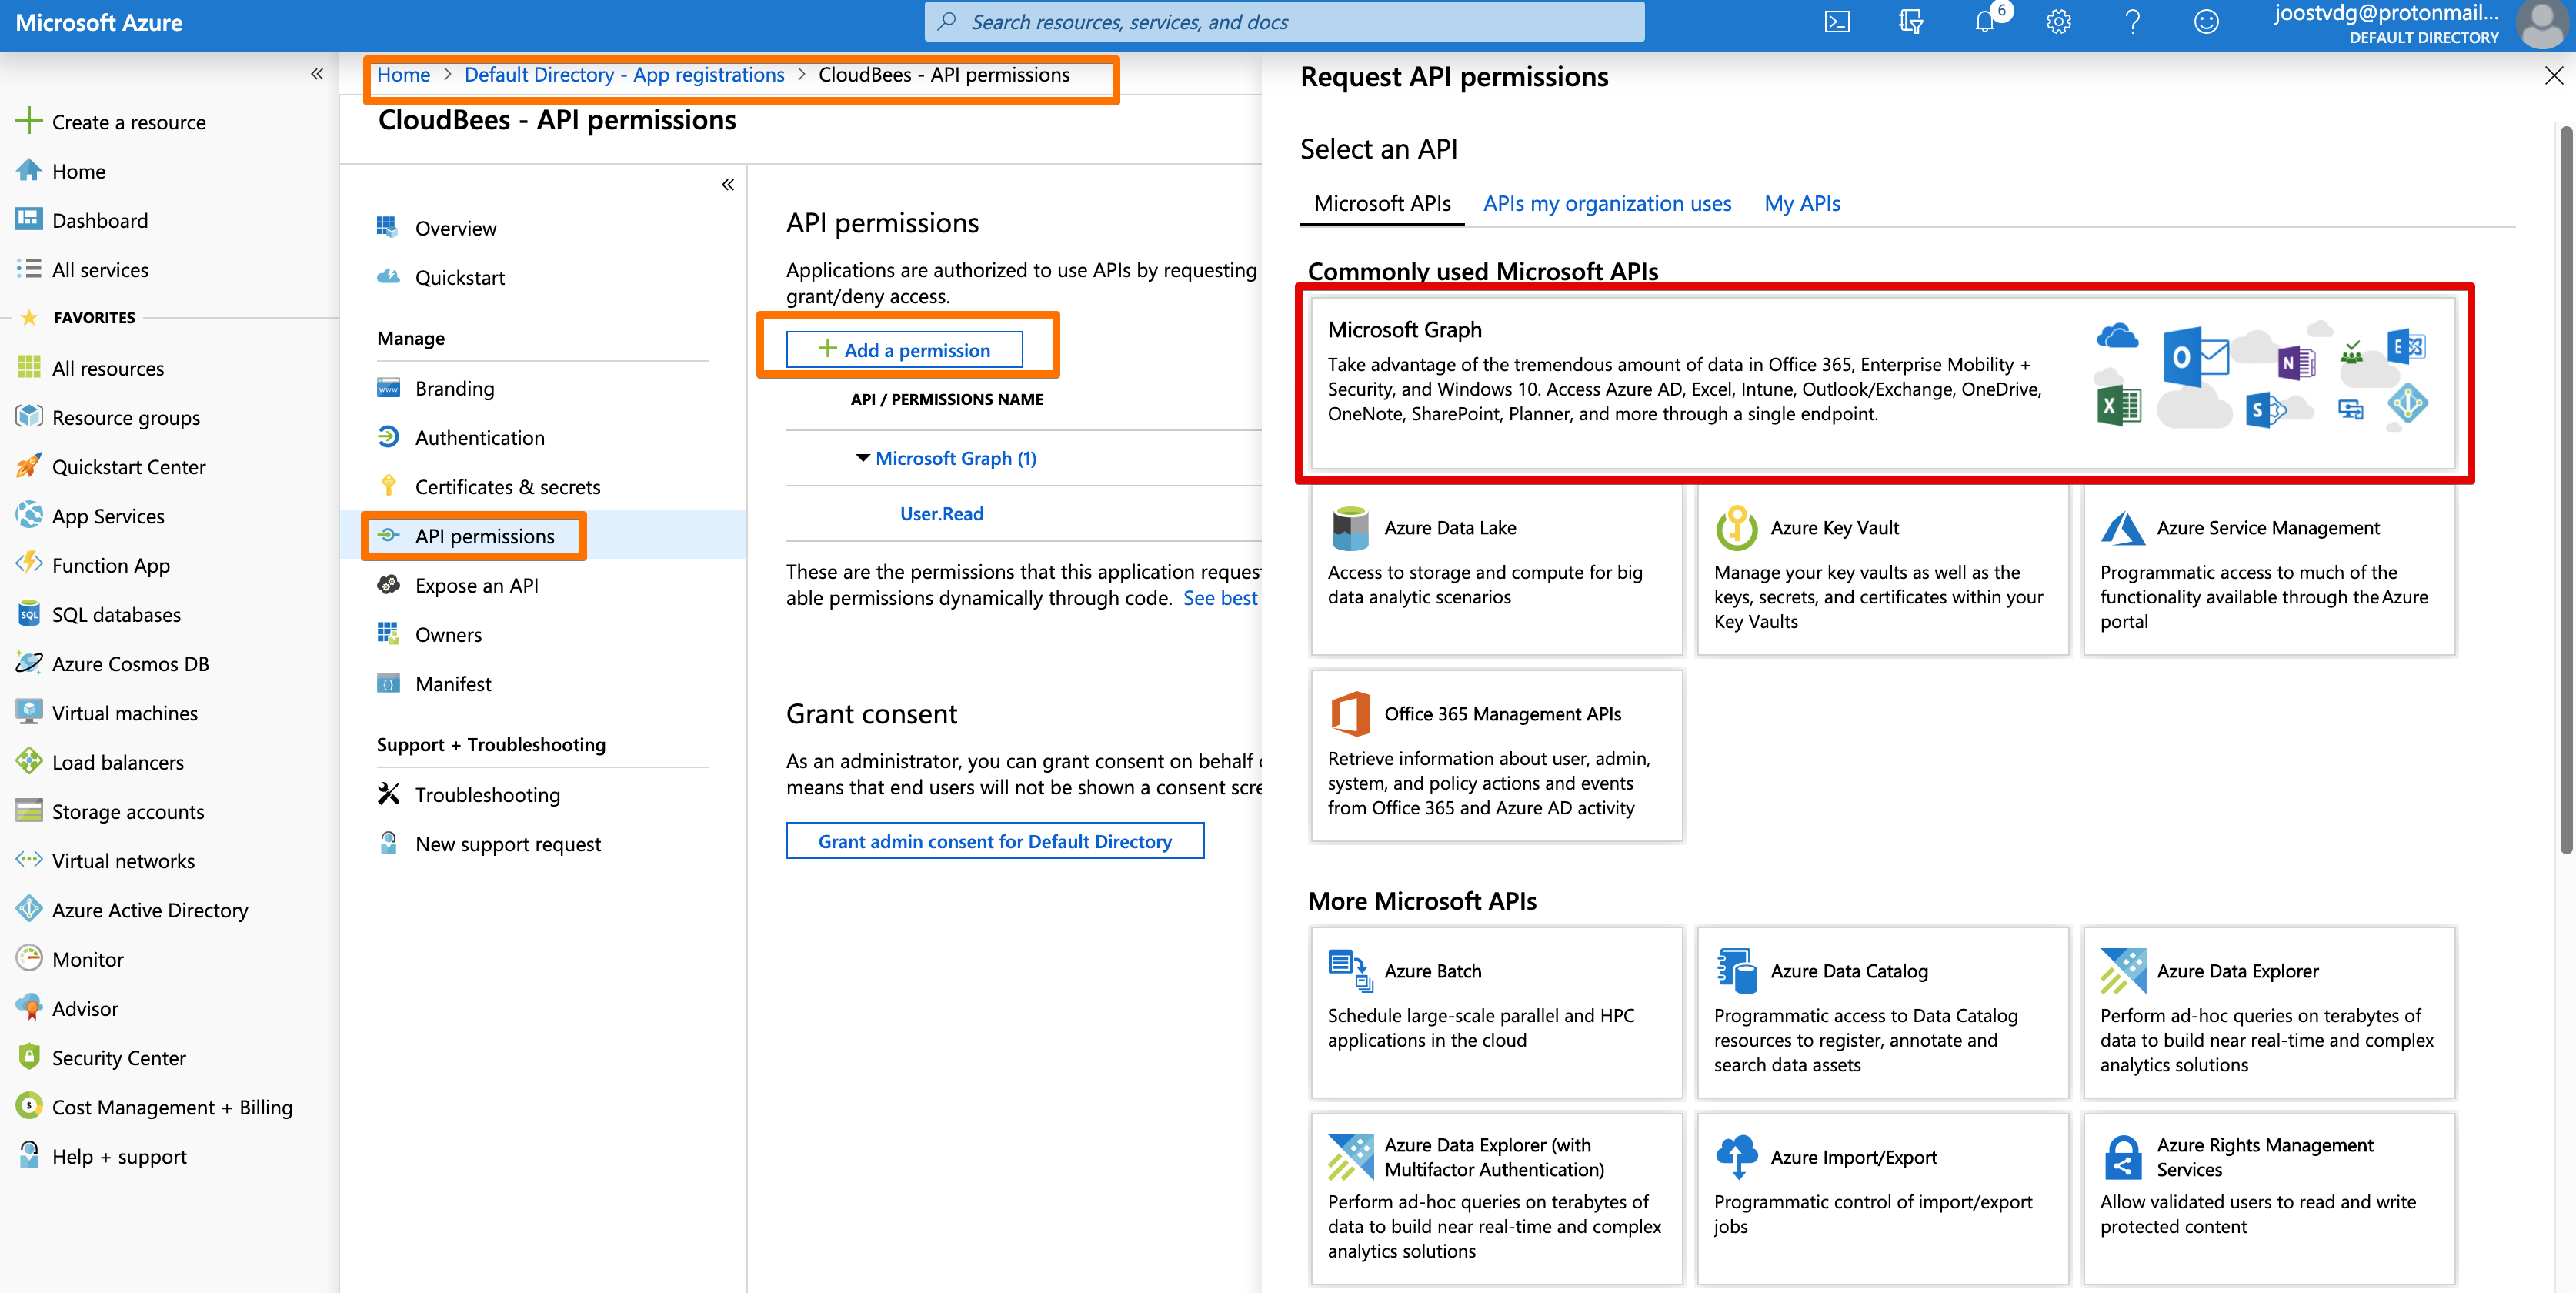
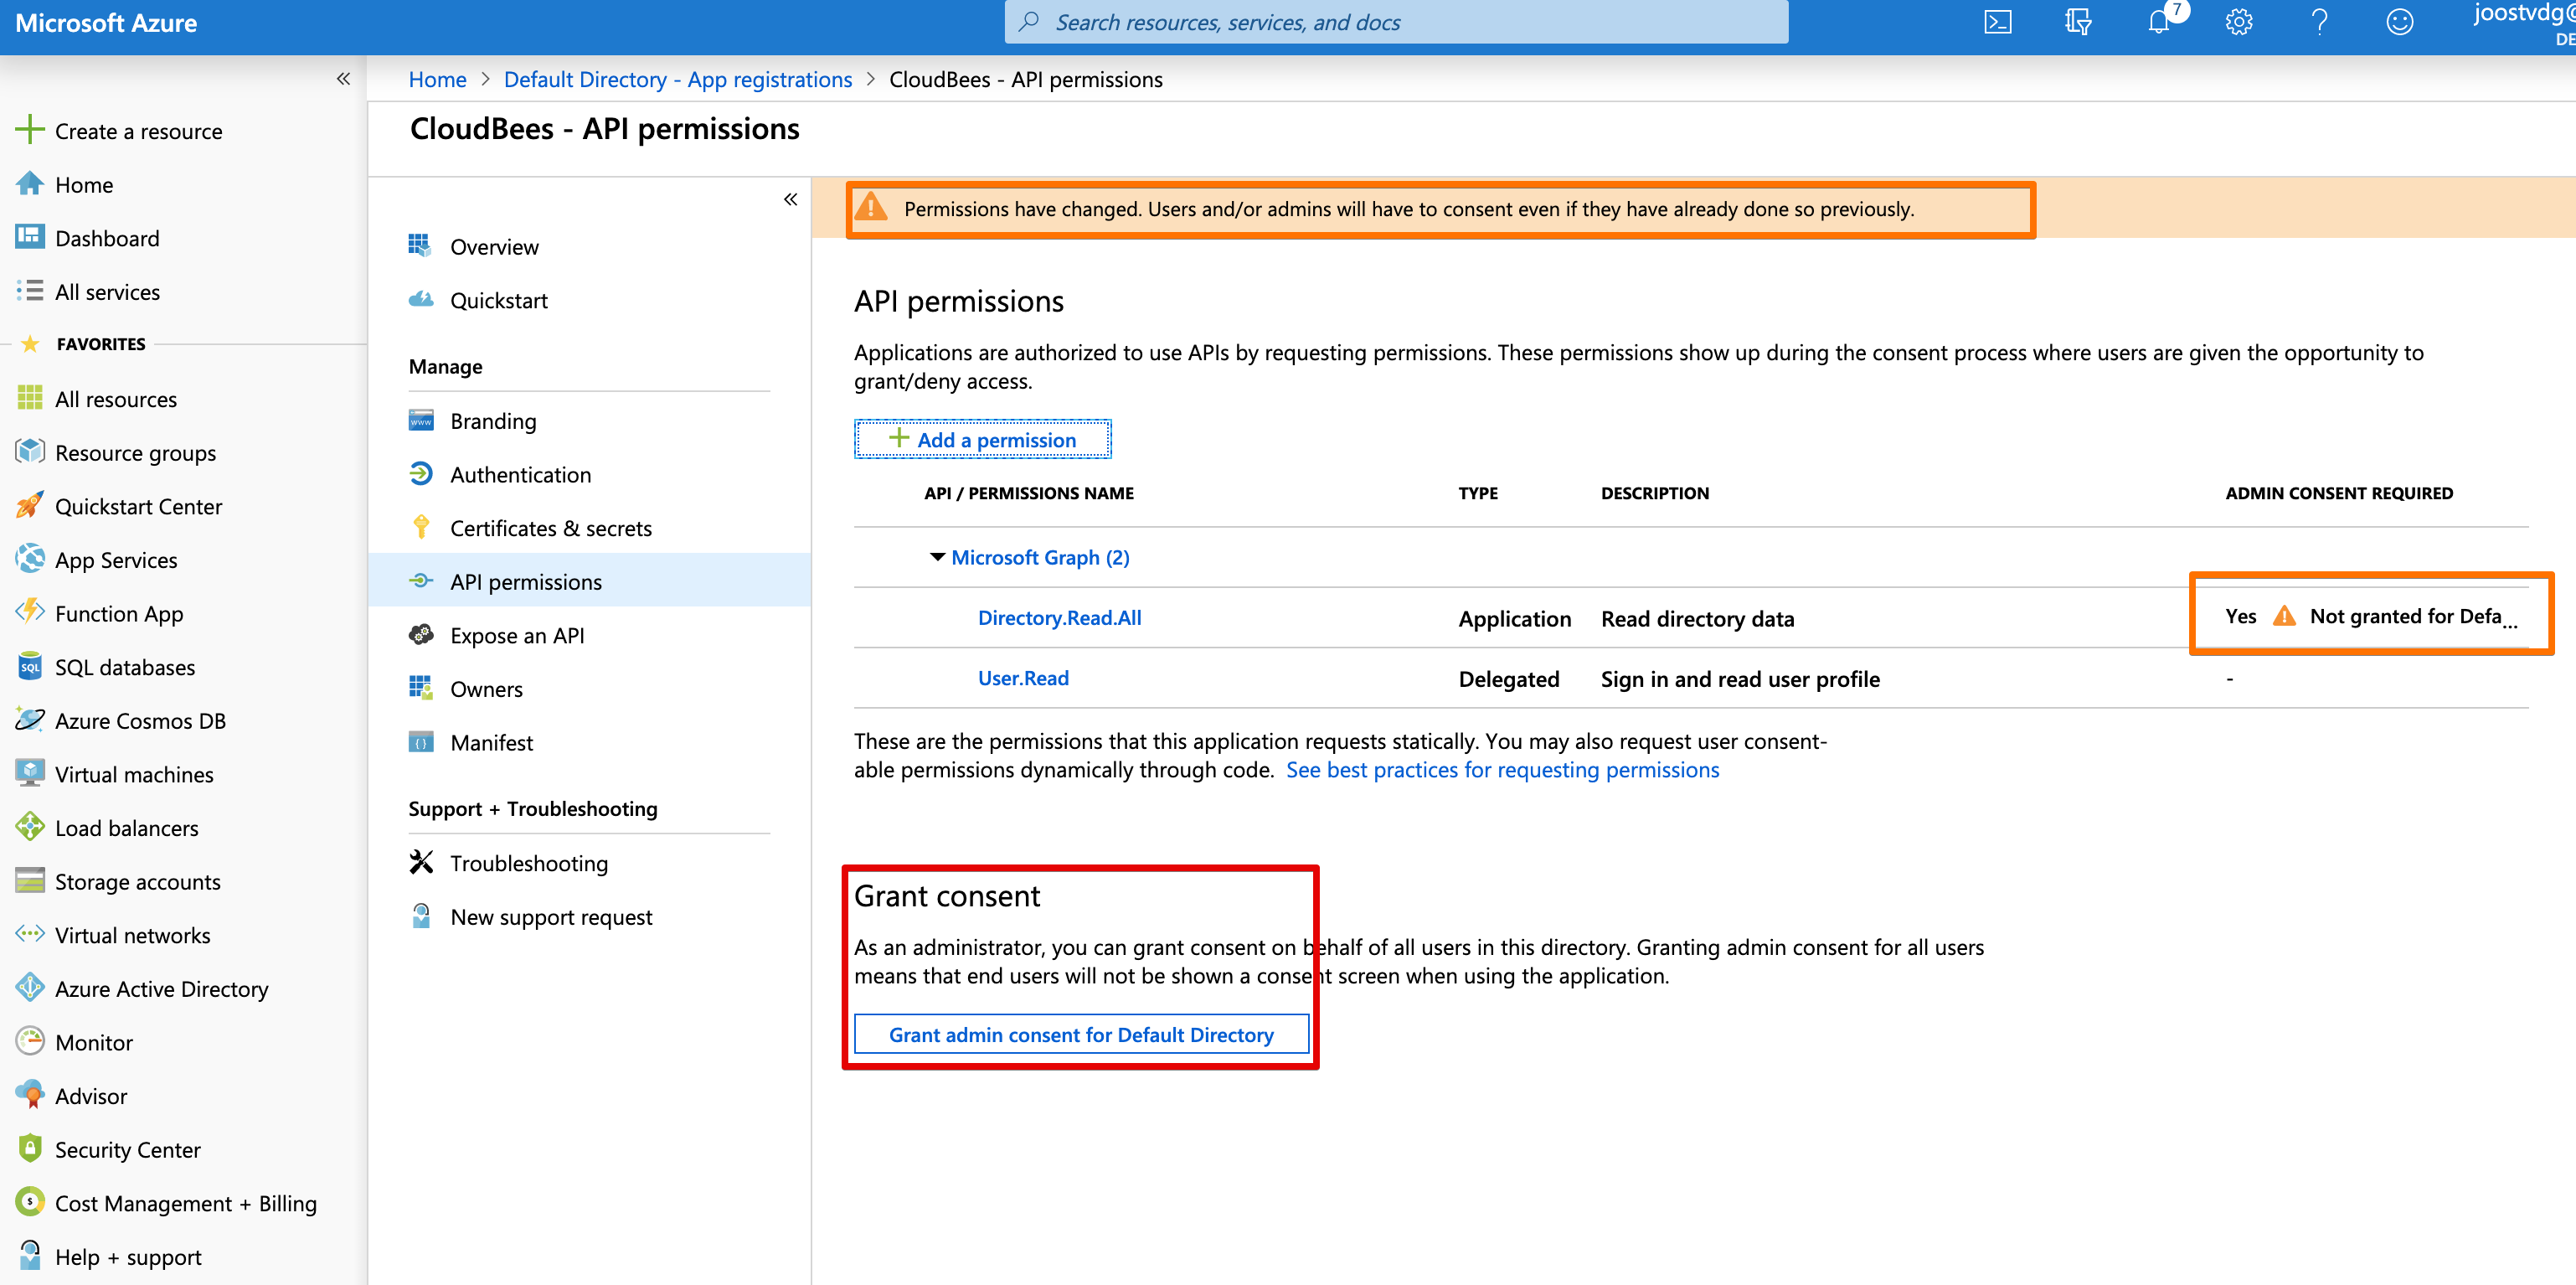
We select Application Permissions and then check Directory.Read.All. We don't need to write.

The Permissions have changed, so we require an Administrator account to consent with the new permissions.
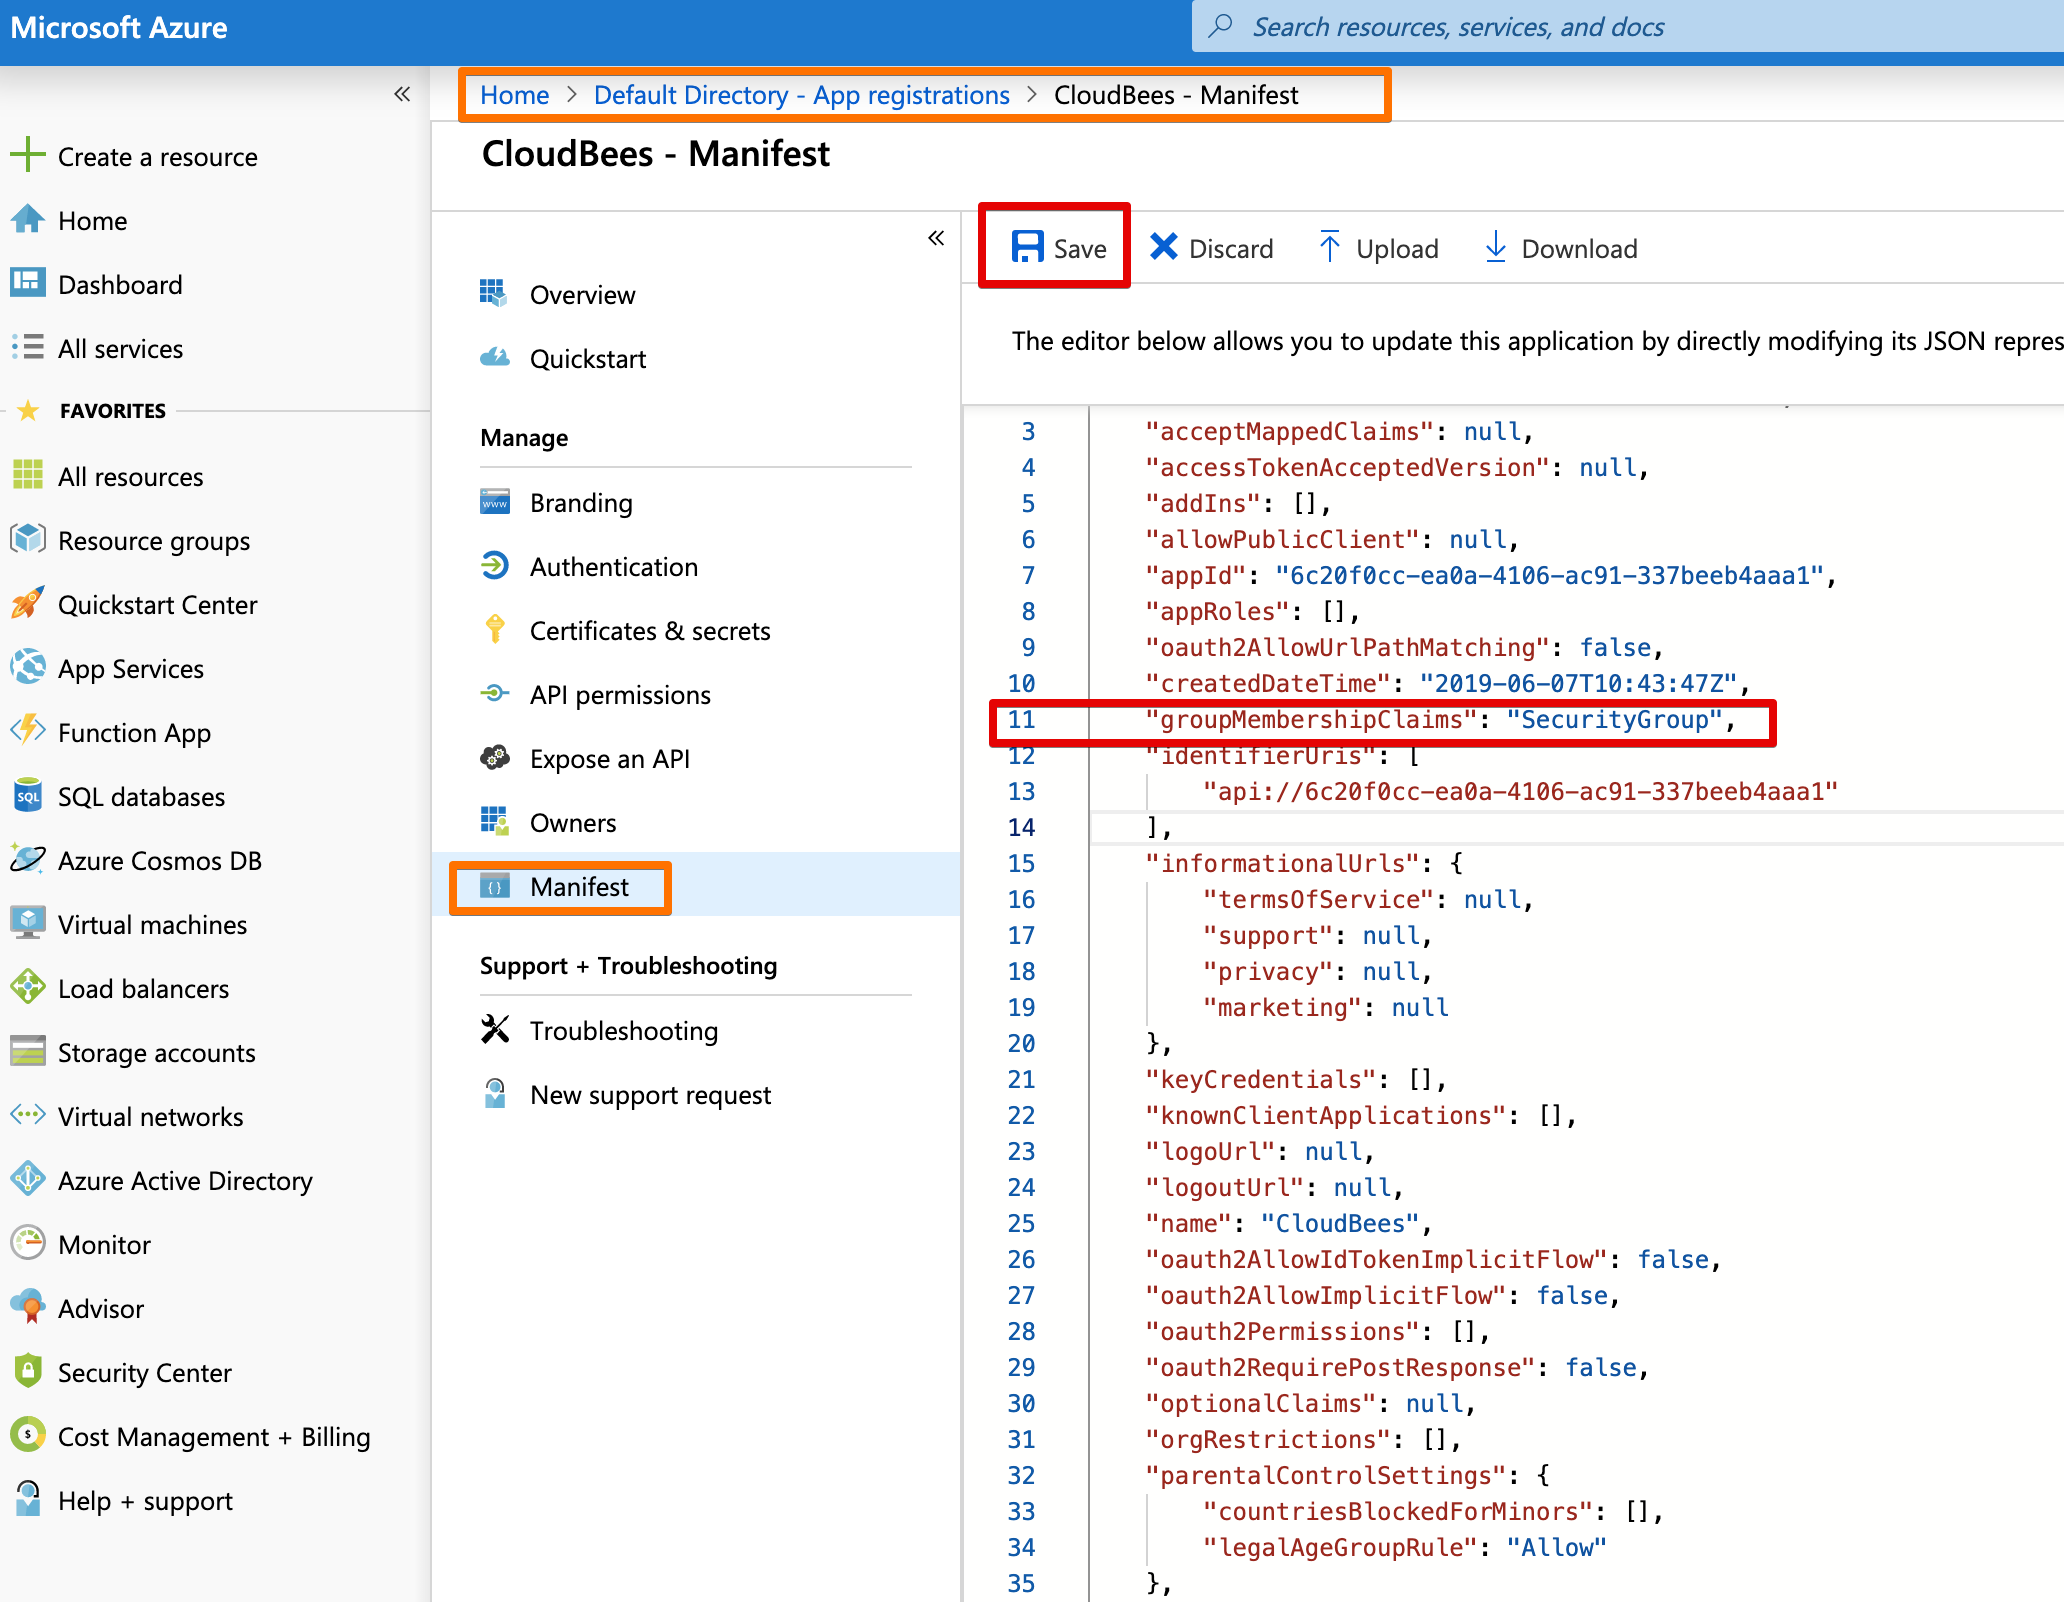
Update Manifest
As with the permissions, the default Manifest doesn't give us all the information we want.
We want the groups so we can configure RBAC, and thus we have to set the groupMembershipsClaims claim attribute.

We change the null to "SecurityGroup". Please consult the Microsoft docs (see reference below) for other options.
We can download, edit, and upload the manifest file. Alternatively, we can edit inline and hit save on top.
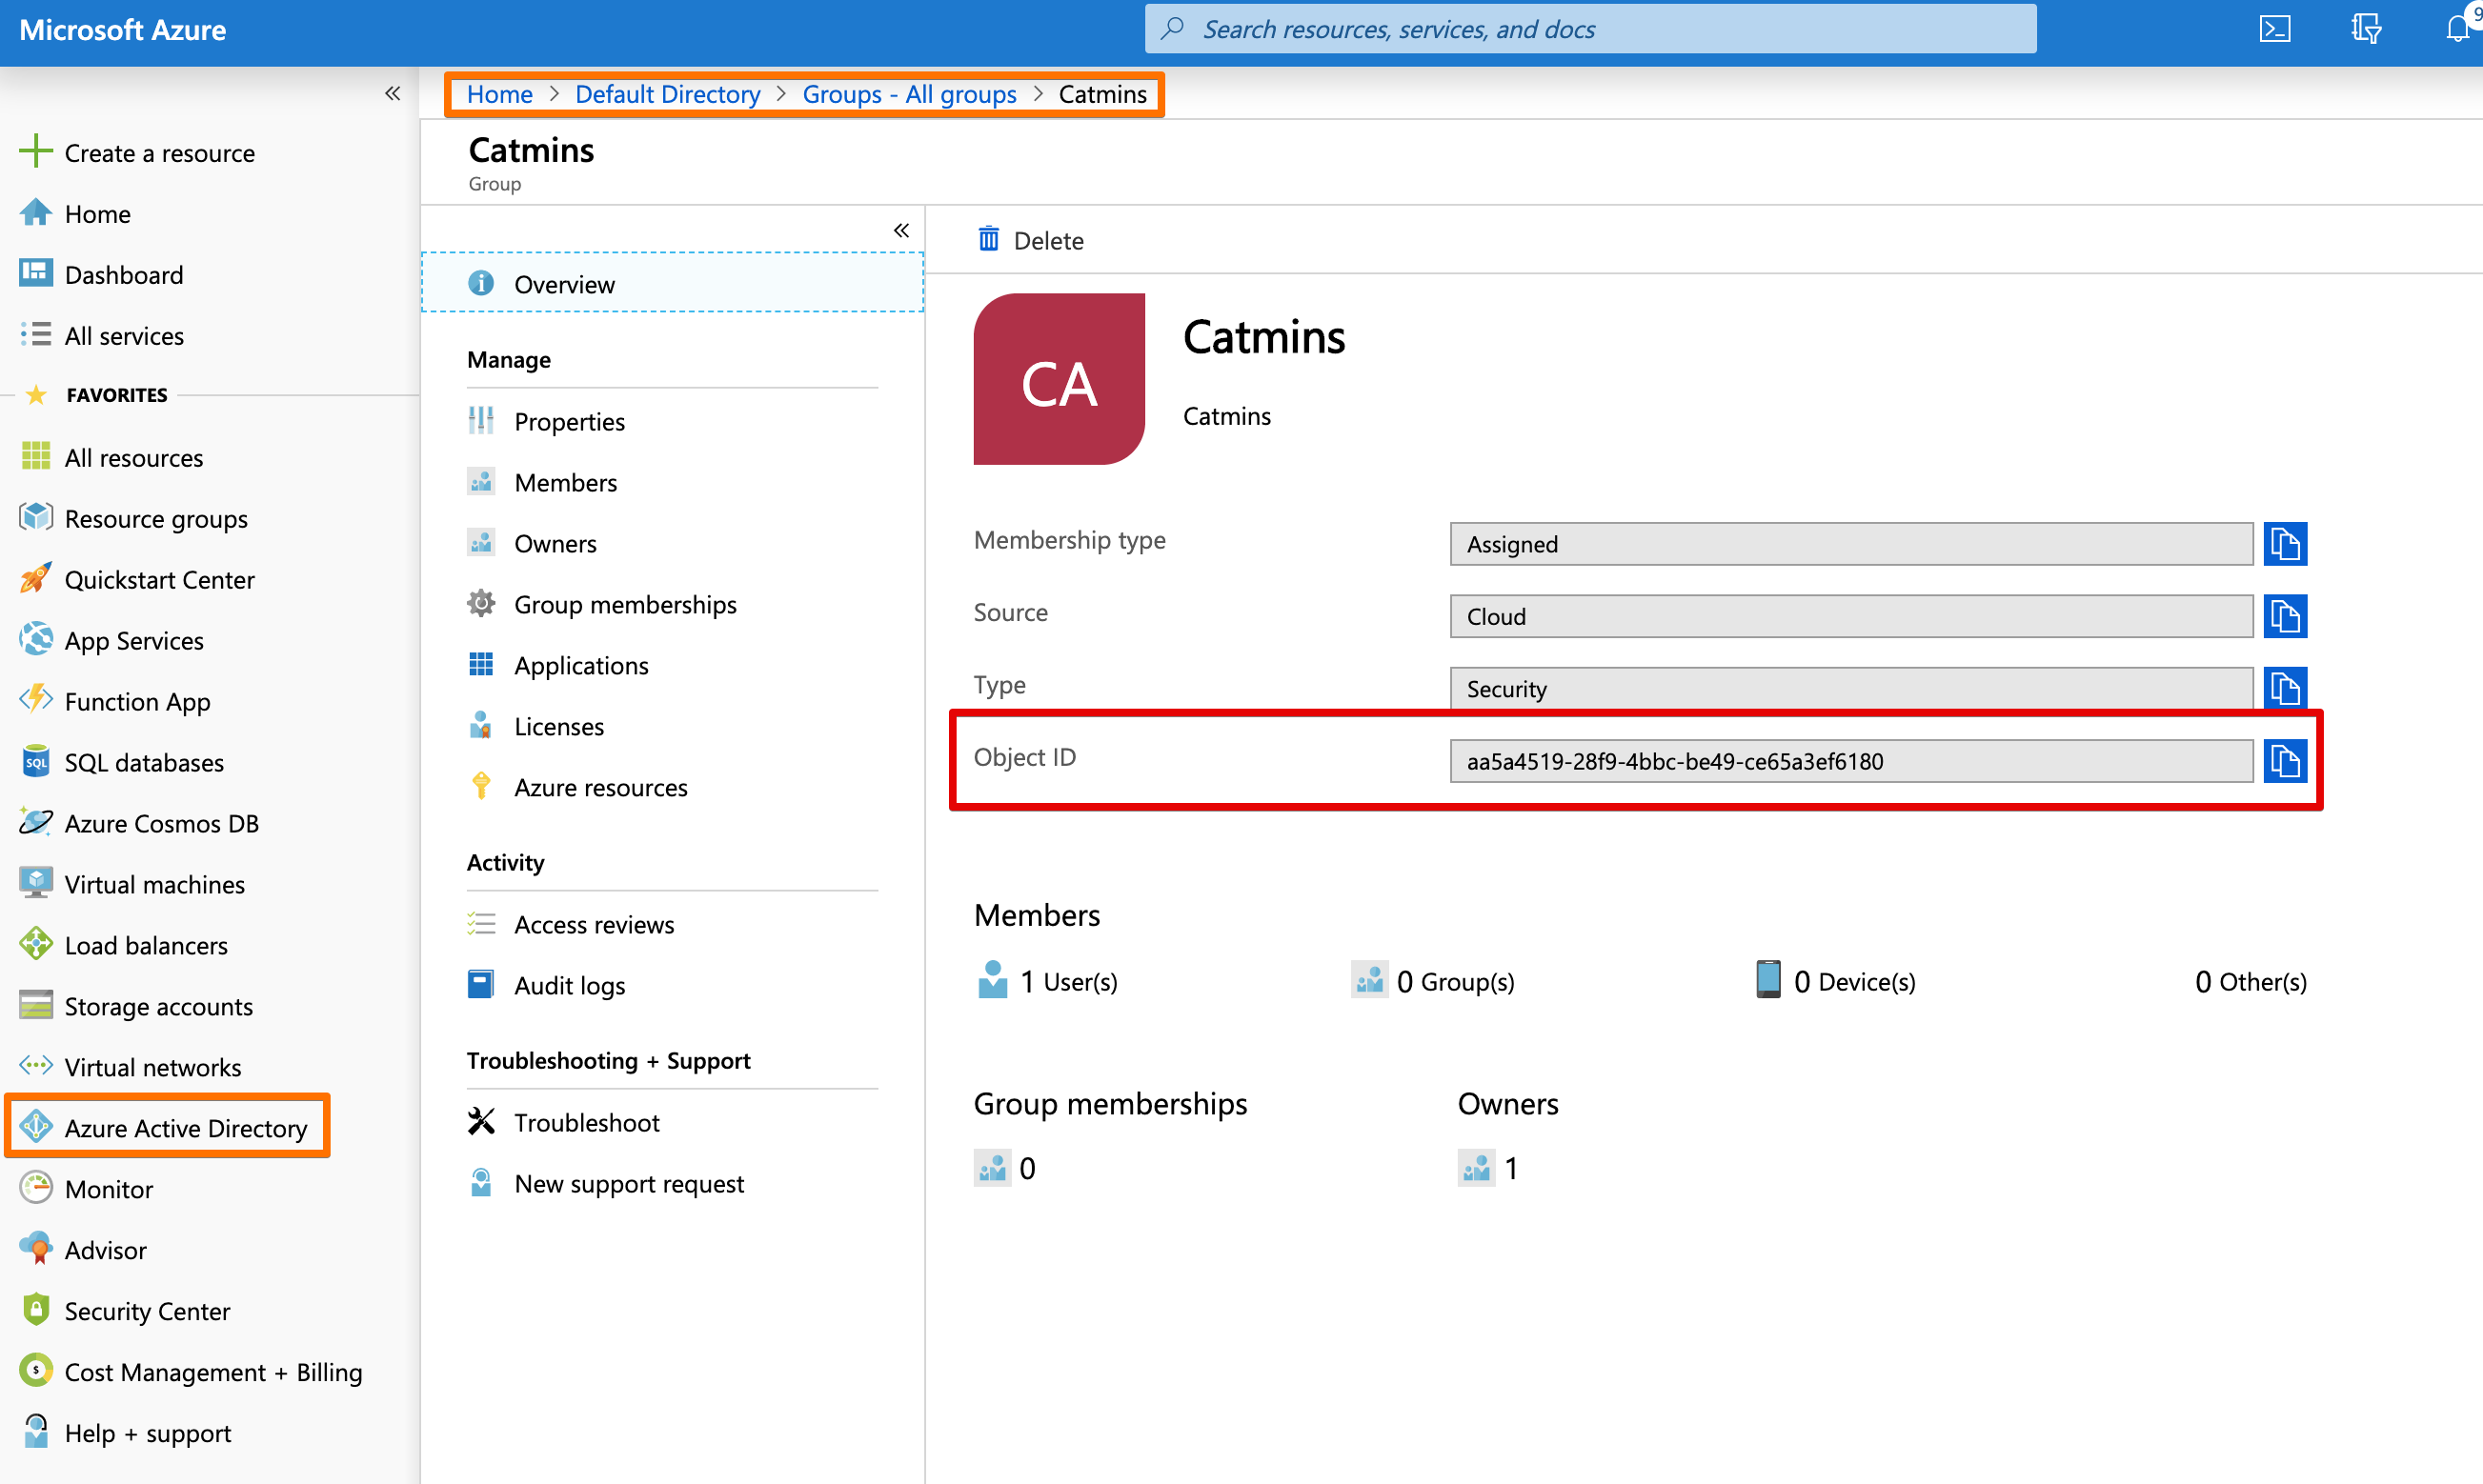
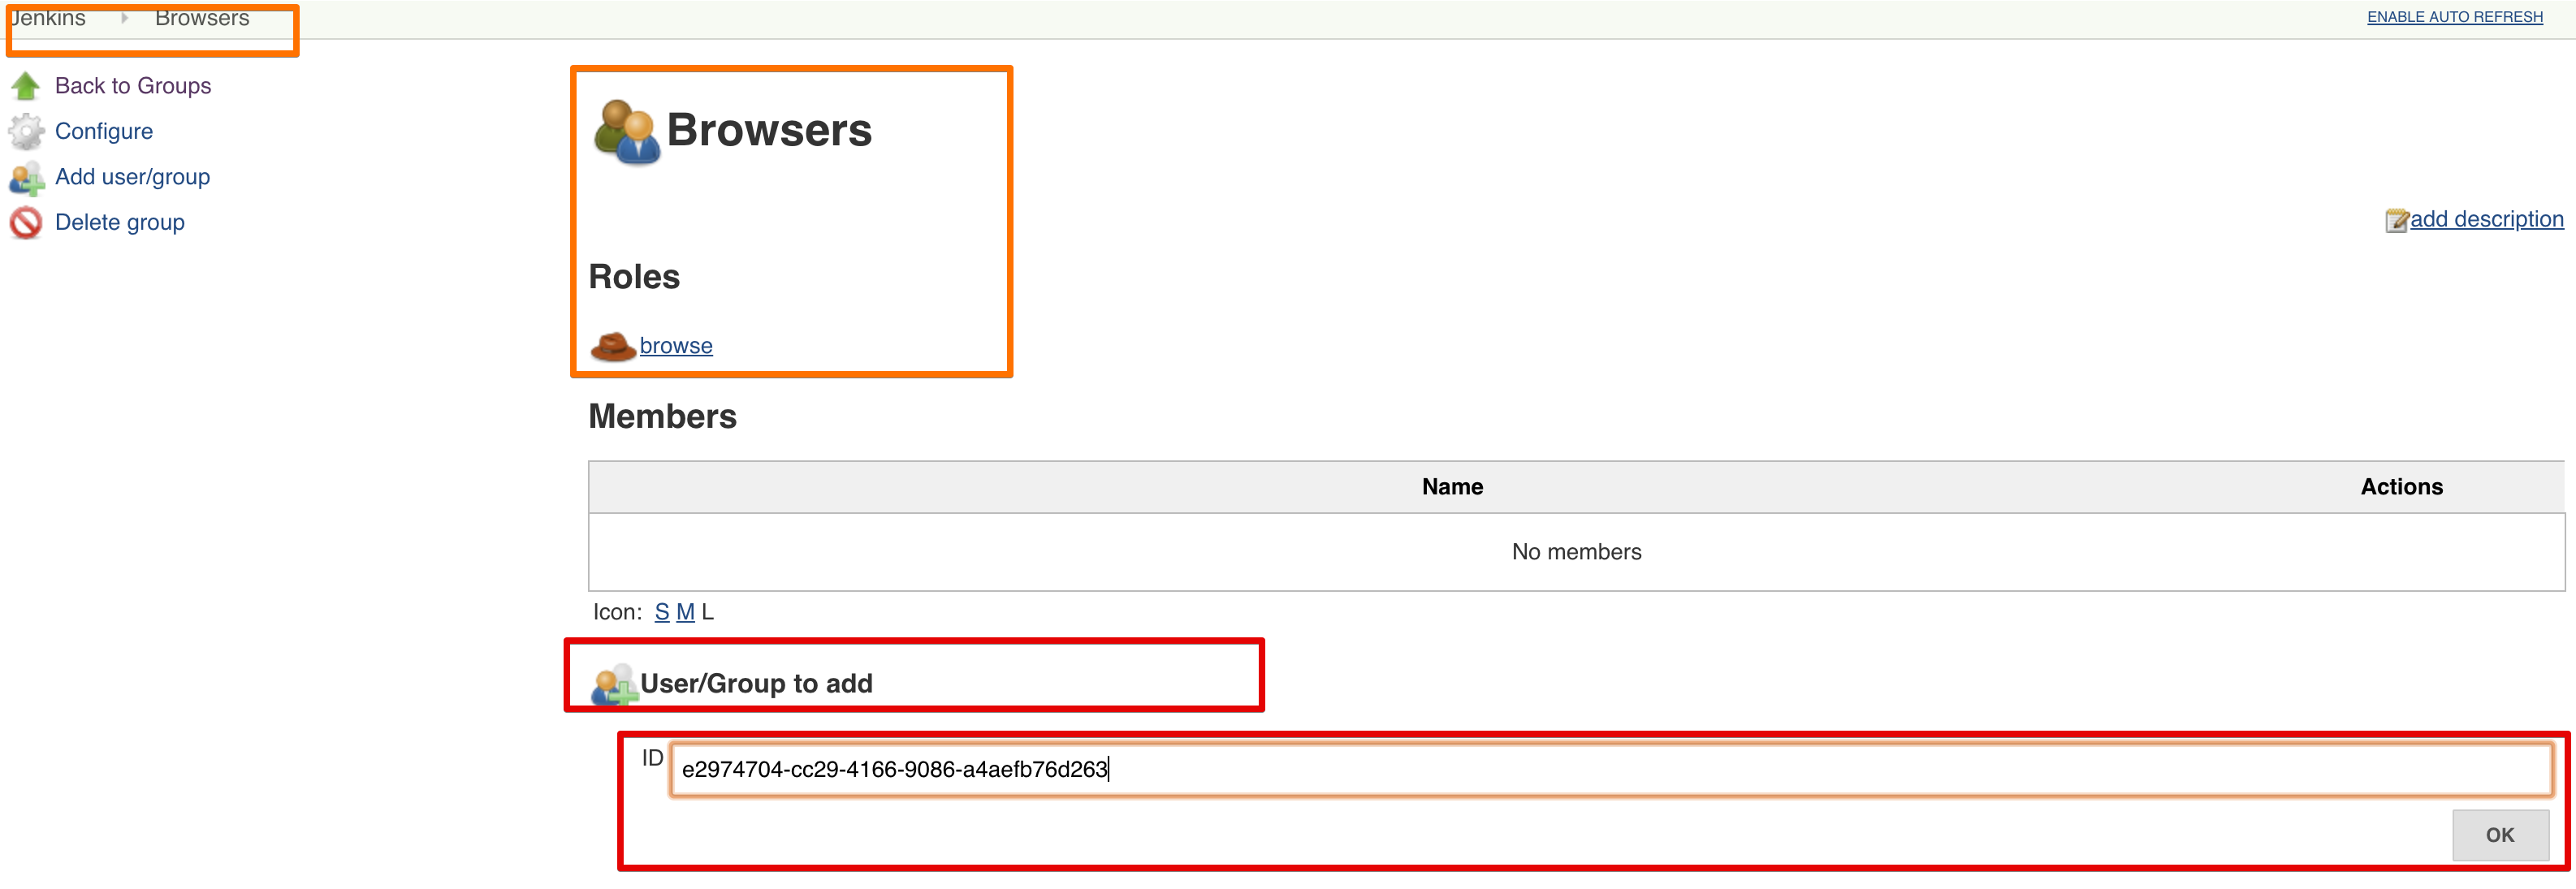
Retrieve Group Object ID
If we want to assign Azure AD groups to groups or roles in Jenkins' RBAC, we need to use the Object ID's.
Each Group and User has an Object ID, which have a handy Copy this button on the end of the value box!
Configure Jenkins
We now get to the point where we configure Jenkins. The SAML plugin is opensource, and thus it's configuration can also be used for Jenkins or CloudBees Jenkins Distribution.
Steps
Here are the steps we perform to configure Azure AD as the Single-Sign-On solution.
- install the SAML plugin
- I assume you know how to install plugins, so we skip this
- if you don't know Read the Managing Plugins Guide
- configure saml 2.0 in Jenkins
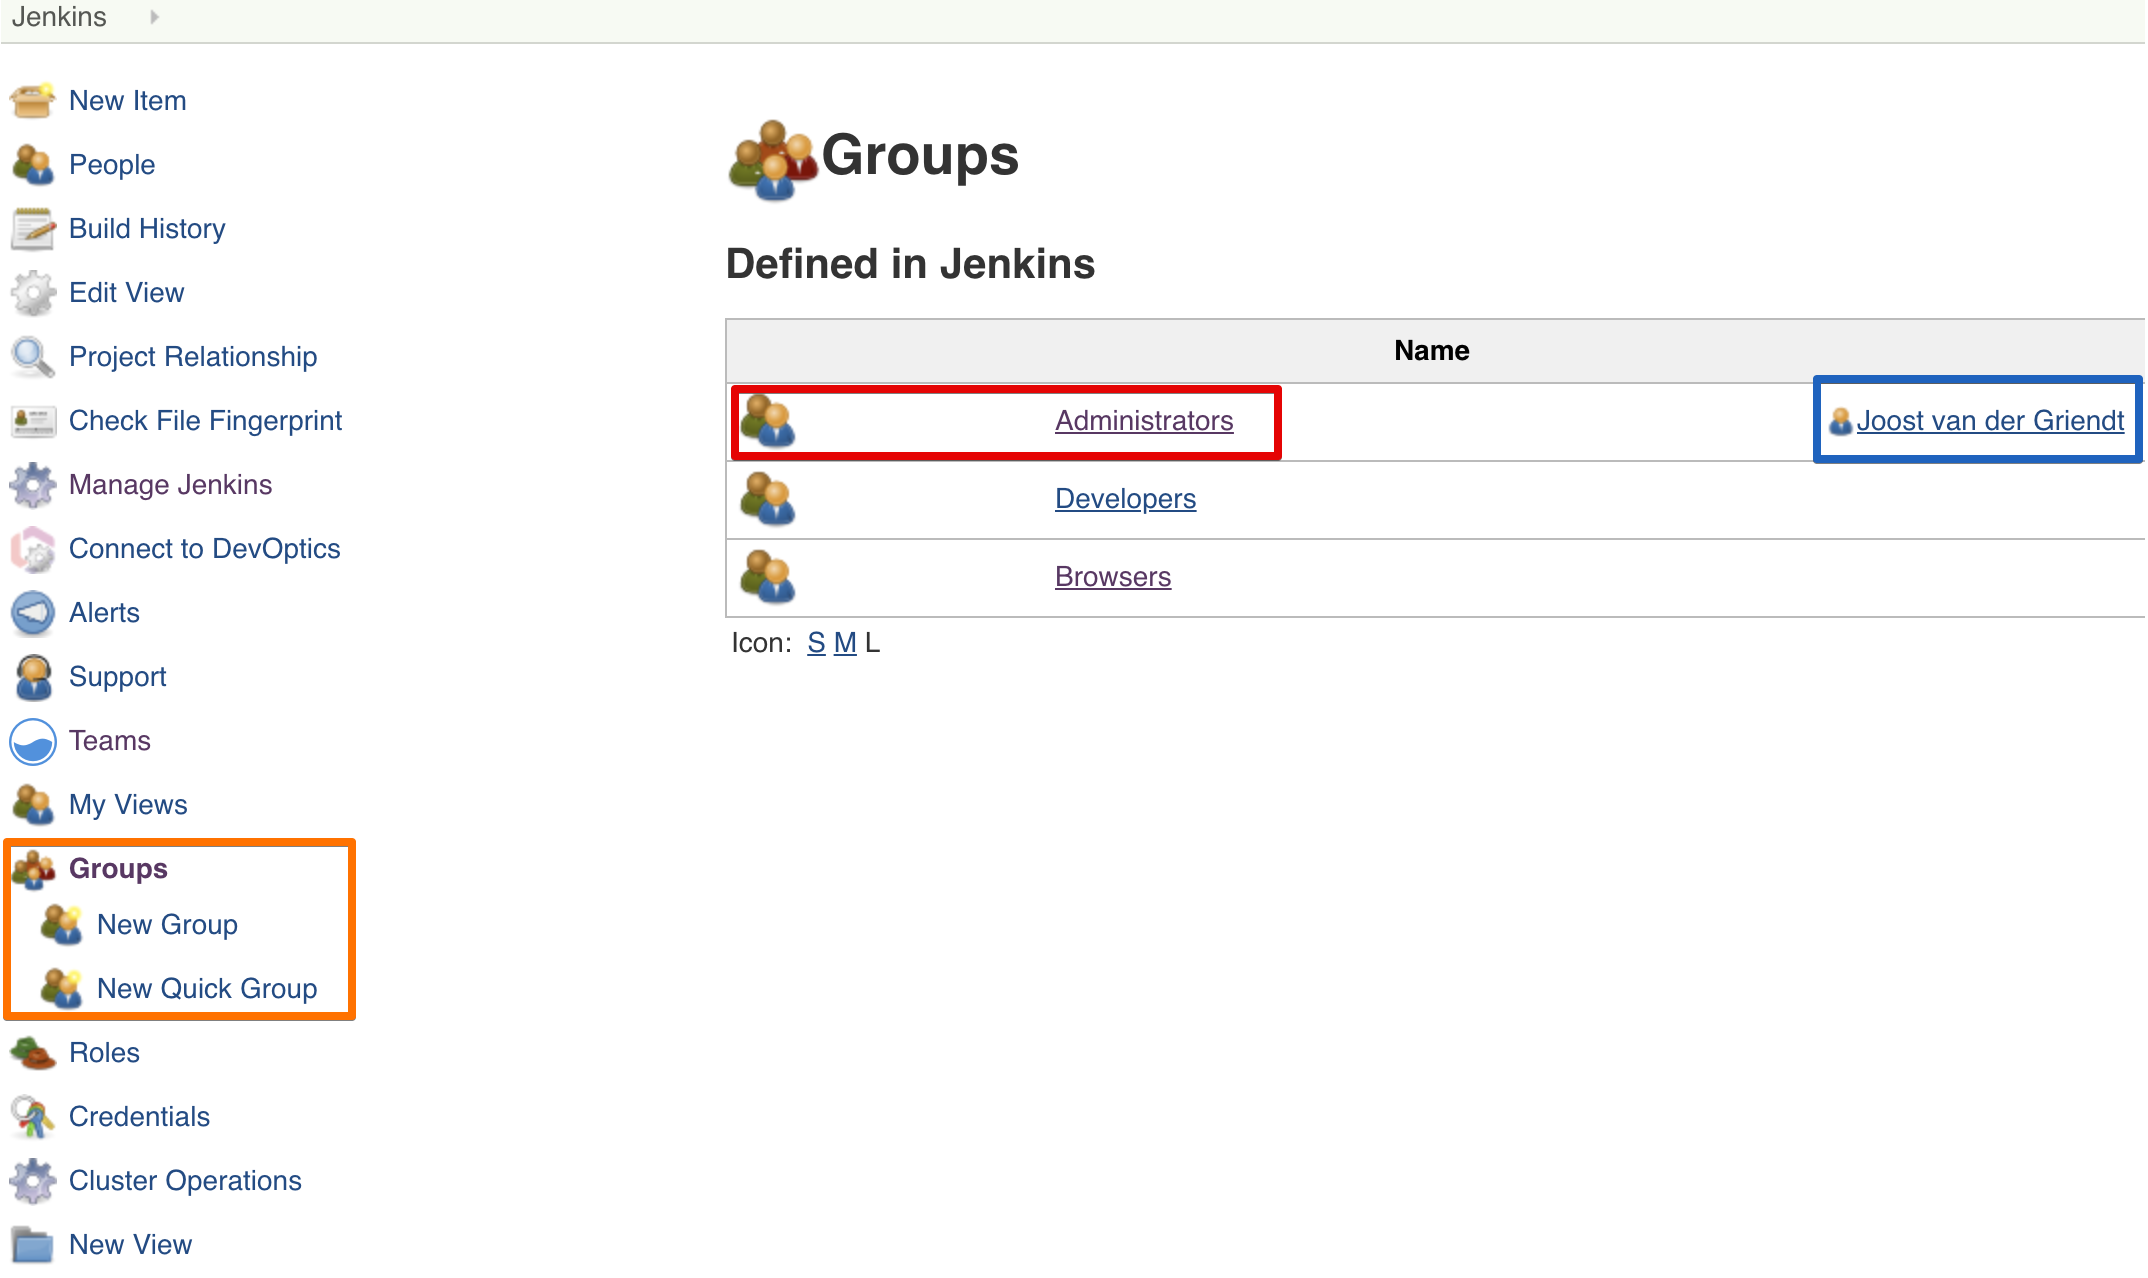
- setup groups (RBAC)
- administrators -> admin group
- browsers -> all other groups
Visual Guide
Below is a visual guide with screenshots. Please pay attention to the hints in the screenshots.
- Red: this is the main thing
- Orange: this is how we got to the current page/view
- Blue: while you're in this screen, there might be other things you could do
Configure Security
To go to Jenkins' security configuration, follow this route:
- login with an Admin user
- go to the
Operations Center Manage Jenkins->Global Security Configuration
Configure RBAC
The SAML plugin configuration pollutes the screen with fields.
My advice is to enable RBAC first.
If you haven't got any groups/roles yet, I recommend using the Typical Initial Setup from the dropdown. The logged-in user is automatically registered as administrator. So if your Azure AD configuration doesn't work, this user can still manage Jenkins.
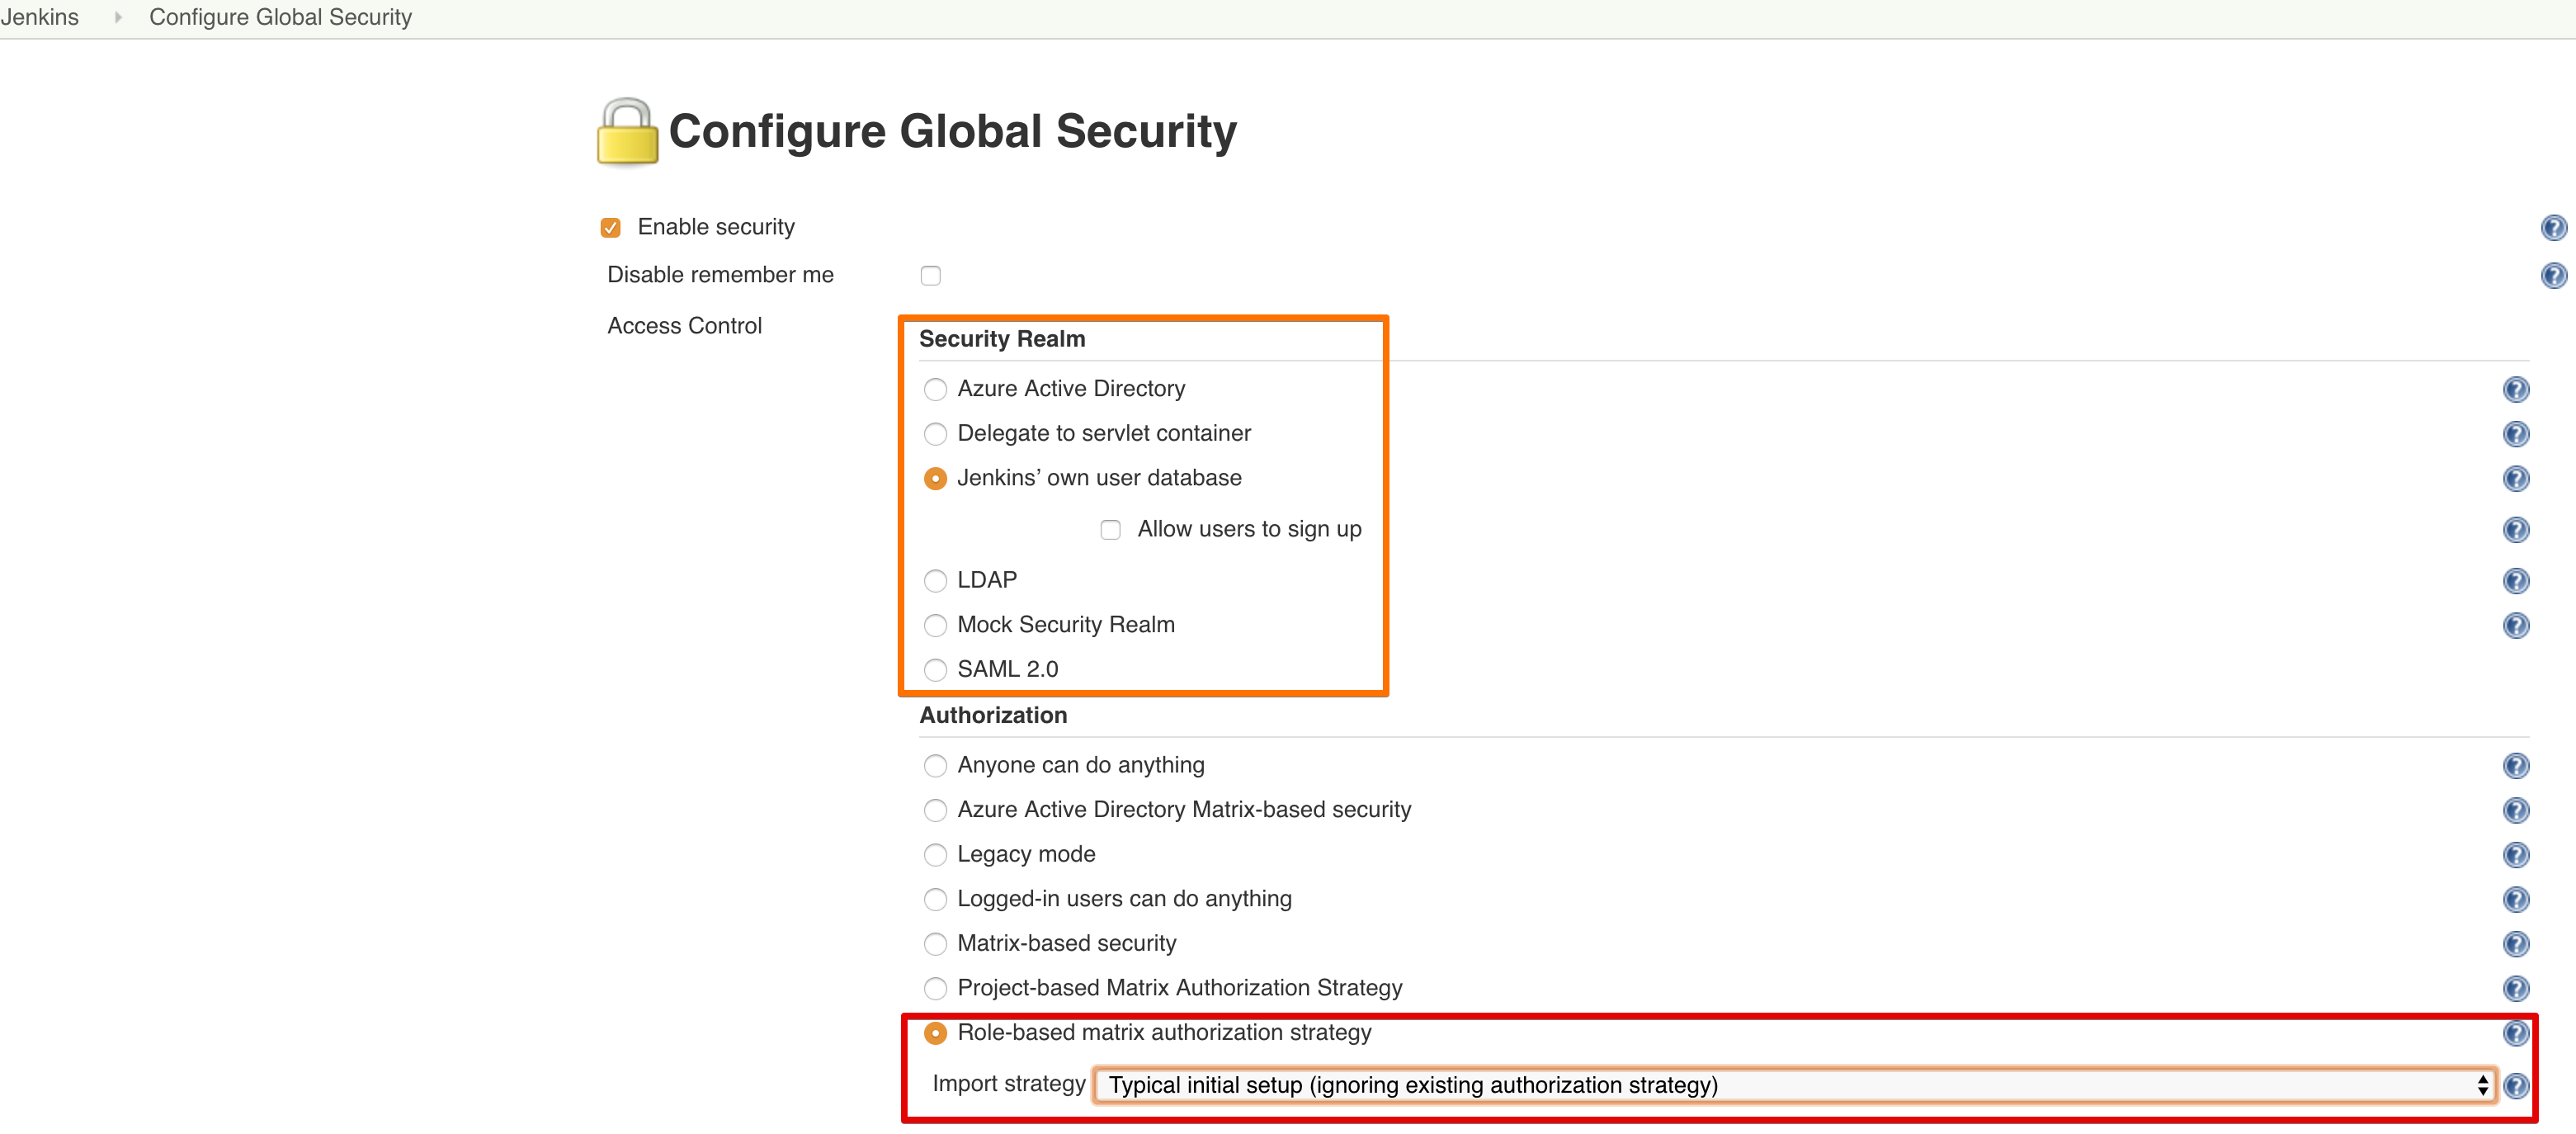
Important
Make sure you know the credentials of the current admin user.
It will automatically be added to the Administrators group, and it will be your go-to account when you mess up the SAML configuration and you have to reset security.
For how to reset the security configuration, see the For When You Mess Up paragraph.
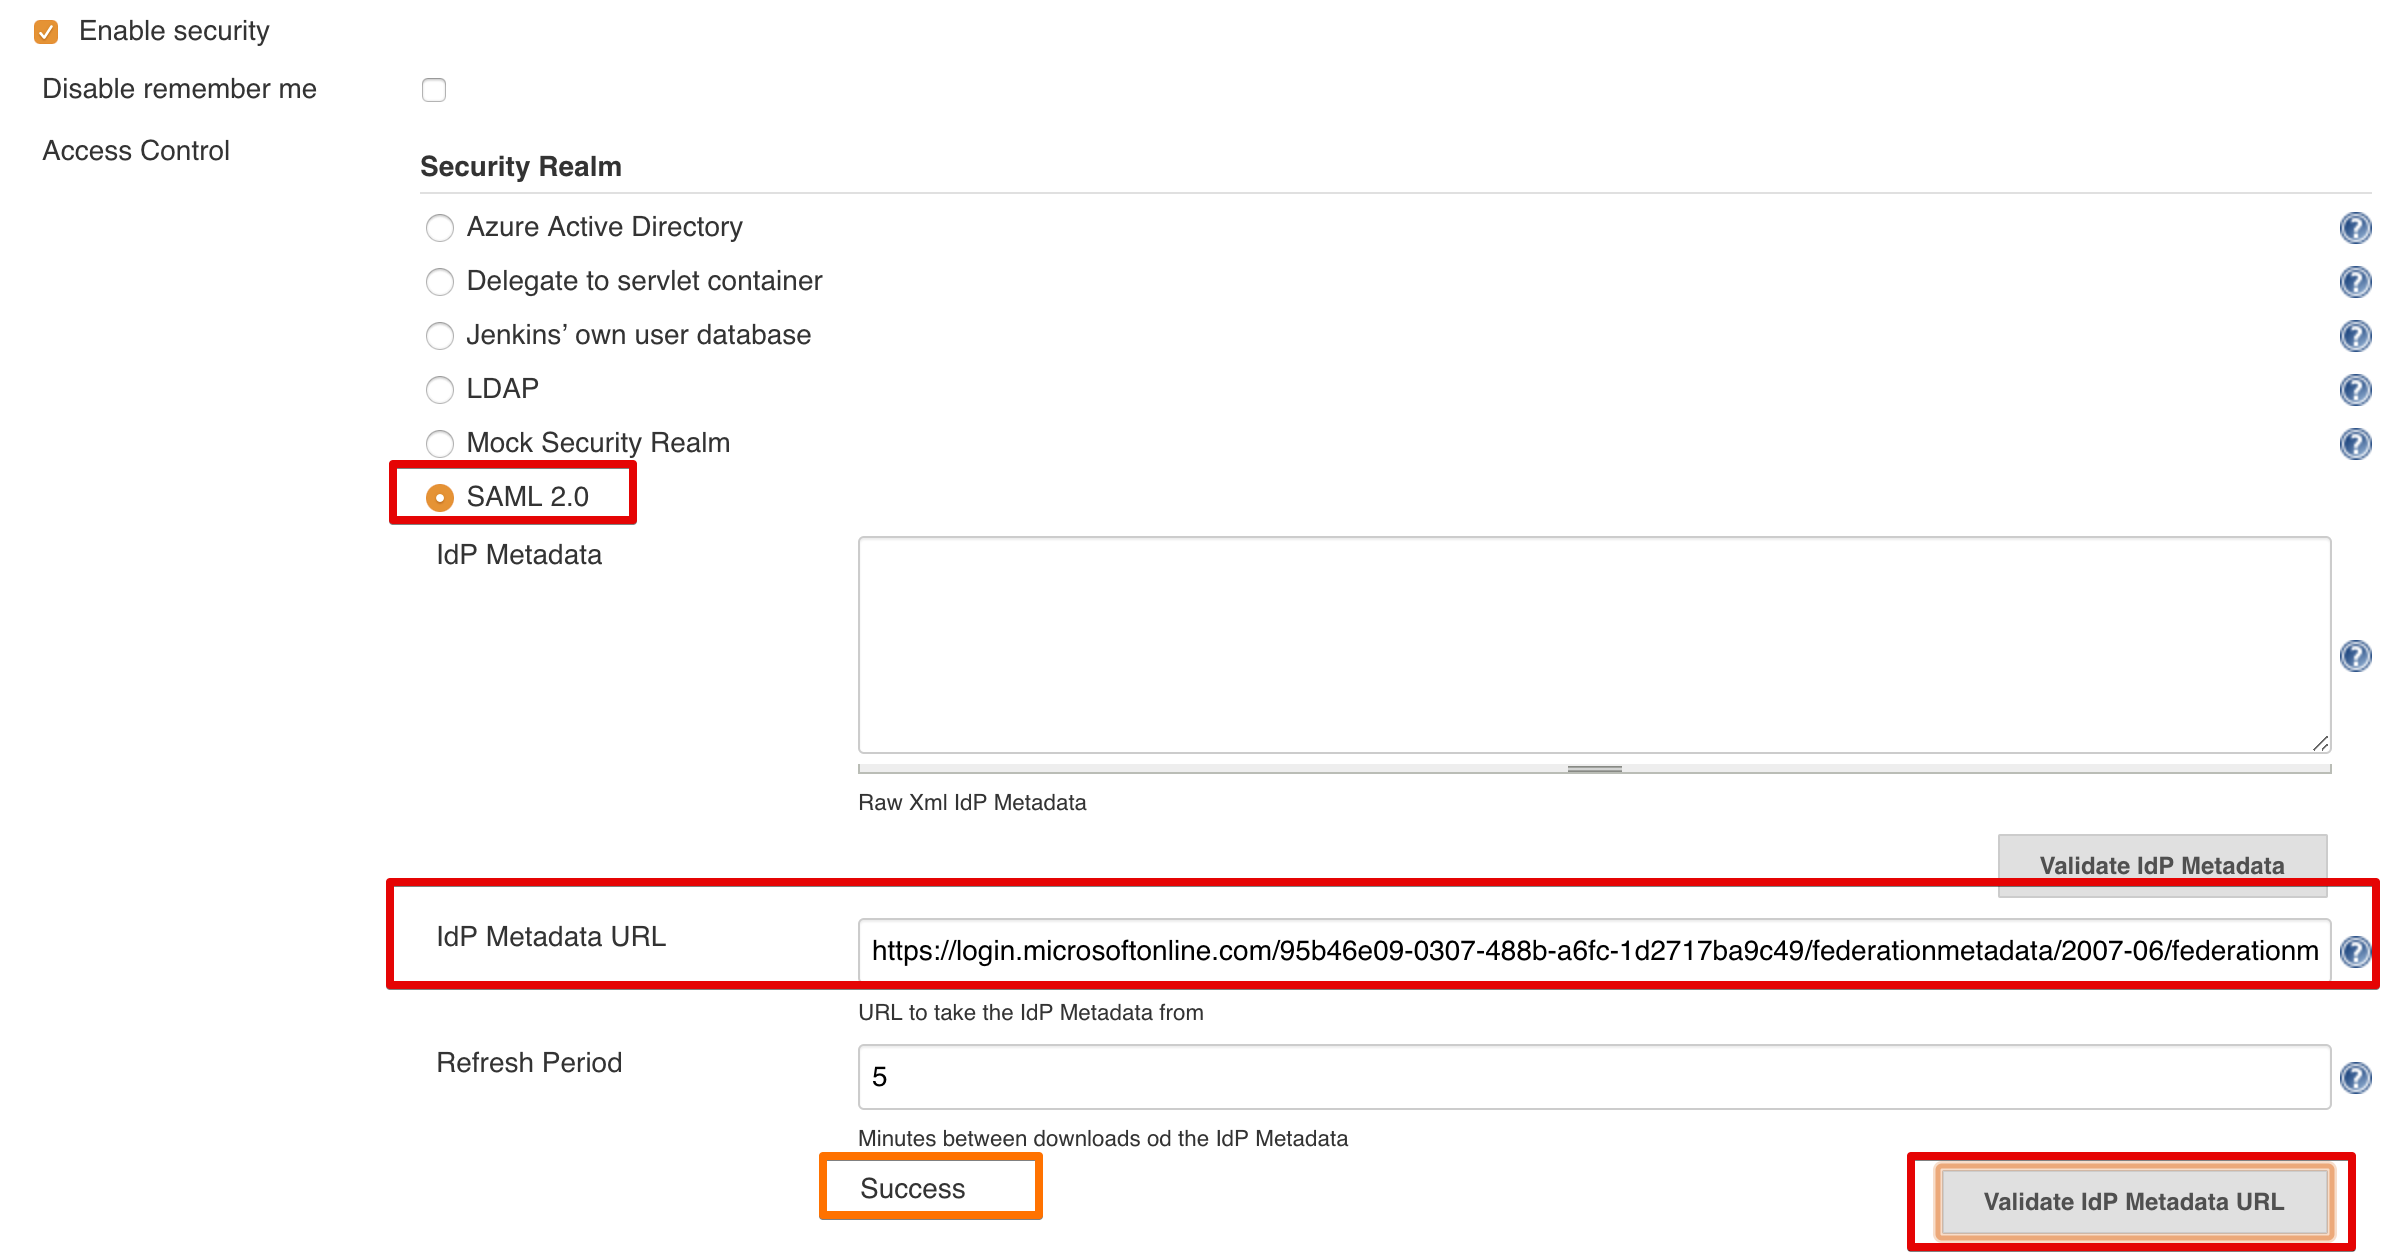
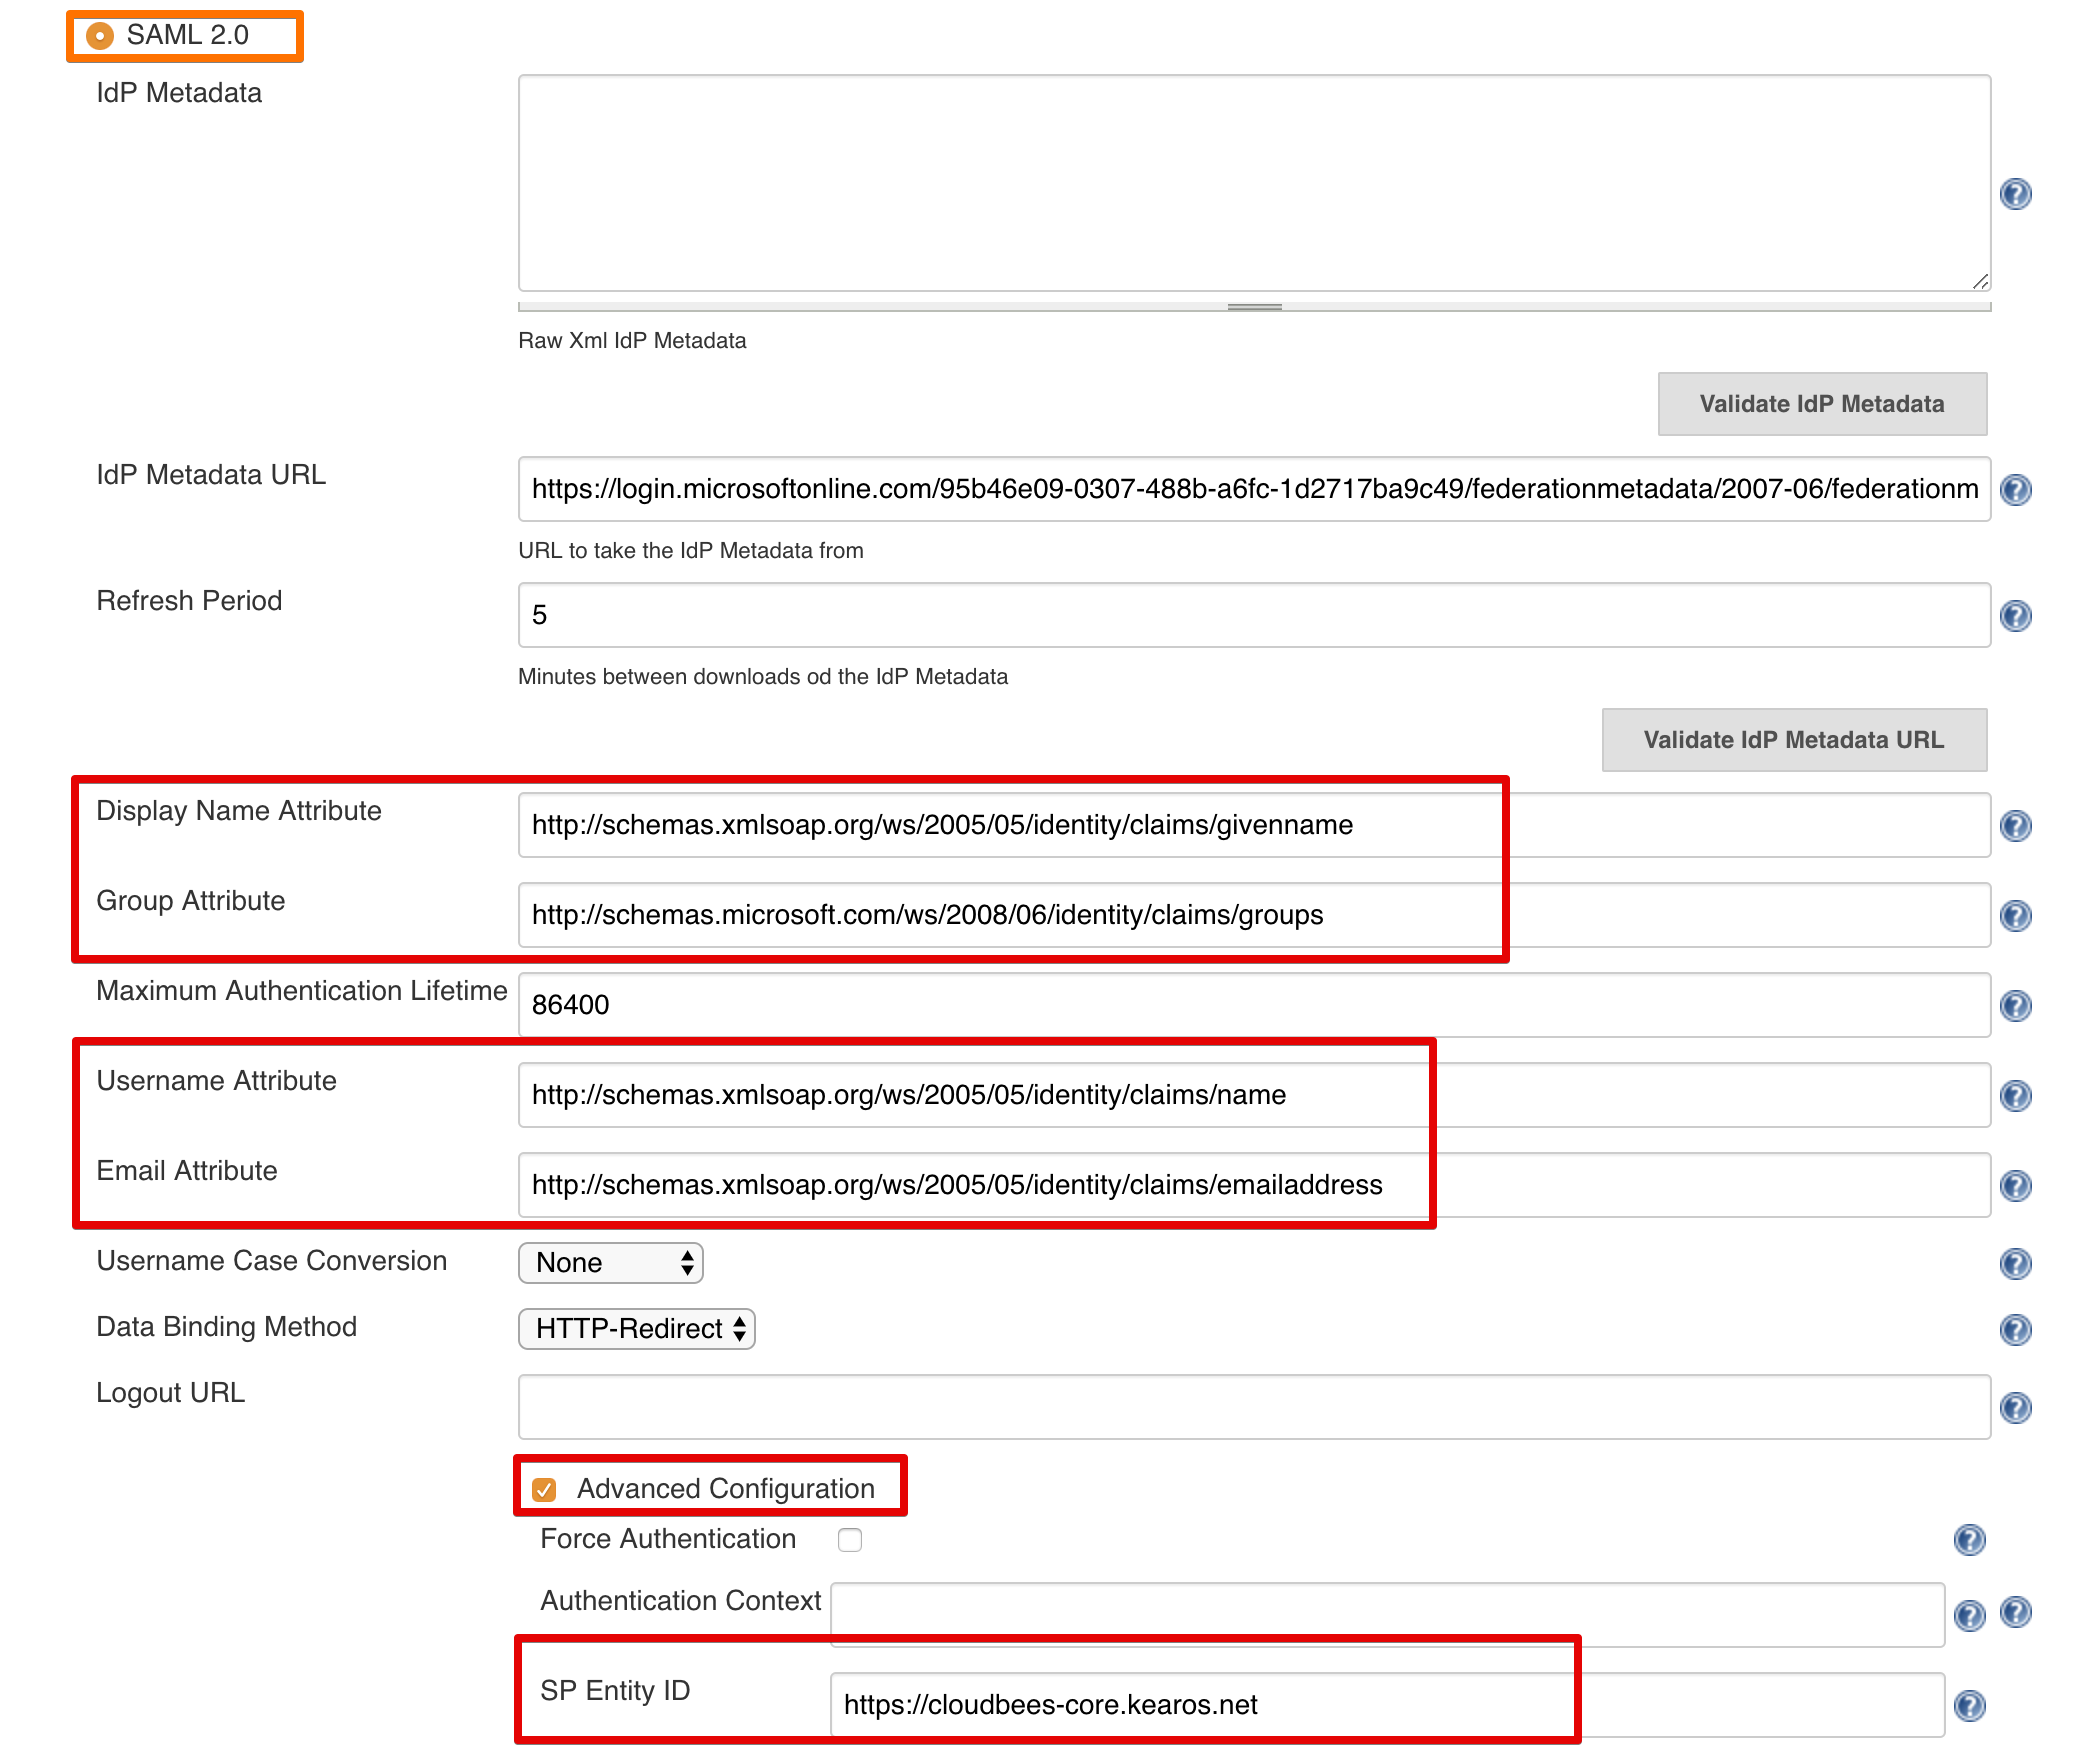
Configure SAML
Select SAML 2.0 from the Security Realm options.
Here we first supply our Federation Metadata Document content or it's URL.
Each option - document content or URL - has its own Validate ... button, hit it and confirm it says Success.
Info
You can leave Displayname empty, which gives you the default naming scheme from Azure AD. I think this is ugly, as it amounts to something like ${EMAIL_ADDRESS}_${AD_DOMAIN}_${AZURE_CORP_DOMAIN}. There are other options, I've settled for givenname, as there isn't a fullname by default, and well, I prefer Joost to a long hard to recognize string.
Fields
- Displayname:
http://schemas.xmlsoap.org/ws/2005/05/identity/claims/givenname - Group:
http://schemas.microsoft.com/ws/2008/06/identity/claims/groups - Username:
http://schemas.xmlsoap.org/ws/2005/05/identity/claims/name - Email:
http://schemas.xmlsoap.org/ws/2005/05/identity/claims/emailaddress - SP Entity ID: the
App IDURI you configured in Azure AD (hidden behindAdvanced Configuration)
Configure RBAC Groups
Tip
Once Azure AD is configured, and it works, you can configure groups for RBAC just as you're used to.
Both for classic RBAC and Team Masters.
Just make sure you use the Azure AD Object ID's of the groups to map them.
Bonus tip, add every Azure AD group to Browsers, so you can directly map their groups to Team Master roles without problems.
XML Config
  <useSecurity>true</useSecurity>
  <authorizationStrategy class="nectar.plugins.rbac.strategy.RoleMatrixAuthorizationStrategyImpl"/>
 <securityRealm class="org.jenkinsci.plugins.saml.SamlSecurityRealm" plugin="saml@1.1.2">
    <displayNameAttributeName>http://schemas.xmlsoap.org/ws/2005/05/identity/claims/givenname</displayNameAttributeName>
    <groupsAttributeName>http://schemas.microsoft.com/ws/2008/06/identity/claims/groups</groupsAttributeName>
    <maximumAuthenticationLifetime>86400</maximumAuthenticationLifetime>
    <emailAttributeName>http://schemas.xmlsoap.org/ws/2005/05/identity/claims/emailaddress</emailAttributeName>
    <usernameCaseConversion>none</usernameCaseConversion>
    <usernameAttributeName>http://schemas.xmlsoap.org/ws/2005/05/identity/claims/name</usernameAttributeName>
    <binding>urn:oasis:names:tc:SAML:2.0:bindings:HTTP-Redirect</binding>
    <advancedConfiguration>
      <forceAuthn>false</forceAuthn>
      <spEntityId>https://cloudbees-core.kearos.net</spEntityId>
    </advancedConfiguration>
    <idpMetadataConfiguration>
      <xml></xml>
      <url>https://login.microsoftonline.com/95b46e09-0307-488b-a6fc-1d2717ba9c49/federationmetadata/2007-06/federationmetadata.xml</url>
      <period>5</period>
    </idpMetadataConfiguration>
  </securityRealm>
  <disableRememberMe>false</disableRememberMe>
Logout URL
Depending on the requirements, you may want to specify a logout url in the SAML configuration to log you completely out of SAML, not just Core.
An example https://login.windows.net/<tenant_id_of_your_app>/oauth2/logout?post_logout_redirect_uri=<logout_URL_of_your_app>/logout
For When You Mess Up
This is the default config for security in CloudBees Core.
This file is in ${JENKINS_HOME}/config.xml, the XML tags we want to look at are quite near the top.
 <useSecurity>true</useSecurity>
  <authorizationStrategy class="hudson.security.FullControlOnceLoggedInAuthorizationStrategy">
    <denyAnonymousReadAccess>true</denyAnonymousReadAccess>
  </authorizationStrategy>
  <securityRealm class="hudson.security.HudsonPrivateSecurityRealm">
    <disableSignup>true</disableSignup>
    <enableCaptcha>false</enableCaptcha>
  </securityRealm>
  <disableRememberMe>false</disableRememberMe>
On CloudBees Core Modern / Kubernetes
To rectify a failed configuration, execute the following steps:
- exec into the
cjoc-0container:kubectl exec -ti cjoc-0 -- bash - open
config.xml:vi /var/jenkins_home/config.xml - replace conflicting lines with the above snippet
- save the changes
- exit the container:
exit - kill the pod:
kubectl delete po cjoc-0
Tip
For removing a whole line, stay in "normal" mode, and press d d (two times the d key). To add the new lines, go into insert mode by pressing the i key. Go back to "normal" mode by pressing the esc key. Then, save and quit, by writing: :wq followed by enter.
References
- CloudBees Guide on Azure AD for Core SSO(outdated)
- SAML Plugin Docs for Azure AD (outdated)
- Microsoft Doc for Azure AD Tokens
- Microsoft Doc for Azure AD Optional Tokens
- Microsoft Doc for Azure AD Custom Tokens
- Alternative Azure AD Plugin (very new)
Info
Currently, there is a limitation which requires you to use the Object ID's which make searching groups and people less than ideal. When the Alternative Azure AD Plugin is approved this may provide a more satisfactory solution.