Multi-Cluster (OLD/AKS)
Imagine you have a whole range of departments and development teams. Preferably you want to serve them with a standardized SDA(Software Delivery Automation) platform, but at the same time, make sure they pay for their usage.
I don't think this is too far fetched or something terrible. I think it makes sense. In this light, CloudBees Core now supports running on multiple Kubernetes clusters.
In this guide, we're going to explore how to run CloudBees Core on a GKE and AKS cluster at the same time. And how to deal with the details of getting the namespace configured, certificates, Kubernetes API tokens and so on and so forth.
Prerequisites
First off, we need a [GKE cluster] (/kubernetes/distributions/gke-terraform/) and a AKS cluster.
Next, we make the GKE cluster the default one. Here we will install CloudBees Core. You can either install CloudBees Core directly or via Jenkins X.
You're also welcome to follow the CloudBees documentation.
The expected state is that you access Operations Center via a proper DNS name with TLS enabled, served via Nginx Ingress. And the AKS cluster is ready to be used - but empty.
Some further assumptions: you have admin rights on both clusters the TLS certificate is from Let's Encrypt via Certmanager the AKS cluster is empty You can break these assumptions, but that means you have to change the examples to reflect your situation.
Steps to do
High over, we have to do the following steps:
- tweak the GKE cluster
- configure the AKS cluster
- configure Operations Center
- create a Managed Master
Tweak GKE Cluster
At this time of writing, Jenkins is suffering from an outdated OpenSSL library. This version doesn't support SNI, which is what the Nginx Ingress Controller relies on.
When a Client Master (Managed or not) connects to the Operations Center via the Nginx Controller without SNI, the controller will not route you to the correct path. Because of this, when TLS is enabled, you will get the default controller's TLS certificate. As this certificate, by default, is an invalid one, you get TLS handshake errors.
We have to rectify this. There are many ways to do this. For example, you make the TLS certificate for Operations Center the default TLS certificate. While this might not be nice for other applications, it will suit our case.
Info
If there are many other applications in the same cluster, consider having more than one Nginx Ingress Controller.
Via the configuration parameters controller.scope.enabled and controller.scope.namespace , you can limit the controller to a single namespace. This way, you can configure the default TLS certificate only for the Ingress Controller that manages the Operations Center's namespace — limiting the effect of the workaround.
In addition to the change for the default certificate, we also need to make sure external Masters can connect to the Operations Center. They require two ports to be open, 443 (or 80 if no TLS) and 50000 (if you've kept the default).
For this we enable tcp-services and configure the 50000 port on the deployment and service (Kubernetes resources).
How to change the Nginx Ingress configuration depends on how you've installed it. For sake of brevity, I will simply edit the resources via a kubectl edit (hint: don't do this in production).
TCP Services
To enable the TCP services, we need to do two things: * create a config map with the configuration * enable tcp services in the deployment and point to the configmap
# nginx-config-map.yaml
apiVersion: v1
kind: ConfigMap
metadata:
 name: tcp-services
 namespace: kube-system
data:
 50000: "<CJOC_NAMESPACE>/cjoc:50000"
Info
Do replace CJOC_NAMESPACE with the actual namespace!
Once this is done, we can edit the controller's deployment.
We have to make two changes: * add the tcp-services coniguration * add the port 50000 configuration
--tcp-services-configmap. spec:
containers:
- args:
- /nginx-ingress-controller
...
- --tcp-services-configmap=kube-system/tcp-services
Next, we edit the same deployment, and add the tcp port.
We will add the 50000 to the container ports.
It will then look something like this.
ports:
- containerPort: 80
name: http
protocol: TCP
- containerPort: 443
name: https
protocol: TCP
        - containerPort: 50000
          name: jnlp
          protocol: TCP
Last but not least, we also have to update the Nginx Ingress service resource.
We add a similar port definition.
Which will then look something like this (clusterIp and nodePort's will be different).
spec:
clusterIP: .....
externalTrafficPolicy: Cluster
ports:
- name: http
nodePort: 31406
port: 80
protocol: TCP
targetPort: http
- name: https
nodePort: 30391
port: 443
protocol: TCP
targetPort: https
  - name: jnlp
    nodePort: 31559
    port: 50000
    protocol: TCP
    targetPort: jnlp
Set Default TLS Certificate
The first thing you'll have to do is to find out the name of the secret container the certificate. If you've created it yourself, great, else this is a way.
The output should look like this:
NAMESPACE    NAME                           READY   SECRET                         AGE
jx-staging   tls-staging-gke-kearos-net-p   True    tls-staging-gke-kearos-net-p   4d
jx           tls-dev-gke-kearos-net-p       True    tls-dev-gke-kearos-net-p       15d
It should tell you which secret belongs to which certificate and in which namespace it resides. Note down both the secret name and the namespace.
Info
Hint, the -A flag means --all-namespaces but then with less typing.
- --default-ssl-certificate=<namespace>/<secretName>. And it should then look something like this:
    spec:
      containers:
      - args:
        - /nginx-ingress-controller
    ...
        - --default-ssl-certificate=default/tls-fake-kearos-net
Configure AKS Cluster
We need to do the following steps:
- retrieve the Kubernetes API endpoint
- retrieve the Kubernetes API endpoint's certificate
- retrieve the service account token
- install an Ingress controller
- create & configure namespace for Managed Master(s)
- configure CloudBees Sidecar Injector
Gather Kubernetes Credential & Certificate
If you haven't already retrieved the Kubernetes credentials for your AKS cluster, you can do so via the az or AzureCLI.
.kubeconfig. In my case, it is located at ~/.kube/config. - Kubernetes API endpoint:
cluster.server - Kubernetes API endpoint's certificate:
cluster.certificate-authority-data - Service Account Token:
users.user.token
Mind you, the certificate is Base64 encoded. To decode, you can usually use a command line tool.
```bash tab="macOs" echo "LS0tLS1C....LS0tCg==" | base64 -D
The decoded thing should look like this:

```bash
-----BEGIN CERTIFICATE-----
MIIEyTCCArGgAwIBAgIQK0sOS0aRjfZPYLM1TaRQMjANBgkqhkiG9w0BAQsFADAN
..........
kKrPcnzV0gRdWNGNoJtRh9EGtKDP1VZUBiwdH44=
-----END CERTIFICATE-----
Save this into a .pem file, we're going to need it. Let's call it aks-kubernetes-api-server.pem.
Install an Ingress controller
We're going to use Helm to install the Nginx Ingres Controller.
Let's start by creating a namespace for your ingress resources
Add the official stable repository, just to be sure.
And update the helm repos.
Create a values file, ingress-values.yaml, we will need to change some values.
rbac:
 create: true
defaultBackend:
 enabled: false
controller:
 ingressClass: "nginx"
 metrics:
   enabled: "true"
 replicaCount: 2
 nodeSelector:
   beta\.kubernetes.io/os: linux
 scope:
   enabled: "true"
   namespace: cbmasters
 service:
   externalTrafficPolicy: "Cluster"
```bash tab="Helm V3" helm install nginx-ingress stable/nginx-ingress \ --namespace ingress-nginx \ --values ingress-values.yaml \ --version 1.29.6
```bash tab="Helm V2"
helm install \
 --name nginx-ingress stable/nginx-ingress \
 --namespace ingress-nginx \
 --values ingress-values.yaml \
 --version 1.29.6
Create & Configure Namespace
We're going to use a feature from the official CloudBees Core helm chart. We start by creating the namespace that will house our Managed Master(s).
Create a configuration for CloudBees Core Helm chart, called cloudbees-values.yaml. The namespace of the Operations Center doesn't really matter, it is in a different cluster anyway.
OperationsCenter:
 Enabled: false
Master:
 Enabled: true
 OperationsCenterNamespace: cloudbees-core
Agents:
 Enabled: true
To be able to generate the Kubernetes resources files, we first have to use helm fetch to retrieve the chart.
helm fetch \
 --repo https://charts.cloudbees.com/public/cloudbees \
 --version 3.8.0+a0d07461ae1c \
 cloudbees-core
Now we can generate the Kubernetes resource definitions and store them as a single yaml file.
helm template cloudbees-core-namespace \
 cloudbees-core-3.8.0+a0d07461ae1c.tgz \
 -f cloudbees-values.yaml \
 --namespace ${NAMESPACE} \
 > cloudbees-core-namespace.yml
Which we then apply.
Configure CloudBees Sidecar Injector
Unfortunately, the Let's Encrypt Root CA certificates are not yet in the trust stores of our images. So we have to ensure they end up in the Masters we run in this (AKS) cluster, so they do not run into SSL errors. You can find the certificates on the certificates page of letsencrypt.org.
Make sure to download and save the PEM of ISRGRoot X1 (self-signed), Let's Encrypt Authority X3 (IdenTrust Cross-signed), and Let's Encrypt Authority X3 (Signed By ISRG Root X1).
Next, we have to add them to a bundle and a truststore, we can then put into a ConfigMap.
We first have retrieve the current bundle and truststore. We can get them from Operations Center via a kubectl cp. The process is described in the CloudBees Cloud Admin Guide. Unfortunately, it seems as of CloudBees Core 2.204.+ the location has changed. The new locations are below.
kubectl cp cjoc-0:etc/pki/ca-trust/extracted/java/cacerts ca-bundle/cacerts
kubectl cp cjoc-0:etc/pki/ca-trust/extracted/pem/tls-ca-bundle.pem ca-bundle/ca-certificates.crt
Now that we have the files to start with, we can add our Let's Encrypt Root and Intermediary certificates.
This assumes we're in the folder ca-bundle.
cat valid-isrgrootx1-letsencrypt-org.pem >> ca-certificates.crt
keytool -import -noprompt -keystore cacerts -file valid-isrgrootx1-letsencrypt-org.pem -storepass changeit -alias letsencrypt;
We also have to add the aks-kubernetes-api-server.pem to ensure we can talk to the Kubernetes API Endpoint.
cat aks-kubernetes-api-server.pem >> ca-certificates.crt
keytool -import -noprompt -keystore cacerts -file aks-kubernetes-api-server.pem -storepass changeit -alias kubeapi;
Info
If you use custom or self-signed certificates, the process is the same. Simply substitute the Let's Encrypt certificates mentioned by your own / your provider's.
This assumes we're in the folder ca-bundle.
Now we can focus on installing the CloudBees Sidecar Injector. It is a tool that creates a Sidecar to inject the certificate bundle and truststore from the Configmap into containers.
As before, we first fetch chart. Unfortunately, the value we need to change is not parameterized, so we have to un tar the config. We can let the Helm fetch do that via the --untar flag, followed by the --untardir <folderName> flag.
helm fetch \
 --repo https://charts.cloudbees.com/public/cloudbees \
 --version 2.0.1 \
--untar \
--untardir cloudbees-sidecar-injector\
 cloudbees-sidecar-injector
Tip
If you haven't done so already, configure the CloudBees Helm repo by the following commands.
Update the configmap, in the filetemplates/configmap.yaml, set requiresExplicitInjection to true.
Generate the end result via helm template.
helm template cloudbees-sidecar-injector \
 cloudbees-sidecar-injector \
 --namespace cloudbees-sidecar-injector\
 > cloudbees-sidecar-injector.yml
And apply the file.
Configure Operations Center
We have to configure two things in Operations Center. First, we create the AKS endpoint, and then we configure the Master template by adding a YAML snippet.
We go to Operations Center -> Manage Jenkins -> Configure System -> Kubernetes Master Provisioning.
Configure Endpoint
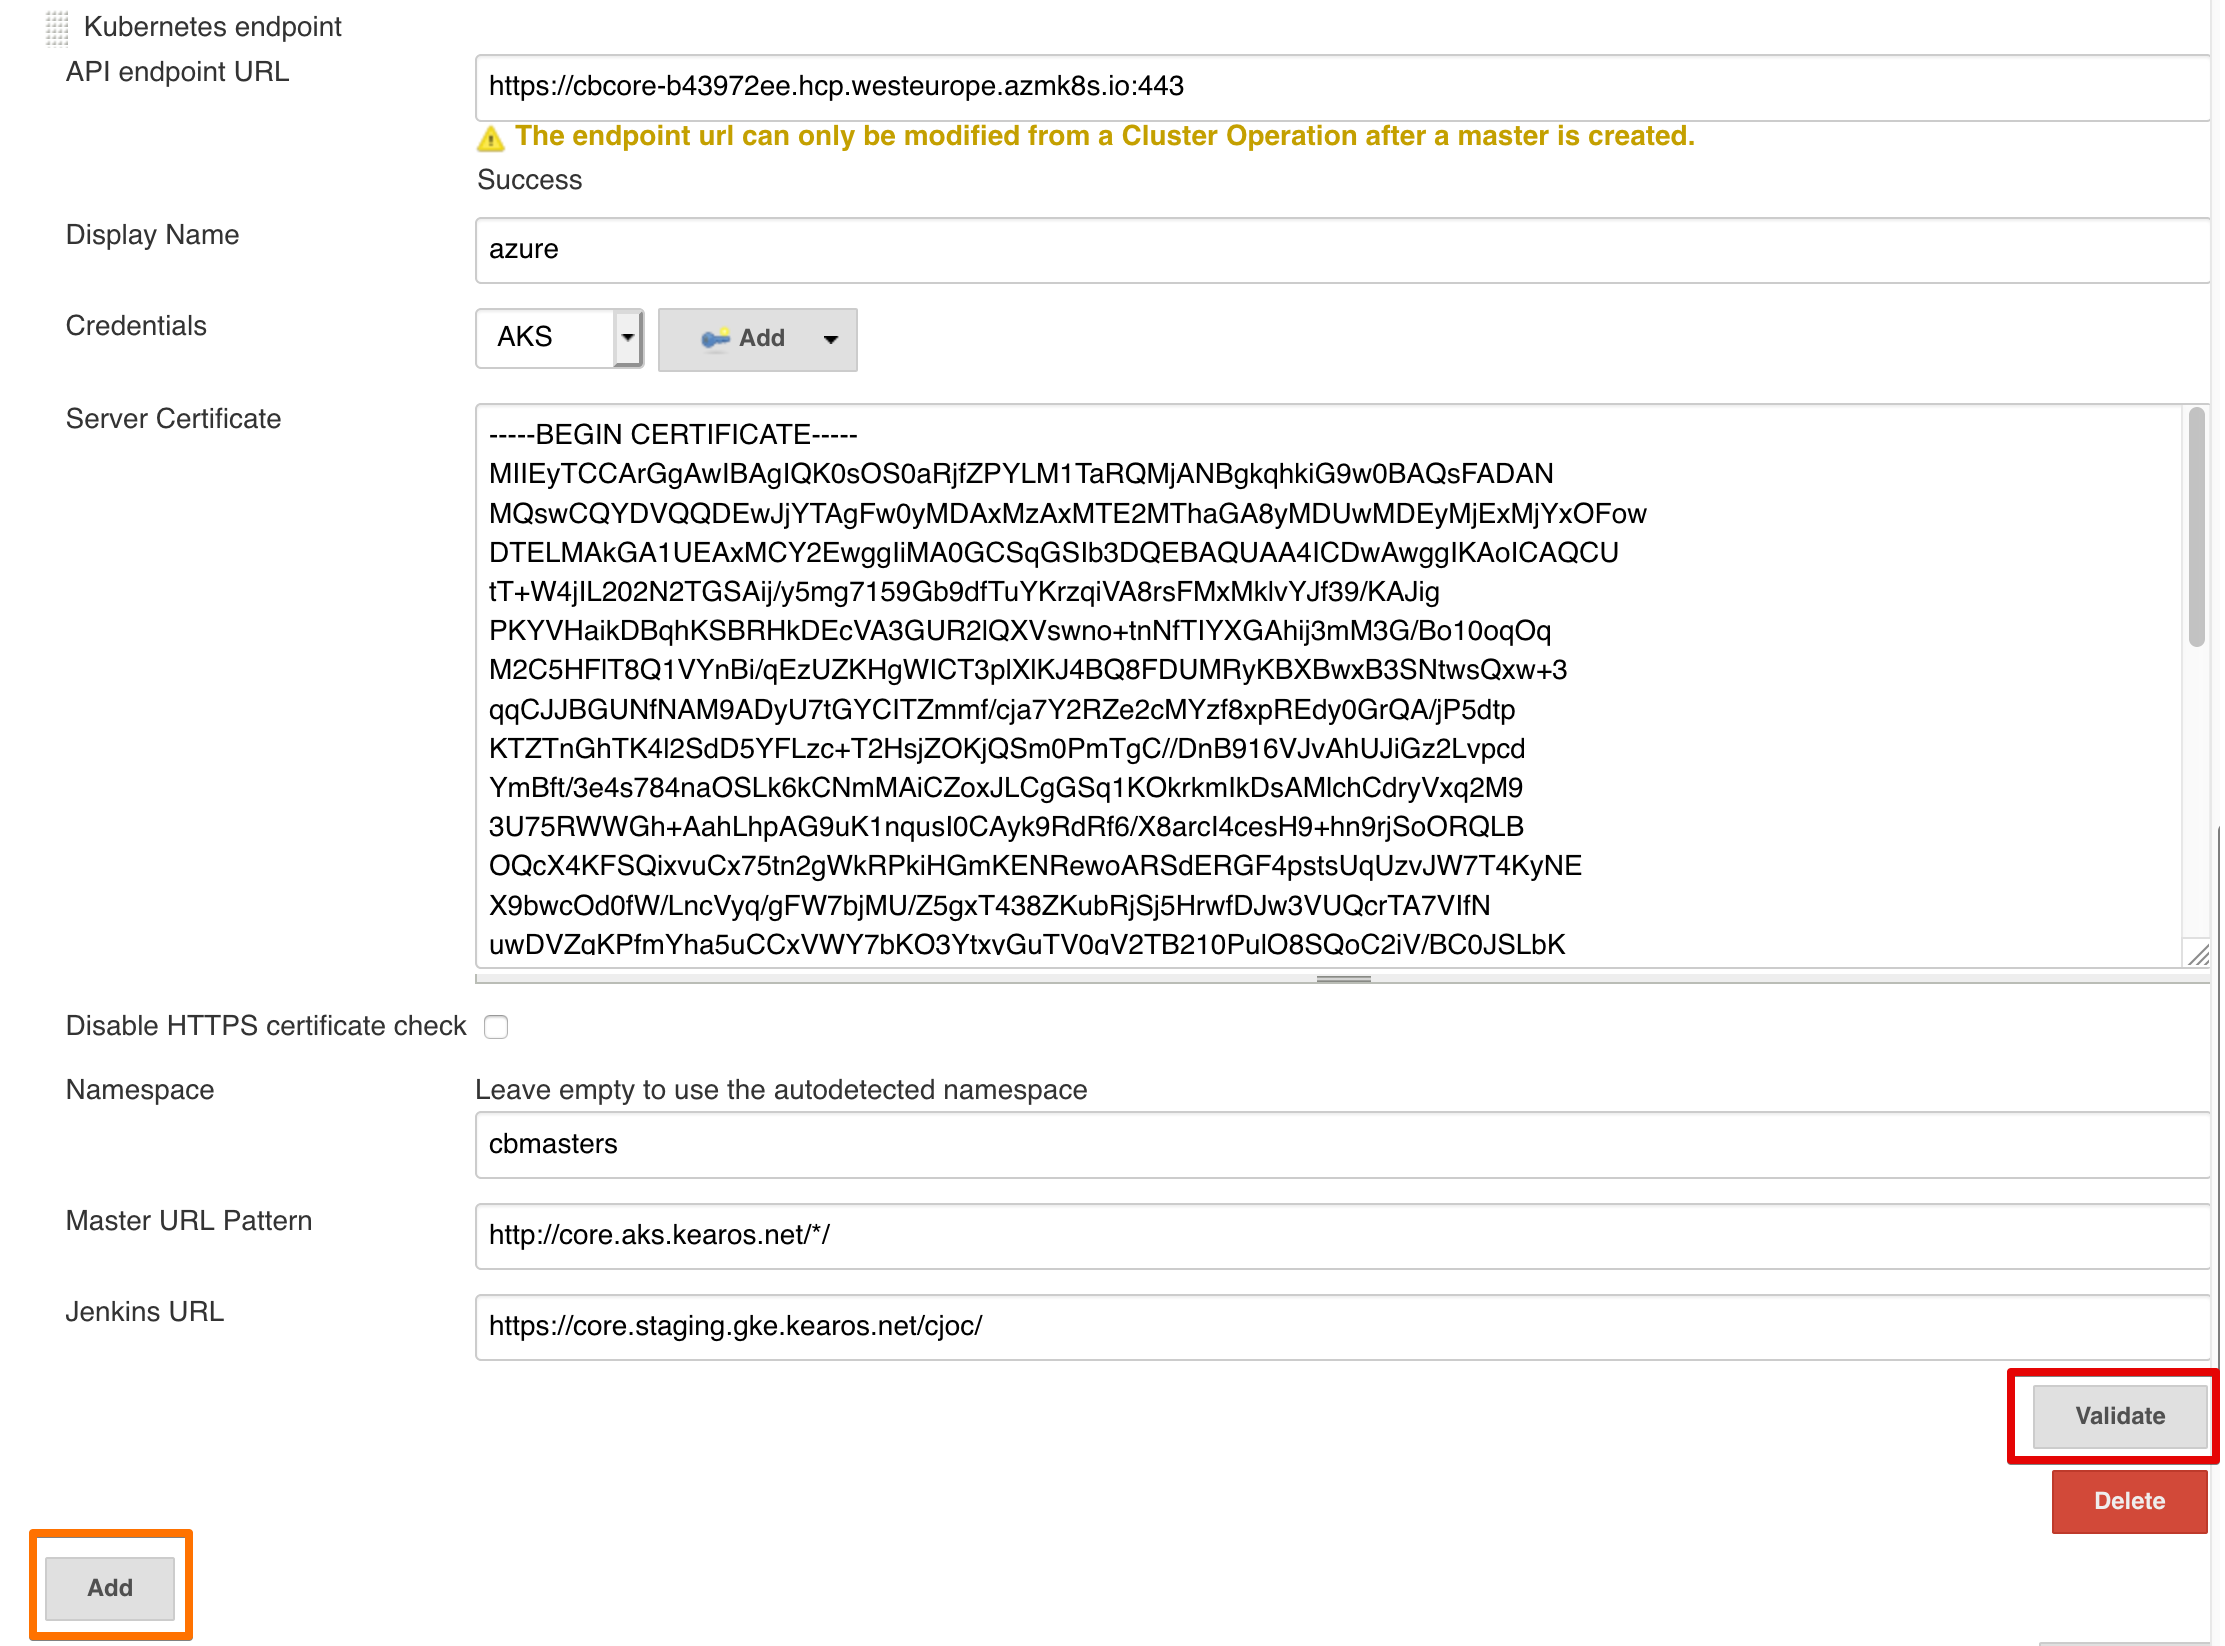
Every field is essential here.
- API endpoint URL: the Kubernetes API server url, you should have this saved somewhere (e.g.
~/.kube/config) - Display Name: the name by which you can refer to this endpoint
- Credentials: credentials of the Service Account that can access the Kubernetes API, you should have this saved somewhere (e.g.
~/.kube/config,users.user.token) - Server Certificate: the certificate of the Kubernetes API Server of the target cluster, copy paste the contents of
aks-kubernetes-api-server.pem - Namespace: the namespace we created on the AKS cluster which is configured to be used by Operations Center
- Master URL Pattern: assuming that your domain name for the other cluster is different, make sure you have a pattern in here
http://ake.mydomain.com/*/ensure all Master will have that host name and the Master name will replace the* - Jenkins URL: the URL of this Operations Center, you can leave this blank
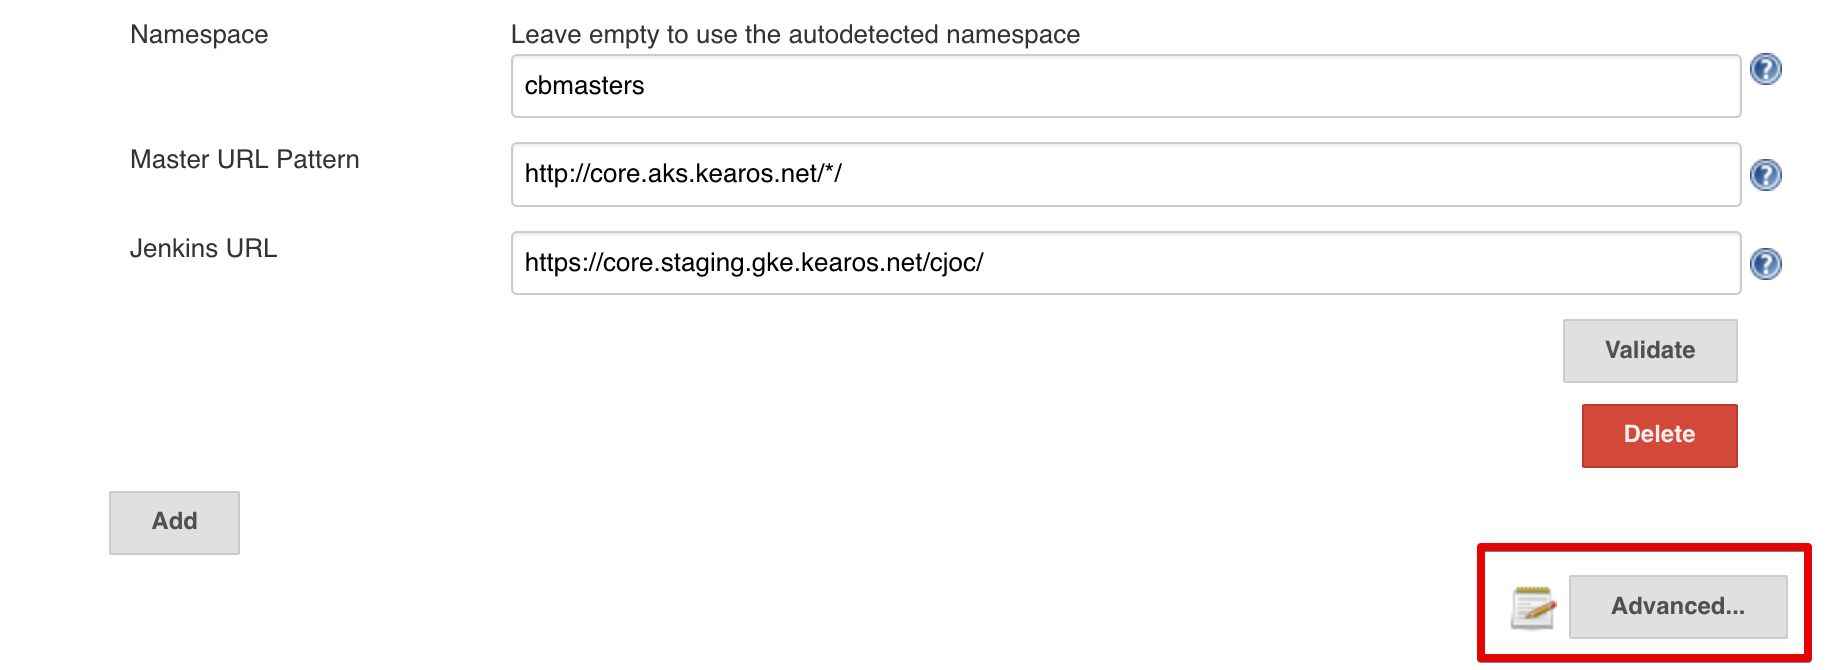
Master Template
We can open up the Master template configuration by hitting the Advanced button in the Kubernetes Master Provisioning block.
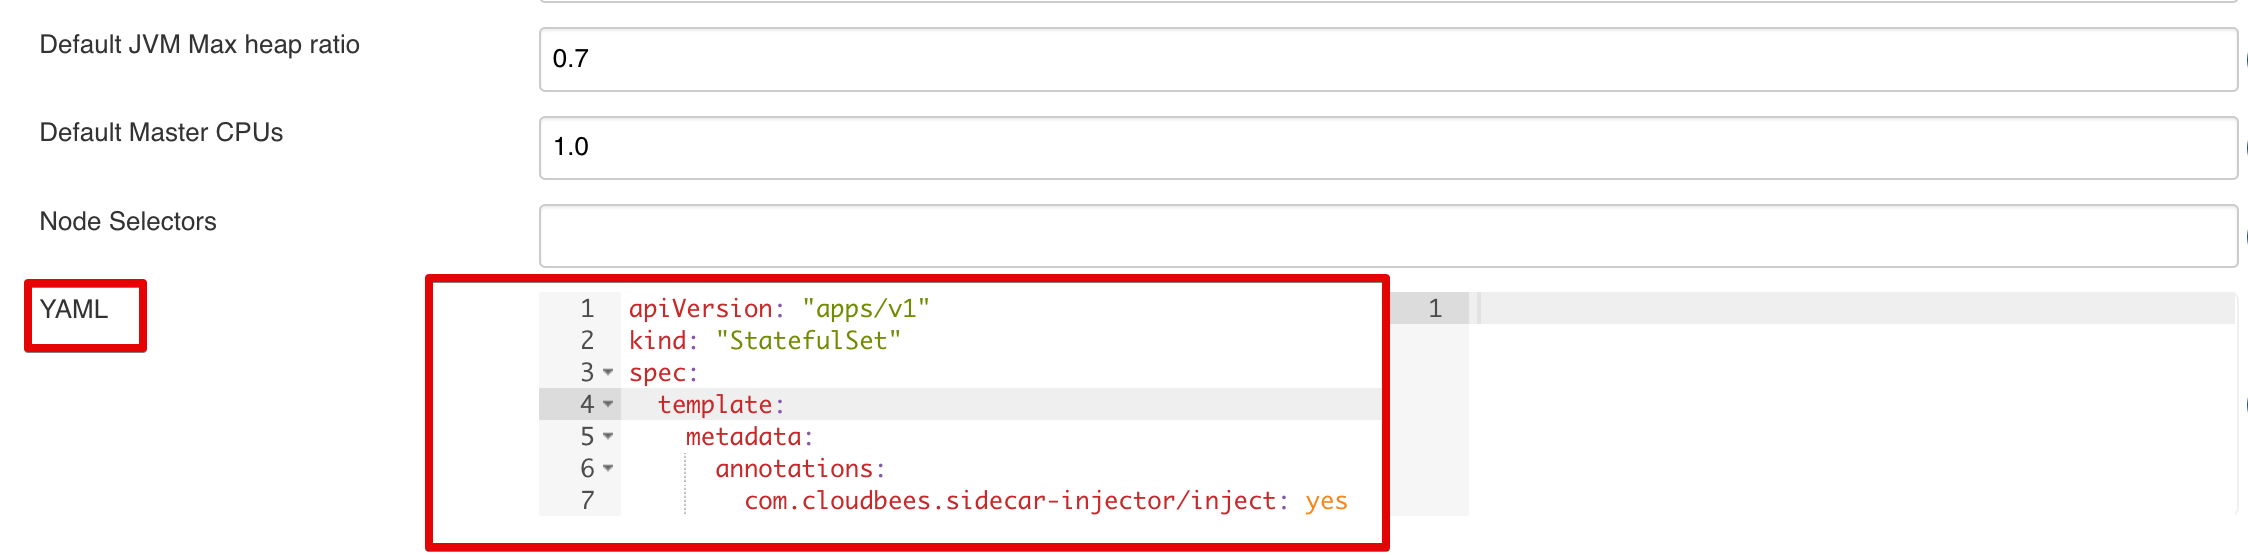
We have to add the annotation com.cloudbees.sidecar-injector/inject: yes to ensure the Masters will receive the certificates from the CloudBees Sidecar Injector - so they can talk to Operations Center.
The full snippet becomes this:
apiVersion: "apps/v1"
kind: "StatefulSet"
spec:
  template:
    metadata:
      annotations:
        com.cloudbees.sidecar-injector/inject: yes
And then hit the Save button at the bottom to persist our changes.
Create a Managed Master
To create a Managed Master, we go to the home page of the Operations Center. If you're unsure, go to <cjocHost>/cjoc/ or click on the top left breadcrumb Jenkins.
On the top right, hit the button New Master.

Give the Master an appropriate name and hit Go.
Tip
Sometimes the button is not clickable. Click next to the button with your mouse to make the text field lose focus. It should now be clickable.

The first thing we have to change, is the Cluster endpoint. This should now be a dropdown with kubernetes and Azure (or whatever you've named your endpoint). Select the one that points to your other cluster, in my case, Azure.

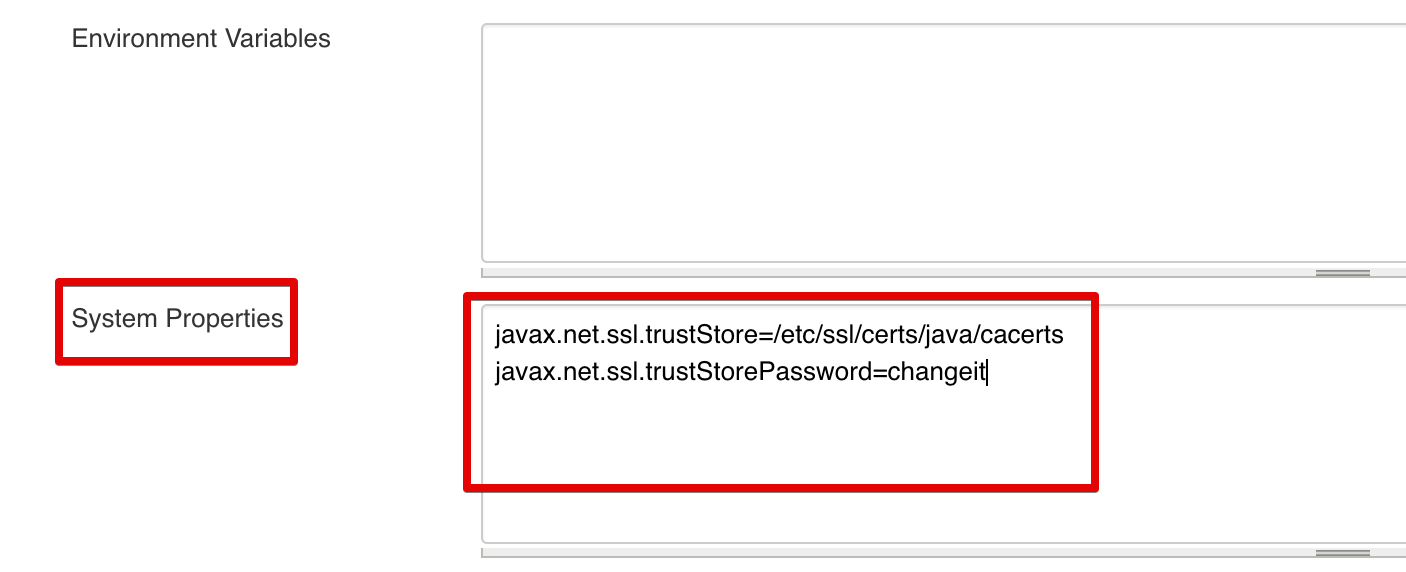
We have one more change to make. We have to tell the JVM where our truststore is with the additional certificates. To ensure we can contact the Operations Center and the Kubernetes API.
We do this by supplying the javax.net.ssl.trustStore and javax.net.ssl.trustStorePassword properties in the System Properties field. Each should be on its own line. If you're wondering what the location is, this is where the CloudBees Sidecar Injector will place the truststore.
If you run into SSL or truststore issues -not trust issues, I cannot help you with those - you can enable debug logging by adding the following property.
Hit the Save button at the bottom, and you should be good to go!