CloudBees CI - Multi Cluster GKE
Imagine you have a whole range of departments and development teams. Preferably you want to serve them with a standardized SDA(Software Delivery Automation) platform, but at the same time, make sure they pay for their usage.
I don't think this is too far fetched or something terrible. I think it makes sense. In this light, CloudBees Core now supports running on multiple Kubernetes clusters.
In this guide, we're going to explore how to run CloudBees Core on two GKE cluster at the same time. And how to deal with the details of getting the namespace configured, certificates, Kubernetes API tokens and so on and so forth.
Prerequisites
- The ability to create two GKE clusters
- CloudDNS enabled
- valid domain name
Steps to do
High over, we have to do the following steps:
- create and configure GKE cluster One
- create GCP service account for accessing CloudDNS
- this is per GCP Project, if cluster two is in another project, repeat this
- install Operations Center
- create GCP service account for accessing CloudDNS
- create and configure GKE cluster Two
- create GCP service account for accessing GKE
- create a Managed Master in both clusters
- configure Operations Center
- create managed masters
Create and Configure Cluster One
The easiest way to create and manage a cluster is with Terraform.
Note
I will use GCP_PROJECT_ONE and one.domain.com as placeholders for the Google Project ID and domain name respectively. You will need to change these to reflect your configuration.
The assumption in this guide is that the clusters are in two different projects. This doesn't have to be so be, so feel free to use the same project id and domain name for both clusters.
To create and configure cluster one, we execute the following steps:
- Create Cluster With Terraform
- Create Cloud DNS Zone
- Install Bootstrapping services (certmanager, ingress controller, external dns)
- Install CloudBees CI
- Configure External Access
1. Create Cluster With Terraform
We create four files:
main.tfcontaining the provider informationvariables.tfcontaing the variables (and their defaults)cluster.tfcluster definitionnodepool.tfhouses our node pool definition, currently one, but should be easy to add more if desired
Main
main.tf
Variables
variables.tf
variable "project" { }

variable "name" {
  description = "The name of the cluster (required)"
  default     = "jvandergriendt_cluster_one"
}

variable "description" {
  description = "The description of the cluster"
  default     = "CloudBees CI environment for jvandergriendt"
}

variable "location" {
  description = "The location to host the cluster"
  default     = "europe-west4"
}

variable "cluster_master_version" {
  description = "The minimum kubernetes version for the master nodes"
  default     = "1.15.9-gke.8"
}

variable "np1count" {
  description = "The initial Node Count for NodePool 2"
  default     = 1
}

variable "np1machinetype" {
  description = "GCP Machine Type for Nodepool 1"
  default     = "e2-standard-2"
}
Cluster
cluster.tf
resource "google_container_cluster" "primary" {
  name        = var.name
  location    = var.location

  # We can't create a cluster with no node pool defined, but we want to only use
  # separately managed node pools. So we create the smallest possible default
  # node pool and immediately delete it.
  remove_default_node_pool  = true
  initial_node_count        = 1
  resource_labels           = {
    environment = "development"
    created-by  = "terraform"
    cb-owner    = "professional-services"
  }

  # Configuration options for the NetworkPolicy feature.
  network_policy {
    # Whether network policy is enabled on the cluster. Defaults to false.
    # In GKE this also enables the ip masquerade agent
    # https://cloud.google.com/kubernetes-engine/docs/how-to/ip-masquerade-agent
    enabled = true

    # The selected network policy provider. Defaults to PROVIDER_UNSPECIFIED.
    provider = "CALICO"
  }
}
Nodepools
nodepool.tf
resource "google_container_node_pool" "nodepool1" {
  name       = "pool1"
  location   = var.location
  cluster    = google_container_cluster.primary.name
  node_count = var.np1count

  management {
    auto_repair  = true
    auto_upgrade = true
  }

  autoscaling {
    min_node_count = 2
    max_node_count = 5
  }

  node_config {
    machine_type = var.np1machinetype
    oauth_scopes = [
      "https://www.googleapis.com/auth/compute",
      "https://www.googleapis.com/auth/devstorage.read_only",
      "https://www.googleapis.com/auth/logging.write",
      "https://www.googleapis.com/auth/monitoring",
      "https://www.googleapis.com/auth/ndev.clouddns.readwrite",
      "https://www.googleapis.com/auth/cloud-platform"
    ]
  }
}
Execute Terraform Steps
2. Create Cloud DNS Zone
Gcloud
gcloud dns managed-zones create one-domain-com --dns-name one.domain.com. \
      --description "Example DNS zone"
Terraform
main.tf
Create GCP Service Account for accessing Cloud DNS
UI
In GCP's IAM/service Account screen, create a new Service Account.
Give the service account two roles:
- Project Viewer
- DNS Admin
Once done, create a JSON key and download this. Rename the file to credentials.json.
Gcloud
Configure Credentials In Cluster
Create the Kubernetes namespace bootstrap and add the credentials to the namespace.
3. Install Bootstrapping
Nginx Ingress
Important
We assume Cluster One will be the cluster hosting Operations Center.
This means Cluster One needs to expose the port 50000 via the LoadBalancer. Nginx can do this automatically, if we add a tcp configuration in the values.yaml.
Cluster Two should not get this configuration as it will throw errors and polute your Nginx Ingress Controller logs. So be mindful that there are two different files and two different commands.
=== "Update Helm repositories
ingress-values-c1.yaml
ingress-values-c2.yaml
Certmanager
certmanager-values.yaml
cluster-issuer.yaml
apiVersion: cert-manager.io/v1alpha2
kind: ClusterIssuer
metadata:
  name: letsencrypt-prod
spec:
  acme:
    email: joostvdg@gmail.com
    privateKeySecretRef:
      name: letsencrypt-prod
    server: https://acme-v02.api.letsencrypt.org/directory
    solvers:
    - dns01:
        clouddns:
          project: GCP_PROJECT_ONE
          serviceAccountSecretRef:
            key: credentials.json
            name: external-dns-gcp-sa
External DNS Controller
extdns-values.yaml
4. Install CloudBees CI
cloudbees-ci-values.yaml
5. Manually Configure External Access
Caution
This configuration is only required if you do not use the Nginx Ingress Helm Chart.
If you do, this is already configured for you in the Nginx Ingress paragraph earlier.
If you're curious how to configure this manually, read on!
To allow Master to connect back to Operations Center from another cluster, two ports must be open, 443 (or 80 if no TLS) and 50000 (if you've kept the default).
For this we enable tcp-services and configure the 50000 port on the deployment and service (Kubernetes resources) of our Nginx Ingress.
How to change the Nginx Ingress configuration depends on how you've installed it. For sake of brevity, I will simply edit the resources via a kubectl edit (hint: don't do this in production).
TCP Services ConfigMap
To enable the TCP services, we need to take three steps:
- create a config map with the configuration
- enable tcp services in the deployment and point to the configmap
- update the service to listen to port
50000
nginx-config-map.yaml
Info
cloudbees-ci is the namespace my CJOC runs in.
Change this if your CJOC runs elsewhere.
Update Nginx Deployment
Once this is done, we can edit the controller's deployment.
We have to make two changes:
- add the tcp-services coniguration
- add the port
50000configuration
Among the container args, we add --tcp-services-configmap.
    spec:
      containers:
      - args:
        - /nginx-ingress-controller
        ...
        - --tcp-services-configmap=kube-system/tcp-services
Next, we edit the same deployment, and add the tcp port.
We will add the 50000 to the container ports.
It will then look something like this.
ports:
- containerPort: 80
name: http
protocol: TCP
- containerPort: 443
name: https
protocol: TCP
        - containerPort: 50000
          name: jnlp
          protocol: TCP
Update Nginx Service
Last but not least, we also have to update the Nginx Ingress service resource.
We add a similar port definition.
Which will then look something like this (clusterIp and nodePort's will be different).
spec:
clusterIP: .....
externalTrafficPolicy: Cluster
ports:
- name: http
nodePort: 31406
port: 80
protocol: TCP
targetPort: http
- name: https
nodePort: 30391
port: 443
protocol: TCP
targetPort: https
  - name: jnlp
    nodePort: 31559
    port: 50000
    protocol: TCP
    targetPort: jnlp
Create and Configure ClusterTwo
Creating Cluster Two is similar to the creation of Cluster One. We re-use some steps of the Creation Cluster One segment, and below are the new steps. Do ensure to replace the placeholders for the cluster name, project id, and domain with the appropriate values for Cluster Two.
To create and configure Cluster Two, we execute the following steps:
- Create Cluster With Terraform see step 1
- Create Cloud DNS Zone see step 2
- Install Bootstrapping services see step 3
- Create GCP service account for accessing GKE
- Configure Receiving Namespace
4. Create GCP service account for accessing GKE
UI
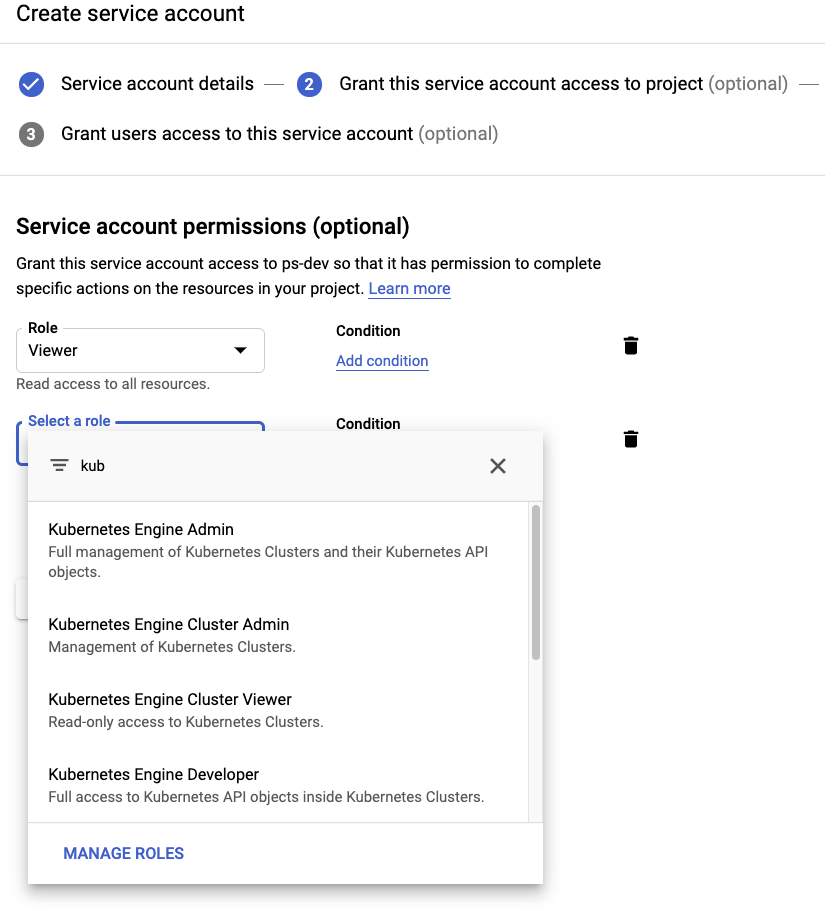
Open the Hamburger Menu on the top left, and select IAM & Admin → Service Accounts -> CREATE SERVICE ACCOUNT (top middle).
Give it a descriptive name and two roles:
Project / ViewerKubernetes Engine Cluster Admin(or,Kubernetes Engine Developer)
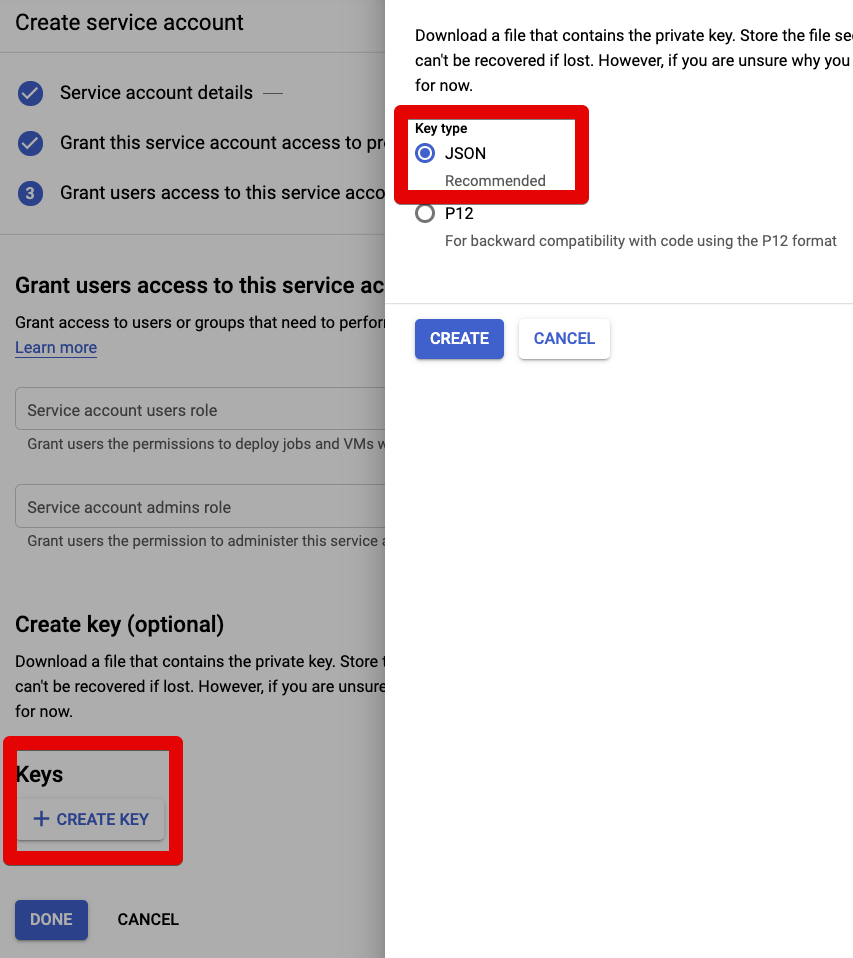
Then hit the + CREATE KEY button, and select (and download) the JSON key.
Gcloud
If you prefer to create the SA via Gcloud CLI:
Read Google Cloud's documentation on Roles for further information.
5. Configure Receiving Namespace
Prepare Namespace
Caution
Make sure you are executing the steps on Cluster Two!
namespace-masters-values.yaml
Give User Admin Rights
I'm not sure if you can figure out the user id upfront. When you create a Master in this cluster, you'll likely see an error that user 98389745879 has no permission to create certain resources, such as the StatefulSet.
Run the command below to give this user permission to create these Kubernetes resources.
kubectl create clusterrolebinding clusterrolebinding-name \
--clusterrole cluster-admin \
--user $USER_ID
If you don't know the user id of your GCP Service Account, go ahead with the next chapter. We refer back to this paragraph.
Create Managed Master in both clusters
- Create CloudBees CI Credential with GCP Service Account
- Create second Kubernetes endpoint configuration
- Create Managed Master in Cluster One
- Create Managed Master in Cluster Two
Create CloudBees CI Credential with GCP Service Account
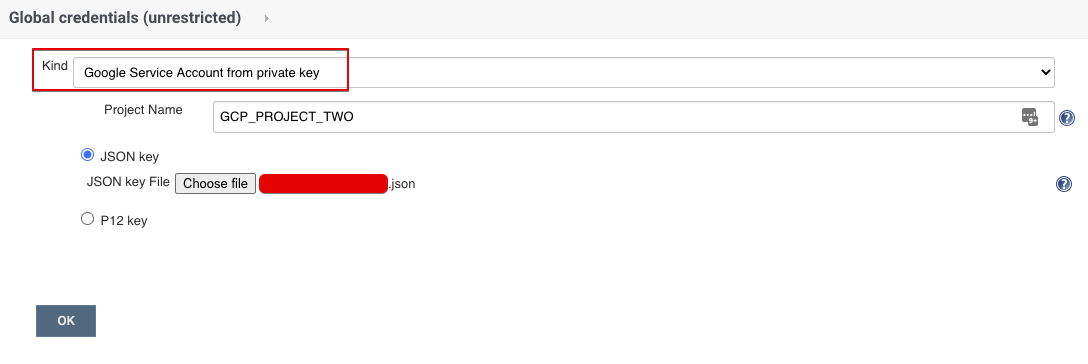
This requires that you've created the GCP Service Account with access to GKE and generated the JSON Key.
You can then upload this JSON Key as a credential to CloudBees CI via the Credentials kind Google Service Account from private key.
Create second Kubernetes endpoint configuration
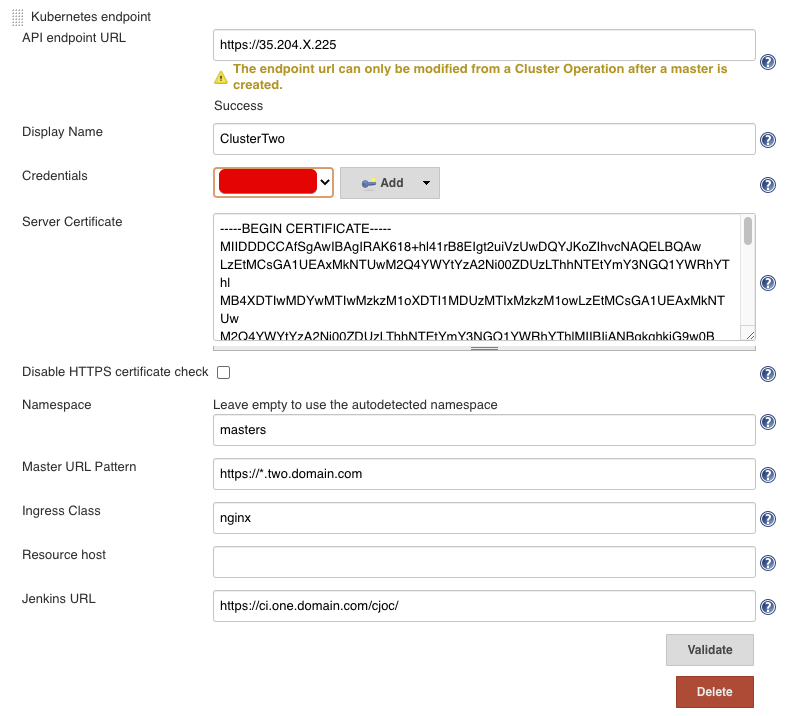
Now we create a second Kubernetes Endpoint in the cluster.
The fields to fill in:
- API endpoint URL: the cluster endpoint of Cluster Two
- Display Name: display name so you know which cluster you create a Master in
- Credentials: the credentials we create in #Create CloudBees CI Credential with GCP Service Account
- Server Certificate: the server certificate of Cluster Two
- Namespace: the namespace you have prepared, in our case
masters - Master URL Pattern: the DNS pattern for Cluster Two, in our case
https://*.two.domain.com - Ingress Class: unless you used a different Ingress than in this guide, set to
nginx - Jenkins URL: the external URL of the Operations Center
Info
If you don't know the API Endpoint or the Server Certificate, you can retrieve this from your ~/.kube/config file. Assuming you have access to Cluster Two, you will the details of the cluster there.
For the Server Certificate, you have to Base64 decode this. You can do so on mac/linux by echo + pipe into base64.
For example, on a mac:
Create Managed Masters
To enable automatic TLS for the Masters in the clusters, you can either edit the Ingress when creating the Mater, or update the Kubernetes Master Provisioning before hand.
Update Master Provisioning
Manage Jenkins->Configure System->Kubernetes Master Provisioning->Advanced->YAML
YAML field
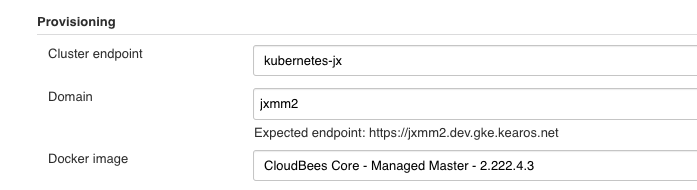
Creating Master
In the top right corner, there's a button "New Master", push it and give your master a name.
In the field Cluster Endpoint, select the one for Cluster Two. Confirm the URL has the correct domain and hit save.
Info
The process for creating a Master in Cluster One and Cluster Two are the same. The only difference is the Kubenernetes endpoint used.
Give User Permissions In Cluster Two
As discussed in the Create Cluster Two chapter, the paragraph #Give User Admin Rights explains how to do so.