CloudBees CI - Multi Cluster EKS
To create and configure cluster one, we execute the following steps:
- Create Cluster via EKSCTL
- Create Route53 Hosted Zone
- Install Bootstrapping services (certmanager, ingress controller, external dns)
- Install CloudBees CI
1. Create Cluster via EKSCTL
For some tasks, you need create IAM access for the workloads.
There are various ways to do this, I urge you to explore those that are suitable to you.
For simplicity, you can let EKSCTL generate them for you on the node instances. Be careful, as this means any Pod on these nodes can use the access.
For production clusters, you either want Service Account IAM access, or multiple node pools where workloads are restricted to node pools related to their level of required access.
Read here more information on eksctl and IAM policies.
Note
When using this example for Cluster Two, make sure to change the metadata.name.
cluster.yaml
apiVersion: eksctl.io/v1alpha5
kind: ClusterConfig

metadata:
  name: cluster-jvandergriendt
  region: us-east-1
  version: "1.15"
  tags:
    CreatedBy: jvandergriendt

nodeGroups:
  - name: ng1-masters
    instanceType: m5.large
    minSize: 3
    maxSize: 8
    volumeSize: 100
    volumeType: gp2
    labels:
      nodegroup-type: masters
    iam:
      withAddonPolicies:
      autoScaler: true
      externalDNS: true
      certManager: true
      ebs: true

availabilityZones: ["us-east-1d", "us-east-1f"]
2. Create Route53 Hosted Zone
- via the UI: https://docs.aws.amazon.com/Route53/latest/DeveloperGuide/CreatingHostedZone.html
- Via CLI: https://docs.aws.amazon.com/cli/latest/reference/route53/create-hosted-zone.html
3. Install Bootstrapping services
Nginx
=== "Update Helm repositories
ingress-values-c1.yaml
ingress-values-c2.yaml
External DNS
- https://github.com/kubernetes-sigs/external-dns/blob/master/docs/tutorials/aws.md
- https://github.com/helm/charts/tree/master/stable/external-dns
- https://github.com/bitnami/charts/tree/master/bitnami/external-dns
- https://github.com/bitnami/charts/tree/master/bitnami/external-dns#tutorials
exdns-values.yaml
Apply Policy
Caution
If you have already configured the policies in the cluster.yaml, you do not need to do this step.
The documentation warns not to use this policy, as it gives every Pod in the cluster the ability to update Route53 records of the specified hostedzone (by default all, *).
aws iam put-role-policy  --region us-east-1 --profile cloudbees-eks \
    --role-name ${ROLE} \
    --policy-name eks-jvandergriendt1-ExdnsPolicy \
    --policy-document file://exdns-policy.json
exdns-policy.json
{
  "Version": "2012-10-17",
  "Statement": [
    {
      "Sid": "Stmt1591221999371",
      "Action": [
        "route53:ChangeResourceRecordSets"
      ],
      "Effect": "Allow",
      "Resource": "arn:aws:route53:::hostedzone/*"
    },
    {
      "Sid": "Stmt1591222034162",
      "Action": [
        "route53:ListHostedZones",
        "route53:ListResourceRecordSets",
        "route53:GetChange"
      ],
      "Effect": "Allow",
      "Resource": "*"
    }
  ]
}
Certmanager
certmanager-values.yaml
cluster-issuer.yaml
apiVersion: cert-manager.io/v1alpha2
kind: ClusterIssuer
metadata:
  name: letsencrypt-prod
spec:
  acme:
    email: joostvdg@gmail.com
    privateKeySecretRef:
      name: letsencrypt-prod
    server: https://acme-v02.api.letsencrypt.org/directory
    solvers:
    # example: cross-account zone management for example.com
    # this solver uses ambient credentials (i.e. inferred from the environment or EC2 Metadata Service)
    # to assume a role in a different account
    - selector:
        dnsZones:
          - "example.com"
      dns01:
        route53:
          region: us-east-1
          hostedZoneID: DIKER8JEXAMPLE
4. Install CloudBees CI
cloudbees-ci-values.yaml
Prepare Cluster Two Access
First, follow step 1, 2 and 3 in the previous chapter but now for the second cluster.
Then, come back and continue with the next steps below.
Create & Prepare Namespace
Caution
Make sure you are executing the steps on Cluster Two!
namespace-masters-values.yaml
Create Managed Master in both clusters
- Configure Operations Center with Access To EKS Cluster Two
- Create second Kubernetes endpoint configuration
- Create Managed Master in Cluster One
- Create Managed Master in Cluster Two
Configure Operations Center with Access To EKS Cluster Two
This is complicated, there are various ways of getting access. These all depend on IAM controls and the policies that exist within your organization.
AWS IAM Authenticator
For more information, you can read this PR on the Jenkins Kubernetes Plugin. And here for downloading the aws-iam-authenticator binary for the target platform.
A set of steps that can work is the following:
curl -o aws-iam-authenticator https://amazon-eks.s3.us-west-2.amazonaws.com/1.16.8/2020-04-16/bin/linux/amd64/aws-iam-authenticator
Then, you have to update the StatefulSet of Operations Center to include /var/jenkins_home/bin in the PATH.
You can add the snippet below to the cloudbees-ci.yaml and run a helm upgrade cloudbees-ci ... command (the same as the helm install but replace install with upgrade).
ContainerEnv:
  - name: PATH
    value: "/usr/local/sbin:/usr/local/bin:/usr/sbin:/usr/bin:/sbin:/bin:/var/jenkins_home/bin"
Then, you create a kubeconfig file with the information for the EKS cluster, see below. And add this as a secret file credential to Operations Center's credentials. Use this credential in the Kubernetes Master Provision's Endpoint for Cluster Two.
kubeconfig
clusters:
- cluster:
    certificate-authority-data: <redacted>
    server: <redacted>
  name: <redacted>
contexts:
- context:
    cluster: <redacted>
    user: <redacted>
  name: <redacted>
current-context: <redacted>
kind: Config
preferences: {}
users:
- name: <redacted>
  user:
    exec:
      apiVersion: client.authentication.k8s.io/v1alpha1
      env:
        - name: AWS_ACCESS_KEY
          value: <redacted>
        - name: AWS_SECRET_ACCESS_KEY
          value: <redacted>
      args:
      - token
      - -i
      - eks-cluster-name
      command: aws-iam-authenticator
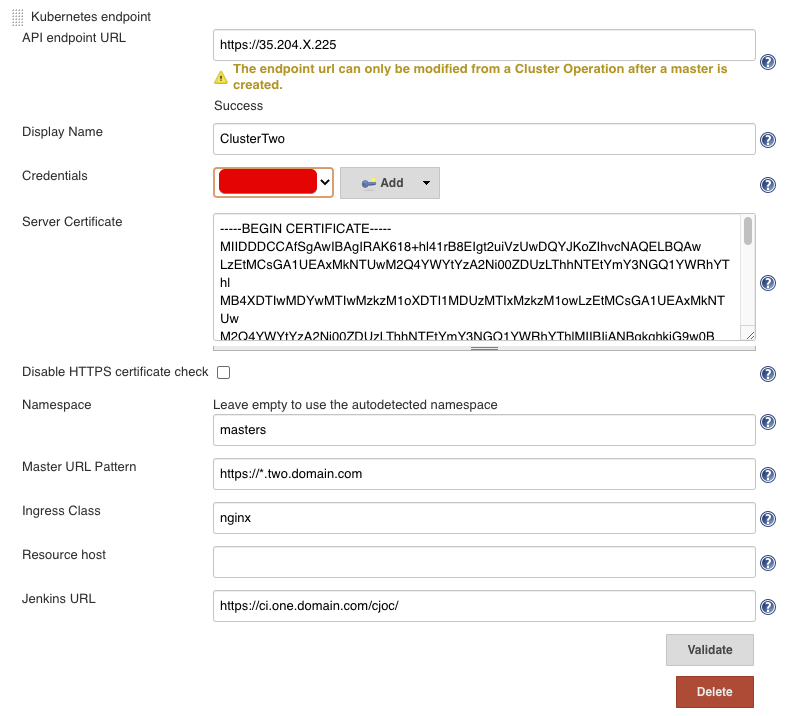
Create second Kubernetes endpoint configuration
Now we create a second Kubernetes Endpoint in the cluster.
The fields to fill in:
- API endpoint URL: the cluster endpoint of Cluster Two
- Display Name: display name so you know which cluster you create a Master in
- Credentials: the credentials you created for IAM access to Cluster Two
- Server Certificate: the server certificate of Cluster Two
- Namespace: the namespace you have prepared, in our case
masters - Master URL Pattern: the DNS pattern for Cluster Two, in our case
https://*.two.domain.com - Ingress Class: unless you used a different Ingress than in this guide, set to
nginx - Jenkins URL: the external URL of the Operations Center
Info
If you don't know the API Endpoint or the Server Certificate, you can retrieve this from your ~/.kube/config file. Assuming you have access to Cluster Two, you will the details of the cluster there.
For the Server Certificate, you have to Base64 decode this. You can do so on mac/linux by echo + pipe into base64.
For example, on a mac:
Update Master Provisioning
Manage Jenkins->Configure System->Kubernetes Master Provisioning->Advanced->YAML
YAML field
Cleanup
For each cluster, we can now run the eksctl cleanup.
Important
If you attached any policies to the nodes, you have to remove them first!
Else you get this error:
AWS::IAM::Role/NodeInstanceRole: DELETE_FAILED – "Cannot delete entity, must delete policies first. (Service: AmazonIdentityManagement; Status Code: 409;
To do so, you can use aws iam delete-role-policy.