Configuration As Code
What we will do is leverage CloudBees CI's(CBCI) Configuration as Code (CasC) to automate as much of the CBCI installation as possible.
Solution
CBCI Modern only!
This solution is for CloudBees CI Modern, on a recent Kubernetes cluster.
Prerequisites
- A running Kubernetes cluster
- Helm
- Helmfile
- Helm diff plugin
- Kubectl with access to the Kubernetes cluster
- CloudBees CI license
Install Helm diff
Steps to take
- Bootstrap the Kubernetes cluster
- Setup Helm configuration (we'll use Helmfile)
- Setup Configuration as Code for the Operations Center
- Setup Configuration as Code for Controllers
Tools Included
- nginx-ingress: our Ingress Controller for accessing web applications in the cluster
- external-dns: manages the DNS entries in our Google CloudDNS Zone, so each Ingress resource gets its own unique DNS entry, this also enables us to generate specfic certificates via cert-manager
- cert-manager: manages certificate requests, so all our web applications can use TLS
- openldap: an LDAP server, for having an actual representative authentication realm for CBCI
- We use Geek-Cookbook's version.
- prometheus: we use Prometheus to collect metrics from the resources in the cluster
- grafana: we use Grafana to turn the metrics from Prometheus into viewable dashboards
- the dashboard that is installed comes from here
Bootstrap Kubernetes Cluster
Create Namespaces
We need a namespace for nginx-ingress, cert-manager, and CloudBees CI.
kubectl create namespace cbci
kubectl create namespace cert-manager
kubectl create namespace nginx-ingress
Configure cert-manager namespace
Cert Manager will perform some validations on Ingress resources. It cannot do that on its own Ingress resource, so we label the cert-manager namespace so Cert Manager ignores itself.
External DNS Config
In my case, I am using the External DNS Controller with Google Cloud and a Cloud DNS Zone.
For this I have created a GCP Service Account with a credentials file (the JSON file). If you want both cert-manager and nginx-ingress to directly use the Cloud DNS configuration to bypass the more lenghty alternatives (such as http verification) you need to supply them with the GCP Service Account.
Read here for more on using the External DNS Controller with GCP.
For other options, please refer to the External DNS Controller docs, which has guides for all the supported environments.
Configure CBCI namespace
We need to configure the LDAP password secret, so our CasC for OC bundle can configure LDAP while JCasC translates the placeholder to the actual password.
This should be the same value as the ldapGlobalPassword in the helmfile-values.yaml.
kubectl create secret generic ldap-manager-pass --from-literal=pass=${LDAP_GLOBAL_PASSWORD} --namespace cbci
Helm(file) Configuration
Helmfile Layout
The files that matter to Helmfile are the following.
.
├── helmfile-values.yaml
├── helmfile.yaml
└── values
    └── *.yaml.gotmpl
Helmfile.yaml
The helmfile.yaml file has several sections.
Let's look at each section separately, before I share the whole file.
We start with the environments. In this case, I have just one environments, default, but you can choose to have more, opting to have seperate value files for Staging and Production for example.
- the default environment is chosen if you do not choose an environment
As Helmfile will interact with Helm for us, we can properly manage our Helm repositories. If we give Helmfile a list of Helm repositories, it will make to update them prior to any installation, so you don't have to worry about that.
repositories:
- name: stable
  url: https://charts.helm.sh/stable
- name: cloudbees
  url: https://charts.cloudbees.com/public/cloudbees
- name: jetstack
  url: https://charts.jetstack.io
- name: bitnami
  url: https://charts.bitnami.com/bitnami
- name: geek-cookbook
  url: https://geek-cookbook.github.io/charts/
- name: grafana
  url: https://grafana.github.io/helm-charts
- name: prometheus-community
  url: https://prometheus-community.github.io/helm-charts
Another thing we cannot steer if Helmfile does the interaction with Helm for us, are Helms flags. Some of these flags might be important for you, I've chosen to set these.
helmDefaults:
  wait: true # (1)
  timeout: 600 # (2)
  historyMax: 25 # (3)
  createNamespace: true # (4)
- We will wait on the resources becoming ready before creating the next. This ensures our dependencies are honored.
- I personally always set an explicit timeout, so it is easy to spot if we hit a timeout. The timeout refers to how long we wait for the resources to be ready.
- How many update versions Hel tracks. I like to be able to rollback and have a bit of history.
- Some namespaces we created in the bootstrap, the rest should get created when required. This setting will make sure that any Helm installation in a new namespace, will have it created.
Next up are the releases. These are the Helm chart releases. For the latest versions and the configurable properties, I recommend using ArtifactHub.io.
Releases need a name, chart, version, and values. The chart, is a combination of the source repository (how you named it) and the chart name in that repository. In our case, this would be cloudbees, because I called the CloudBees Helm repository that, and then /cloudbees-core. While the product has been renamed, the Helm chart has kept the CloudBees Core name.
Another thing you can see, is the needs list. This tells Helmfile to install those releases (by name) before installing this one.
releases:
- name: cbci
  namespace: cbci
  chart: cloudbees/cloudbees-core # (1)
  version: '3.37.2+7390bf58e3ab'
  values:
  - values/cbci.yaml.gotmpl  # (2)
  needs: # (3)
  - nginx-ingress
  - external-dns
  - cert-manager
  - ldap

- name: cm-cluster-issuer
  namespace: cert-manager
  chart: incubator/raw # (4)
  values:
  - values/cluster-issuer.yaml.gotmpl
  needs:
  - cbci
  - cert-manager
- The name of a Chart,
<Repository Name>/<Chart Name> - The values to use for this Helm installation. In this case we're specifying a Go template, signified by the
yaml.gotmplextension. - Informs Helmfile there is a dependency relationship between this Release and others, making sure it install them in the proper order.
incubator/rawlets you include templated files directly, without having a Helm release
Helmfile supports various ways of supplying the Helm values. In this example I'm using a Go template which lets us template the Helm chart installations. By using a template values file, we can re-use values accross Helm charts to ensure that if two or more Charts reference the same value, we can guarantee it is the same.
The second release, cm-cluster-issuer is a file that is in the same repository as the Helmfile configuration. This is why the chart is listed as incubator/raw, it lets you include templated Kubernetes manifests directly, without creating a Helm release.
Full Helmfile
Helmfile-values.yaml
As stated in the previous section, I have opted for using templated Helm values files. This lets me add placeholder values, which I can replace with values via Helmfile.
In the environments section, I referenced the file helmfile-values.yaml for the default, and only, environment. So let's take a look at this file.
There are mostly passwords in there, for Grafana and LDAP. There are also two values related to the External DNS Controller configuration, googleProject and googleASSecret.
Feel free to remove these, if you're not using GCP or you're not using the External DNS Controller.
adminEmail: # (1)
googleProject: # (2)
googleASSecret: external-dns-gcp-sa # (3)
ldapGlobalPassword:
ldapUser1Password:
ldapUser2Password:
ldapUser3Password:
grafanaUser:
grafanaPass:
- the admin email address used for the Cluster Issuer, and will receive notifications from Cert Manager for certificate expirations
- the Google Project id where the Cloud DNS Zone resides
- the name of the Kubernetes secret containing the GCP Service Account JSON file
Values Files
I won't list each of them here, they are all available in my CloudBees CI CasC repo on GitHub.
The Cluster Issuer is an optional resource. I personally always prefer having an automated DNS setup and HTTPS with matching Certificates (e.g., no wildcard certificates).
Optional
Only use this if you are using GCP, the External DNS Controller, and Cert Manager.
resources:
  - apiVersion: cert-manager.io/v1
    kind: ClusterIssuer
    metadata:
      name: letsencrypt-prod
    spec:
      acme:
        email: {{ .Values.adminEmail }}
        server: https://acme-v02.api.letsencrypt.org/directory
        privateKeySecretRef:
          name: letsencrypt-prod
        solvers: # (1)
        - selector: {}
          dns01:
            cloudDNS:
              project: {{ .Values.googleProject }}
              serviceAccountSecretRef:
                name: {{ .Values.googleASSecret }}
                key: credentials.json
- An empty 'selector' means that this solver matches all domains
The most important one of couse, is the Helm values for the CloudBees CI installation. It already contains some secret sauce that will help us with synchronizing the CasC for OC Bundle.
- OC Pod Annotations for Prometheus, so our Prometheus installation can scrape the Metrics from the OC
- Annotations for the Ingress resource, so we get a valid certificate from Cert Manager via our referenced Certificate Issuer
- Disable the Installation Wizard, and tell the OC where it can find its CasC Bundle
- Map the LDAP password secret as an environment variable, so JCasC can interpolate it
- Define a sidecar container with the Git Sync
- Define additional Pod volumes
- Define additional OC Container Volume Mounts
- Let CloudBees CI run Kubernetes agent in a separate namespace
- Enable the CloudBees CI Hibernation feature
Some of the things we're doing in this Helm file configuration:
- OC Pod Annotations for Prometheus, so our Prometheus installation can scrape the Metrics from the OC
- Annotations for the Ingress resource, so we get a valid certificate from Cert Manager via our referenced Certificate Issuer
- Tell the OC where it can find its CasC Bundle
- Define a sidecar container with the Git Sync with additional volume mounts (more at git-sync-for-casc-oc-bundle)
- Let CloudBees CI run Kubernetes agent in a separate namespace
- Enable the CloudBees CI Hibernation feature
Install Via Helmfile
To verify the Helm and Helmfile configuration is correct, you can run the validate command.
The output will be something like this:
Success
Adding repo cloudbees https://charts.cloudbees.com/public/cloudbees
"cloudbees" has been added to your repositories

Fetching cloudbees/cloudbees-core

Linting release=cbci, chart=/var/folders/f_/mpwdv8s16r7_zt43r3r7k20w0000gn/T/helmfile2581490205/cbci/cbci/cloudbees/cloudbees-core/3.37.2+7390bf58e3ab/cloudbees-core
==> Linting /var/folders/f_/mpwdv8s16r7_zt43r3r7k20w0000gn/T/helmfile2581490205/cbci/cbci/cloudbees/cloudbees-core/3.37.2+7390bf58e3ab/cloudbees-core
[WARNING] templates/cjoc-ingress.yaml: extensions/v1beta1 Ingress is deprecated in v1.14+, unavailable in v1.22+; use networking.k8s.io/v1 Ingress
[WARNING] templates/managed-master-hibernation-monitor-ingress.yaml: extensions/v1beta1 Ingress is deprecated in v1.14+, unavailable in v1.22+; use networking.k8s.io/v1 Ingress

1 chart(s) linted, 0 chart(s) failed
Assuming all your configuration is valid, you can now safely apply it to the cluster.
The output of that depends on your charts and their versions, and you will see the post-install messages of each chart. If, like me, you've configured the option helmDefaults.wait, then there will be pauses in the process, as Helmfile waits for the Helm install to finish before moving to the next.
CasC for OC
At the time of writing this (November 2021), Configuration as Code (CasC) for the Operations Center (OC) is still a Preview feature.
But aside from a few wrinkles that are about to be ironed out, CasC for OC is ready for prime time. Where applicable, I will mention the wrinkle and the workaround if required.
We will look at the following things:
- How to make OC use CasC
- How to structure the CasC Bundle
- How to configure some common items
- How to keep the Bundle up to date
- How to manage Items (such as Jobs, Folders, Controllers)
For all the details, my full working CasC for OC example is on GitHub.
What is a Bundle
CloudBees CI extends Jenkins Configuration as Code (JCasC) with additional configuration files, for a full Configuration as Code experience. This collection of files, is called a Bundle. A Bundle has a fixed structure.
For more information, please read creating a OC Bundle in the official documentation.
Make OC use CasC
Warning
There is a chicken and egg problem; unless you have a wildcard license, you need to start OC with the wizard, and either retrieve a valid license based on its Instance ID, or request a trial license.
From then on, you can use CasC to configure the OC, including the License (if you want).
To make OC use a CasC we need three things:
- have a valid CasC Bundle
- have an OC with the CasC plugins installed
- tell OC where its Bundle is
We will explore the first point in the next section. For the second point, we can use CasC to install those plugins and that ability is there by default. So luckily, we can ignore the chicken and egg problem there.
To tell OC to use a Bundle, we set a Java property with the directory where it can find the Bundle. We can set Java properties in the Helm chart, via the OperationsCenter.JavaOpts property. The property to set, is -Dcore.casc.config.bundle=, as you can see in the example below.
OperationsCenter:
  # other config ignored for example
  JavaOpts:
    -Djenkins.install.runSetupWizard=false
    -Dcore.casc.config.bundle=/var/jenkins_config/oc-casc-bundle-from-git/cloudbees-ci-casc/casc-for-oc/bundle

  # other config ignored for example
  ExtraVolumes: # (6)
  - name: casc-oc-volume
    configMap:
      name: casc-oc
  ExtraVolumeMounts: # (7)
  - name: casc-oc-volume
    mountPath: /var/jenkins_config/oc-casc-bundle
    readOnly: true
Help
If you're wondering how we configure that sidecar container and why, we'll dive into this, in the section: Keep Bundle up-to-date with Git Sync.
In this example, we use a sidecar container to synchronize the OC Bundle to a directory. Due to the structure of that repository, the Bundle is accessible at /var/jenkins_config/oc-casc-bundle-from-git/cloudbees-ci-casc/casc-for-oc/bundle.
Bundle Structure
Below is a snippet of my CasC for OC Bundle.
.
├── bundle.yaml
├── items
│   ├── controllers
│   │   ├── blue.yaml
│   │   └── yellow.yaml
│   ├── items.yaml
│   └── jobs
├── jenkins.yaml
├── plugins.yaml
└── rbac.yaml
The main items here are as follows:
bundle.yaml: the Bundle descriptor, informs CasC about the contents of this Bundleitems/: folder with with subfolders and items in their separate filesjenkins.yaml: the main configuration, essentially leveraging JCasCplugins.yaml: list of plugins to install, limited to CAP pluginsrbac.yaml: where we configure Role Based Access Control, global roles and global groups
RBAC Configuration
The rbac.yaml contains the global configuration. Configuration for folders or Controllers is defined in their respective item manifest files. We'll explore these later.
Let's take a look at some of these files.
apiVersion: "1"
id: "jenkins"
description: "OC Bundle"
version: "1.12" # (1)
plugins:
  - "plugins.yaml"
jcasc:
  - "jenkins.yaml"
rbac:
  - "rbac.yaml"
items: # (2)
  - "items/"
- updating the version speeds up the detection of a bundle change
- we can read configuration from a directory and its subdirectories
The only mandatory files are this bundle.yaml and the jcasc section with one or more files. You can either use a named file, like I've done, or use point it to a folder. CasC will read all the files in the directory and its sub-directories.
We leverage that with our items section. We'll explore this in more depth in the Managing Items section.
Configure OC via CasC
To configure OC via a Bundle, let's explore some of the files by which you can do so. Due to the more detailed nature, we'll explore Items and the LDAP configuration separately.
Let's start with the plugins.
plugins:
- {id: notification-api}
- {id: operations-center-notification}
- {id: cloudbees-prometheus}
# skipping some items to reduce example size
Info
At the time of writing, the CasC plugins are restructured. So while the example at some point in time used the following two plugins; cloudbees-casc-api and cloudbees-casc-server.
They are likely different by the time you're reading this. Please look at the official docs for the appropriate plugins for your release.
If you look at the file in my example repository, you'll fine it has ~108 plugins. For the sake of the example, I won't list all of them here.
For plugins in the CAP we do not have to list the versions, as CAP manages those for us. So we only list the plugin id of the plugins we want. If for some reason the plugin cannot be installed, there will be an explicit warning in the logs.
Warning
When adding plugins, the instance must always be restarted for the change to take effect.
Up next is the RBAC configuration, if you're not using CloudBees' RBAC with CloudBees CI yet, I strongly urge you to reconsider!
removeStrategy:
  rbac: SYNC

roles:
- name: authenticated
- permissions:
  - hudson.model.Hudson.Administer
  name: administer
- name: anonymous
- filterable: 'true'
  permissions:
  - hudson.model.Item.Read
  - hudson.model.Item.Discover
  - hudson.model.Hudson.Read
  - hudson.model.View.Read
  name: browse
groups:
- members:
    external_groups:
      - Administrators
    users:
      - admin
      - jvandergriendt
  roles:
  - name: administer
    grantedAt: current
  name: Administrators
- roles:
  - name: develop
    grantedAt: current
  name: Developers
  members:
    external_groups:
      - BlueAdmins
      - GreenAdmins
- roles:
  - name: browse
    grantedAt: current
  name: Browsers
  members:
    external_groups:
      - Blue
      - Green
There are three main sections in my exmaple.
removeStrategy: determines how differences between the CasC configuration and current state is handledroles: defines the global roles, these are applied to the OC and all Controllers (except those that opt out of global RBAC)groups: these are the global groups, active from the root from OC all the way down. Which is why we give some external groups thebrowserole, so they can see the items in OC they might be administrator of (such as a Controller)
For the sake of brevity, I have excluded some of the roles. These are the roles that are generated when you first initialize RBAC and choose typical initial setup.
If you're not sure how the define these, I recommend exploring the options via the UI first, and then exporting the configuration.
Warning
The removeStrategy is required, please read the official docs for the available options.
Jenkins.yaml
In the jcasc section of the Bundle manifest (bundle.yaml), we define the configuration of the OC. Essentially, anything you can configure via one of the pages of the Manage Jenkins screen, can be defined via CasC.
Again, for the sake of brevity, I'll exclude some details that aren't important to discuss.
jenkins:
  authorizationStrategy: "cloudBeesRoleBasedAccessControl"
  crumbIssuer:
    standard:
      excludeClientIPFromCrumb: true
  primaryView:
    masters:
      columns:
      - "jobName"
      - "status"
      - "weather"
      - "masterConfigurationStaleViewColumn"
      - "jenkinsVersionViewColumn"
      - "cascViewColumn"
      - "manageMaster"
      - "totalJobsViewColumn"
      - "queueSizeViewColumn"
      - "listSelectionColumn"
      jobFilters:
      - "connectedMasterViewFilter"
      name: "Controllers"
      recurse: true
  securityRealm:
    ldap: #  we'll dive into this below
cloudBeesCasCServer:
  defaultBundle: "mc1"
  visibility: true
beekeeper:
  enabled: true

masterprovisioning:
  kubernetes:
    clusterEndpoints:
    # details are explored below
Danger
If you want to manage the RBAC configuration via CasC, the authorizationStrategy must be set to "cloudBeesRoleBasedAccessControl".
You can see that this file can quickly become quite large and unwieldy. So you can break it up into different files, and then in the bundle.yaml point to a folder with all the file instead.
In case you've used either CasC or JCasC before, this is exactly the same, with the only difference that the OC might not support some plugins and has some plugins which do not exist for Controllers.
When in doubt, configure it via the UI first and then export the CasC configuration.
LDAP Configuration
Let's take a look at the LDAP configuration snippet. The configuration as based on the LDAP we've configured via the Helmfile configuration earlier in this guide.
jenkins:
  securityRealm:
    ldap:
      configurations:
      - displayNameAttributeName: "cn"
        groupMembershipStrategy:
          fromGroupSearch:
            filter: "member={0}"
        groupSearchBase: "ou=Groups"
        inhibitInferRootDN: false
        managerDN: "cn=admin,dc=example,dc=org"
        managerPasswordSecret: ${LDAP_MANAGER_PASSWORD}
        rootDN: "dc=example,dc=org"
        server: "ldap://ldap-openldap:389"
        userSearchBase: "ou=People"
      disableMailAddressResolver: false
      groupIdStrategy: "caseInsensitive"
      userIdStrategy: "caseInsensitive"
The password has been set to ${LDAP_MANAGER_PASSWORD}, which will be automatically interpreted by JCasC, read here how and what options there are.
I've opted for leveraging an environment variable. This environment variable comes from a Kubernetes secret by the name ldap-manager-pass, we created in the Configure CBCI namespace section.
OperationsCenter:
  # other config excluded for brevity
  ContainerEnv:
    - name: LDAP_MANAGER_PASSWORD
      valueFrom:
        secretKeyRef:
          name: ldap-manager-pass
          key: pass
Controller Provisioning
Bug
While CloudBees CI stands for inclusive naming and works hard to remove any outdated terminology, sometimes they missed. Expect masterprovisioning to be renamed to controllerprovisioning.
One of the great things about CloudBees CI Modern is its ability of creating and managing Controllers on Kubernetes. To control the properties of the Kubernetes resources, there is the masterprovisioning.
I've configured just the default settings, where the only notable thing is the -Dorg.csanchez...defaultImage=cloudbees/cloudbees-core-agent:2.303.3.3 property. Which will have to be updated if you upgrade CloudBees CI.
Warning
As we're using YAML in YAML and have multiple layers of interpretation, we have to exclude the ${name} variables, so the annotations get the correct Controller name. To escape values, such as the $ in this case, we use the ^, so ${name} becomes ^${name}.
Remember the configuration for Prometheus? Well, if we want our Controller's metrics to be scrapable by Prometheus, we need to ensure they have the proper annotations as well. So I've included the annotations in the yaml section, so any new Controller automatically has them.
masterprovisioning:
  kubernetes:
    clusterEndpoints:
    - id: "default"
      ingressClass: "nginx"
      jenkinsUrl: "http://cjoc.cbci.svc.cluster.local/cjoc/"
      name: "kubernetes"
    cpus: "1.0"
    disk: 50
    fsGroup: "1000"
    globalJavaOptions: "-Djenkins.model.Jenkins.crumbIssuerProxyCompatibility=true\
      \ -Dorg.csanchez.jenkins.plugins.kubernetes.pipeline.PodTemplateStepExecution.defaultImage=cloudbees/cloudbees-core-agent:2.303.3.3\
      \ -Dcom.cloudbees.jenkins.plugins.kube.ServiceAccountFilter.defaultServiceAccount=jenkins-agents\
      \ -Dcom.cloudbees.networking.useSubdomain=false -Dcom.cloudbees.networking.protocol=\"\
      https\" -Dcom.cloudbees.networking.hostname=\"ci.cbci-pm.beescloud.com\" -Dcom.cloudbees.networking.port=443\
      \ -Dcom.cloudbees.networking.operationsCenterName=\"cjoc\""
    javaOptions: "-XshowSettings:vm -XX:+AlwaysPreTouch -XX:+UseG1GC -XX:+DisableExplicitGC\
      \ -XX:+ParallelRefProcEnabled -XX:+UseStringDeduplication -Dhudson.slaves.NodeProvisioner.initialDelay=0"
    livenessInitialDelaySeconds: 300
    livenessPeriodSeconds: 12
    livenessTimeoutSeconds: 12
    memory: 3072
    readinessFailureThreshold: 100
    readinessInitialDelaySeconds: 30
    readinessTimeoutSeconds: 5
    terminationGracePeriodSeconds: 1200
    yaml: |-
      apiVersion: "apps/v1"
      kind: "StatefulSet"
      spec:
        template:
          metadata:
            annotations:
              prometheus.io/path: "/^${name}/prometheus"
              prometheus.io/port: "8080"
              prometheus.io/scrape: "true"
            labels:
              app.kubernetes.io/component: Managed-Controller
              app.kubernetes.io/instance: "^${name}"
              app.kubernetes.io/managed-by: CloudBees-CI-Cloud-Operations-Center
              app.kubernetes.io/name: "^${name}"
Managing Items
As you've seen, we've configured the Bundle to collect Item manifests from the items folder.
CasC will automatically read all the files in the specified folder and its subfolders.
In my example Bundle, the items folder looks like this:
.
├── controllers
│   ├── blue.yaml
│   ├── cyan.yaml
│   ├── green.yaml
│   ├── purple.yaml
│   └── yellow.yaml
├── items.yaml
└── jobs
    └── controller-casc-sync.yaml
In the items.yaml you can define any item you need, such as Folders. I've separated Controllers and Jobs from the main file.
This way, if someone wants to add a new Controller or a new Job, all they have to do is add a new file into the folder and synchronise the Bundle to OC.
Mandatory Boilerplate
In the current iteration of CasC, each file in the Items directory hierarchy, needs some boilerplate configuration, else it throws an error.
Managed Controller
You might have picked it up already, but yes, you can create and managed Managed Controllers via OC's CasC Bundle!
Below is about as minimal an example as it can get. It configures some basic properties such as the name and description, and some more specific items. Such as the RBAC configuration (via groups:), which CasC Bundle it should use, and its Kubernetes configuration (overriding or extending masterprovisioning from the OC).
Created but not provisioned
In the CloudBees CI releases prior to December 2021, Managed Controllers get created, but do not get provisioned. This means their respective Kubernetes resources do not get created automatically.
You can create a Cluster Operations Job, use the UI, or the CLI to save and restart the Controllers to create their Kubernetes resources.
removeStrategy:
  rbac: SYNC
  items: NONE
items:
- kind: managedController
displayName: 'Cyan'
name: mc-cyan
description: 'Cyan Controller (Managed by CasC)'
groups:
- members:
users:
- bluedev
- blueadmin
name: Blues
properties:
- configurationAsCode:
bundle: purple
configuration:
kubernetes:
domain: cyan
Keep Bundle up-to-date with Git Sync
There are various ways you can get a CasC Bundle to the OC.
For example, you can store the YAML files in a Kubernetes ConfigMap, and then mount that ConfigMap into the OC's volume.
If you have a flat Bundle file hierarchy, or you have a transformation pipeline that creates a customizable output a ConfigMap is an option.
Tip
If you do want to use a ConfigMap, this is how you configure the Helm values, assuming you CasC Bundle's ConfigMap is called casc-oc.
I've opted to go another route, synchronizing my CasC Bundle directly from Git into a (Kubernetes) Volume. To do so, I've used Git Sync, a tool from the Kubernetes maintainers for exactly this purpose.
So what we want to achieve, is that when I make a change in my Bundle in Git, it is automatically updated in the OC. To do so, we will add a sidecar container to the OC via the Helm values and some volume mounts, and thats all we need.
I've based my solution based on the Git Sync documentation example for raw Kubernetes.
Warning
The example uses a Container repository that is either not accessible, or does not contain the Git Sync images.
After some digging around, I found the 3.x version images in a GCR; gcr.io/k8s-staging-git-sync/git-sync:v3.3.4__linux_amd64.
For those who want to use the hash id instead of the tag, that tag is the following git-sync@sha256:866599ca98bcde1404b56152d8601888a5d3dae7fc21665155577d607652aa09.
While not documented, there is an option in the CBCI Helm chart to add a side car container. You do so via OperationsCenter.ExtraContainers which is a list item.
This container needs a name and an image. For the sake of Git Sync, we need to supply it with arguments which tell it which repository to synchronize, how, and where to store it.
My repository is public, so it does not need credentials, if yours does, all the common solutions are supported, as per the docs. Do verify the actual options the version you use supports, as it seems some flags were renamed between the version 4.x that is the current main branch and the 3.4 version I'm using.
We add a Volume Mount to this sidecar container, so it can store the Git checkout on a Volume that is also usable by OC. We can add volumes via the OperationsCenter.ExtraVolumes property, which is also a list item.
Then to make sure the OC can read from this Volume, we also mount that same Volume via the OperationsCenter.ExtraVolumeMounts property. The mountPath is what is the basis of the -Dcore.casc.config.bundle flag we set, to tell OC where it can find its Bundle.
  ExtraContainers:
  - name: git-sync
    image: gcr.io/k8s-staging-git-sync/git-sync@sha256:866599ca98bcde1404b56152d8601888a5d3dae7fc21665155577d607652aa09
    args:
      - --repo=https://github.com/joostvdg/cloudbees-ci-casc
      - --branch=main
      - --depth=1
      - --wait=20
      - --root=/git
    volumeMounts:
      - name: content-from-git
        mountPath: /git

  ExtraVolumes:
  - name: content-from-git
    emptyDir: {}
  ExtraVolumeMounts:
  - name: content-from-git
    mountPath: /var/jenkins_config/oc-casc-bundle-from-git
    readOnly: true
Speaking of the flag -Dcore.casc.config.bundle, to save you some of the trouble I had, lets take a good look at the path I've specified. Essentially, the Git Sync checks out the repository into a folder with the same name.
The path starts from the mountPath, which is /var/jenkins_config/oc-casc-bundle-from-git. My Bundle's repository is called cloudbees-ci-casc, which we'll add next, and then the path to my Bundle within that repository.
  JavaOpts:
    -Djenkins.install.runSetupWizard=false
    -Dcore.casc.config.bundle=/var/jenkins_config/oc-casc-bundle-from-git/cloudbees-ci-casc/casc-for-oc/bundle
CasC for Controllers
What is a Bundle
CloudBees CI extends Jenkins Configuration as Code (JCasC) with additional configuration files, for a full Configuration as Code experience. This collection of files, is called a Bundle. A Bundle has a fixed structure.
For more information, please read creating a Controller Bundle in the official documentation.
As a Controller Bundle is essentially the same as the one for the OC, I'll limit myself to two things. One, how you can get those Bundles into the OC and usable by Controllers, and two, how to leverage the inheritance.
Synchronize Controller Bundles to OC
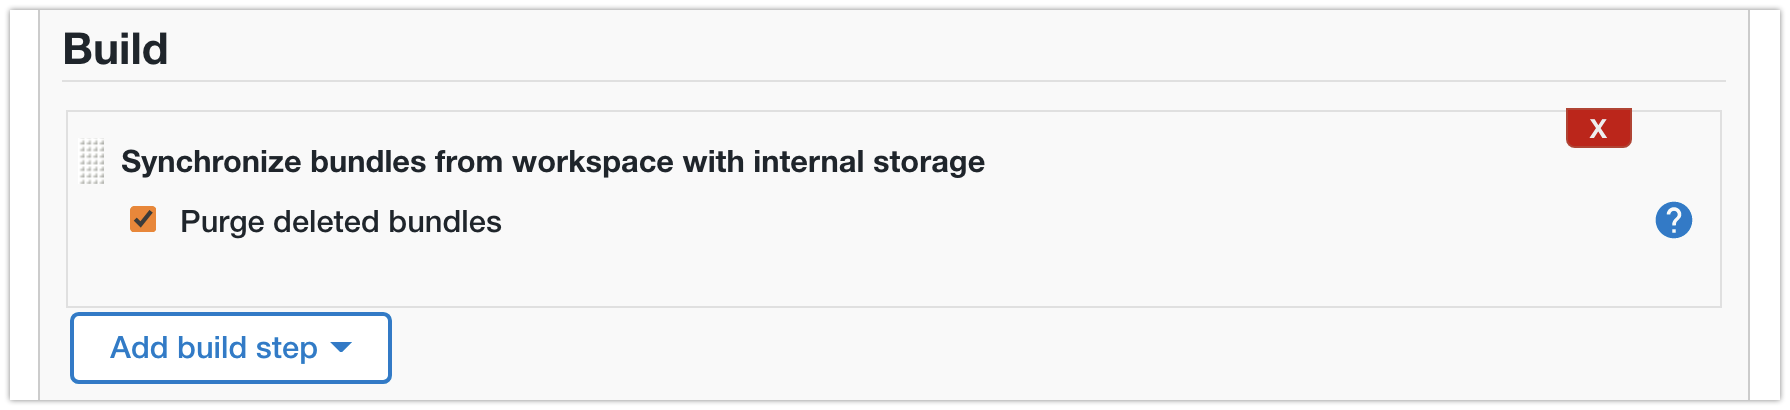
Steps to Synchronize Bundles
- install a git client on Operations Center
- for example:
github-branch-source - create a Freestyle job
- check out from your repository with the casc Bundles
- use the
Synchronize bundles from workspace with internal storagebuild step - create a Controller and select an available Bundle
Update Bundle Configuration
If you're not sure what you'd want to configure in the bundle, or which plugins you really need.
You can first create a Managed Controller how you want it to be. Then export its CasC configuration by the built-in casc-exporter.
You do this, by going to the following URL <controllerUrl>/core-casc-export.
Freestyle Job - On OC
URL to checkout: https://github.com/joostvdg/cloudbees-ci-casc.git Use the Synchronize bundles from workspace with internal storage build step.
Note: this only works if the Bundles are at the top level
CasC Sync Job as CasC Item
Bundle Inheritance
You can have Bundles inherit from each other. You do so by using the parent property in a Bundle descriptor (bundle.yaml).
For example, let's take a look at my community2 Bundle.
apiVersion: "1"
version: "1.0"
id: "community2"
description: "Shared Bundle"
parent: "community1"
jcasc:
  - "jenkins.yaml"
plugins:
  - "plugins.yaml"
This means the Bundle now extends the community1 Bundle. When you use community2, you essentially get all the files of both community1 and community2.
Inheritance Limitation
At this time of writing, Bundles cannot override configuration they inherit and the configuration must be complimentary. Meaning, once you specify the jenkins.systemMessage, the entire inheritance chain has to use the same message.
What does work, which may not be obvious, is list items. Such as SharedLibraries, PodTemplates, and Tool definitions. Meaning, if you define two SharedLibraries in Bundle A, one SharedLibrary in Bundle B, the Controller using Bundle B, will have three SharedLibraries defined.
Another caveeat to take note of, is that the last found Plugin Catalog is used. As a Plugin Catalog essentially just lists plugins that can be installed, I suggest you define one Plugin Catalog at the root of your hierarchy, and any plugins you need after, you add them to that same one Plugin Catalog.
This is what I've done with the community chain of Bundles. The Bundle community1 contains a Plugin Catalog, with all the Tier 3 plugins all downstream Bundles need.
- Bundle
community1sets up a basic configuration, including a Plugin Catalog listing common Tier 3 (Community) plugins - Bundle
community2installs a chunk of these plugins, and sets a system message - Bubdle
purpleinstall an additional community plugin (also defined in the Plugin Catalog) and has Controllers specific items (jobs)
.
├── community1
│   ├── bundle.yaml
│   ├── jenkins
│   │   ├── jenkins.yaml
│   │   ├── podtemplate-golang.yaml
│   │   ├── podtemplate-maven-jdk17.yaml
│   │   └── shared-libraries.yaml
│   ├── plugin-catalog.yaml
│   └── plugins.yaml
├── community2 (inherits community 1)
│   ├── bundle.yaml
│   ├── jenkins.yaml
│   └── plugins.yaml
└── purple (inherits community 2)
    ├── bundle.yaml
    ├── items
    │   └── pipeline-example.yaml
    └── plugins.yaml