Single Sign On on Kubernetes with Keycloak
This article is about setting up an Apache Keycloak1 instance for Single Sign-On2 (SSO) on Kubernetes.
Important
This guide is created to help you show how you can do this from a technical point of view. If you are in an enterprise, please consult your in-house - if available - or external security professionals before running tools such as Keycloak in production.
Goal
The goal is to show why using Keycloak as SSO can be valuable and guide on how to do so.
For what's in the How, look at the next paragraph: Steps.
At the outset, this article is not about comparing SSO solutions or about claiming Keycloak is the best. Its a solution, and if you're interested in using this, it helps you with the how.
Below are some links to alternatives as reference, but are not discussed.
Audience
The expected audience are those who are using Kubernetes3 and are:
- looking to host a SSO solution themselves
- want to use LDAP4 as
User Federationfor Keycloak - want to setup a SSO with Jenkins5 and/or SonarQube6
Steps
These are the steps we will execute.
- configure an LDAP server with a test data set
- package LDAP server in a Docker container and run it as an kubernetes
Deployment- you might think, why not a
StatefulSet, but our LDAP will have static data - and the idea of this setup, is that we do not control LDAP, meaning, we should expect LDAP's data to be immutable
- you might think, why not a
- install Keycloak with Helm8
- we use Helm 2, as Helm 39 is still in beta at the time of writing (September 2019)
- configure Keycloak to use LDAP for
User Federation - install Jenkins and SonarQube with Helm8
- configure SSO with Keycloak in Jenkins
- configure SSO with Keycloak in SonarQube
LDAP
We will use OpenDJ7 as LDAP implementation. There are many alternatives out there, feel free to use those. But for this guide, we will use OpenDJ's community edition, it works well and is easy to configure.
We need the following:
- configured with a test data set including users and groups
- Docker container image definition
- Kubernetes
Deploymentdefinition to run - Kubernetes
Servicedefinition to access a stable address
Test Data Set
example.ldiff
This a full example.
The different parts will be explained below.
dn: dc=example,dc=com
objectclass: top
objectclass: domain
dc: example

dn: ou=People, dc=example,dc=com
objectclass: top
objectclass: organizationalunit
ou: People
aci: (targetattr="*||+")(version 3.0; acl "IDM Access"; allow (all)
userdn="ldap:///uid=idm,ou=Administrators,dc=example,dc=com";)

dn: uid=cptjack, ou=People, dc=example,dc=com
cn: cpt. Jack Sparrow
sn: Sparrow
givenname: Jack
objectclass: top
objectclass: person
objectclass: organizationalPerson
objectclass: inetOrgPerson
ou: Operations
ou: People
l: Caribbean
uid: cptjack
mail: jack@example.com
telephonenumber: +421 910 123456
facsimiletelephonenumber: +1 408 555 1111
roomnumber: 666
userpassword: MyAwesomePassword

dn: uid=djones, ou=People, dc=example,dc=com
cn: Davy Jones
sn: Jones
givenname: Davy
objectclass: top
objectclass: person
objectclass: organizationalPerson
objectclass: inetOrgPerson
ou: Operations
ou: People
l: Caribbean
uid: djones
mail: d.jones@example.com
telephonenumber: +421 910 382735
facsimiletelephonenumber: +1 408 555 1112
roomnumber: 112
userpassword: MyAwesomePassword

dn: ou=Groups, dc=example,dc=com
objectclass: top
objectclass: organizationalunit
ou: Groups
aci: (targetattr="*||+")(version 3.0; acl "IDM Access"; allow (all)
userdn="ldap:///uid=idm,ou=Administrators,dc=example,dc=com";)

dn: cn=Pirates,ou=Groups,dc=example,dc=com
objectclass: top
objectclass: groupOfUniqueNames
cn: Pirates
ou: Groups
uniquemember: uid=cptjack, ou=People, dc=example,dc=com
uniquemember: uid=djones, ou=People, dc=example,dc=com
description: Arrrrr!

dn: cn=Catmins,ou=Groups,dc=example,dc=com
objectclass: top
objectclass: groupOfUniqueNames
cn: Catmins
ou: Groups
uniquemember: uid=djones, ou=People, dc=example,dc=com
description: Purrrr!

dn: ou=Administrators, dc=example,dc=com
objectclass: top
objectclass: organizationalunit
ou: Administrators

dn: uid=idm, ou=Administrators,dc=example,dc=com
objectclass: top
objectclass: person
objectclass: organizationalPerson
objectclass: inetOrgPerson
uid: idm
cn: IDM Administrator
sn: IDM Administrator
description: Special LDAP acccount used by the IDM
to access the LDAP data.
ou: Administrators
userPassword: MySecretAdminPassword
ds-privilege-name: unindexed-search
ds-privilege-name: password-reset
Basics
We need some basic meta data for our server. The two most important elements being:
- the base
dn(Distinguished Name), where all of our data lives- build up out of
dc(domainComponent) elements, representing a domain name, usually companyName.com
- build up out of
- the
dnwhere our user data will live and which user owns it (theuserdnassigned in theaci)
dn: dc=example,dc=com
objectclass: top
objectclass: domain
dc: example

dn: ou=People, dc=example,dc=com
objectclass: top
objectclass: organizationalunit
ou: People
aci: (targetattr="*||+")(version 3.0; acl "IDM Access"; allow (all)
  userdn="ldap:///uid=idm,ou=Administrators,dc=example,dc=com";)
User Entries
After these two main metadata dn elements, we have all the user entries.
We start with the identifier of the entry, designated by the dn, followed by attributes and classifications. While LDAP stands for Lightweight, it has a lot of attributes which are not easily understood because they are commonly used by their two-letter acronym only. Below we explain a few of the attributes, but there are more complete lists available10.
- dn: the full identifier of the data entry, in reverse tree
- uid: the unique id of the user within the organizational structure
- cn: Common Name, generally how humans would identify this resource
- l: Location
- ou: Organizational Unit, these commonly represent departments
- objectclass: defines a object hierarchy, derived from Object Oriented Programming
- top: is commonly the root object class, every other object inheriting from there
- object classes are used to create typed objects which have their own schema
- this allows you to define what values are required and which are optional
- object classes are also used in search filters, so you can distinguish different value types (users, groups)
dn: uid=jwick, ou=People, dc=example,dc=com
cn: John Wick
sn: Wick
givenname: John
objectclass: top
objectclass: person
objectclass: organizationalPerson
objectclass: inetOrgPerson
ou: Operations
ou: People
l: New York
uid: jwick
mail: jwick@example.com
telephonenumber: +1 408 555 1236
facsimiletelephonenumber: +1 408 555 4323
roomnumber: 233
userpassword: myawesomepassword
Group
We first create the OU housing our Groups, including which object classes it represents.
Then we can attach groups to this OU by creating dn's under it. There are two flavors of groups, we have groupOfNames and groupOfUniqueNames, I'm sure you understand what the difference is.
We explain wich kind of group we are by the objectclass: groupOfUniqueNames, and include a list of members. In the case of groupOfNames we use member: <member dn>, in our case we user uniquemember: uid=cptjack, ou=People, dc=example,dc=com. To make it a list, add more than one entry, each with a unique value.
dn: ou=Groups, dc=example,dc=com
objectclass: top
objectclass: organizationalunit
ou: Groups
aci: (targetattr="*||+")(version 3.0; acl "IDM Access"; allow (all)
  userdn="ldap:///uid=idm,ou=Administrators,dc=example,dc=com";)

dn: cn=Pirates,ou=Groups,dc=example,dc=com
objectclass: top
objectclass: groupOfUniqueNames
cn: Pirates
ou: Groups
uniquemember: uid=cptjack, ou=People, dc=example,dc=com
uniquemember: uid=will, ou=People, dc=example,dc=com
uniquemember: uid=djones, ou=People, dc=example,dc=com
description: Arrrrr!
Administrator
We have to configure our main administrator, as we've already given it a lot of privileges to manage the other resources (via the aci rules). As usual, we start with defining a ou that houses our Administrators.
In this case, we give it two more special permissions via ds-privilege-name. So this user can also reset passwords, just in case.
dn: ou=Administrators, dc=example,dc=com
objectclass: top
objectclass: organizationalunit
ou: Administrators

dn: uid=idm, ou=Administrators,dc=example,dc=com
objectclass: top
objectclass: person
objectclass: organizationalPerson
objectclass: inetOrgPerson
uid: idm
cn: IDM Administrator
sn: IDM Administrator
description: Special LDAP acccount used by the IDM
  to access the LDAP data.
ou: Administrators
userPassword: MySecretAdminPassword
ds-privilege-name: unindexed-search
ds-privilege-name: password-reset
Configure OpenDJ
One of the reasons I like OpenDJ is because it is very easy to operate. It has many tools to help you manage the server. Some are separate tools that interact with a running server, others interact with the configure while the server is offline.
We have to do two configuration actions, 1) we intialize it with our root dn, which port to use and so on, 2) we add our test data set, so we have our groups and users to work with.
/opt/opendj/setup --cli \
    -p 1389 \
    --ldapsPort 1636 \
    --enableStartTLS \
    --generateSelfSignedCertificate \
    --baseDN dc=example,dc=com \
    -h localhost \
    --rootUserDN "$ROOT_USER_DN" \
    --rootUserPassword "$ROOT_PASSWORD" \
    --acceptLicense \
    --no-prompt \
    --doNotStart
/opt/opendj/bin/import-ldif \
    --includeBranch dc=example,dc=com \
    --backendID userRoot \
    --offline \
    --ldifFile example.ldiff
Dockerfile
For completeness I will also include my Docker image.
We use Tini11 order to manage the process of OpenDJ nicely, even in the face of being shutdown. For more information, read my article on Docker Graceful Shutdown.
We use a jre as we only need to run Java, so no need for a JDK. We use the OpenJDK distribution from Azul15 in order to avoid possible violations of Oracle's License12. We use Azul's Alpine13 based image as it is much smaller than those based of full-fledged OS's. This makes the image smaller in size on disk and in memory and reduces the attack vector and recommended by the likes of Docker and Snyk14.
We download the latest version available which, as of this writing in September 2019, is 4.4.3 which you can retrieve from the OpenDJ Community's releases page on GitHub13.
FROM azul/zulu-openjdk-alpine:8u222-jre

LABEL authors="Joost van der Griendt <joostvdg@gmail.com>"
LABEL version="0.2.0"
LABEL description="OpenDJ container"

WORKDIR /opt
EXPOSE 1389 1636 4444

ENV CHANGE_DATE='20190916-2100'
ENV JAVA_HOME /usr/lib/jvm/zulu-8
ENV OPENDJ_JAVA_HOME /usr/lib/jvm/zulu-8
ENV VERSION=4.4.3
ENV ROOT_USER_DN='cn=admin'
ENV ROOT_PASSWORD='changeme'
RUN apk add --no-cache tini

ENTRYPOINT ["/sbin/tini", "-vv","-g","-s", "--"]
CMD ["/opt/opendj/bin/start-ds", "--nodetach"]

RUN wget --quiet \
    https://github.com/OpenIdentityPlatform/OpenDJ/releases/download/$VERSION/opendj-$VERSION.zip && \
    unzip opendj-$VERSION.zip && \
    rm -r opendj-$VERSION.zip

RUN /opt/opendj/setup --cli \
    -p 1389 \
    --ldapsPort 1636 \
    --enableStartTLS \
    --generateSelfSignedCertificate \
    --baseDN dc=example,dc=com \
    -h localhost \
    --rootUserDN "$ROOT_USER_DN" \
    --rootUserPassword "$ROOT_PASSWORD" \
    --acceptLicense \
    --no-prompt \
    --doNotStart

ADD Example.ldif /var/tmp/example.ldiff
# RUN /opt/opendj/bin/import-ldif --help
RUN /opt/opendj/bin/import-ldif --includeBranch dc=example,dc=com --backendID userRoot --offline --ldifFile /var/tmp/example.ldiff
Kubernetes Deployment
In production you might want to run LDAP in a StatefulSet and give it some permanent storage. But in this guide the goal of LDAP is to show how to use it with Keycloak and we stick to a Deployment as it is easier.
apiVersion: apps/v1
kind: Deployment
metadata:
  name: opendj4
  labels:
    app: opendj4
spec:
  replicas: 1
  selector:
    matchLabels:
      app: opendj4
  template:
    metadata:
      labels:
        app: opendj4
    spec:
      containers:
      - name: opendj4
        image: caladreas/opendj:4.4.3-1
        ports:
        - containerPort: 1389
          name: ldap
        resources:
          requests:
            memory: "250Mi"
            cpu: "50m"
          limits:
            memory: "500Mi"
            cpu: "250m"
Kubernetes Service
When we use a Deployment our container instance will have a generated name and a new ip address on every (re-)start. So we use a Service to create a stable endpoint, which means that we will now access our LDAP server via our service: ldap://opendj4:389.
apiVersion: v1
kind: Service
metadata:
  labels:
    app: opendj4
  name: opendj4
spec:
  ports:
    - name: http
      port: 389
      targetPort: 1389
      protocol: TCP
  selector:
    app: opendj4
Caution
If you deploy the Service and Deployment in a different namespace than where you want to access them from, you will have to add the namespace to the access url.
If you've configured them in namespace ldap, the access url becomes ldap://opendj4.ldap:389.
Homegrown Helm chart with GitHub
You can also package the above explained Docker Image + Kubernetes Yaml definition as a Helm package in a GitHub repository16.
So if you do not want to use any of the above, feel free to use my personal Helm Repository17.
helm repo add joostvdg https://raw.githubusercontent.com/joostvdg/helm-repo/master/
helm repo update
The service, retrieved by kubectl get service now has a different name.
NAME           TYPE        CLUSTER-IP       EXTERNAL-IP   PORT(S)   AGE
ldap-opendj4   ClusterIP   10.100.19.29     <none>        389/TCP   105s
So now we access the LDAP server via ldap://ldap-opendj4:389.
Keycloak
Pre-requisites
- Helm installed
- TLS certificate
Using a tool as Keycloak to do SSO well, feels wrong without using TLS certificates. So I wholeheartedly recommend configuring Keycloak with a Domain name and TLS Certificate.
For the TLS certificate, you use Let's Encrypt20 with Cert Manager19, if you unsure how to proceed in Kubernetes read my guide on Let's Encrypt on Kubernetes.
Install Via Helm
Note
Make sure you replace the dns name keycloak.my.domain.com with your own domain. If you do not have a domain, you can use `nip.io18.
keycloak-certificate.yaml
keycloak-values.yaml
LDAP As User Federation
Assuming you have Keycloak running now, login with the admin user, keycloak, and the password you set in the keycloak-values.yaml.
In the left hand menu, you can select User Federation, this is where we can add ldap and kerberos providers. As Keycloak supports multiple sources, these will be listed by their priority (the smaller the number, the higher). The federations are consulted in the order according to their priority.
Create LDAP
Let's create the new LDAP provider, select the Add provider dropdown - top right - and choose ldap.
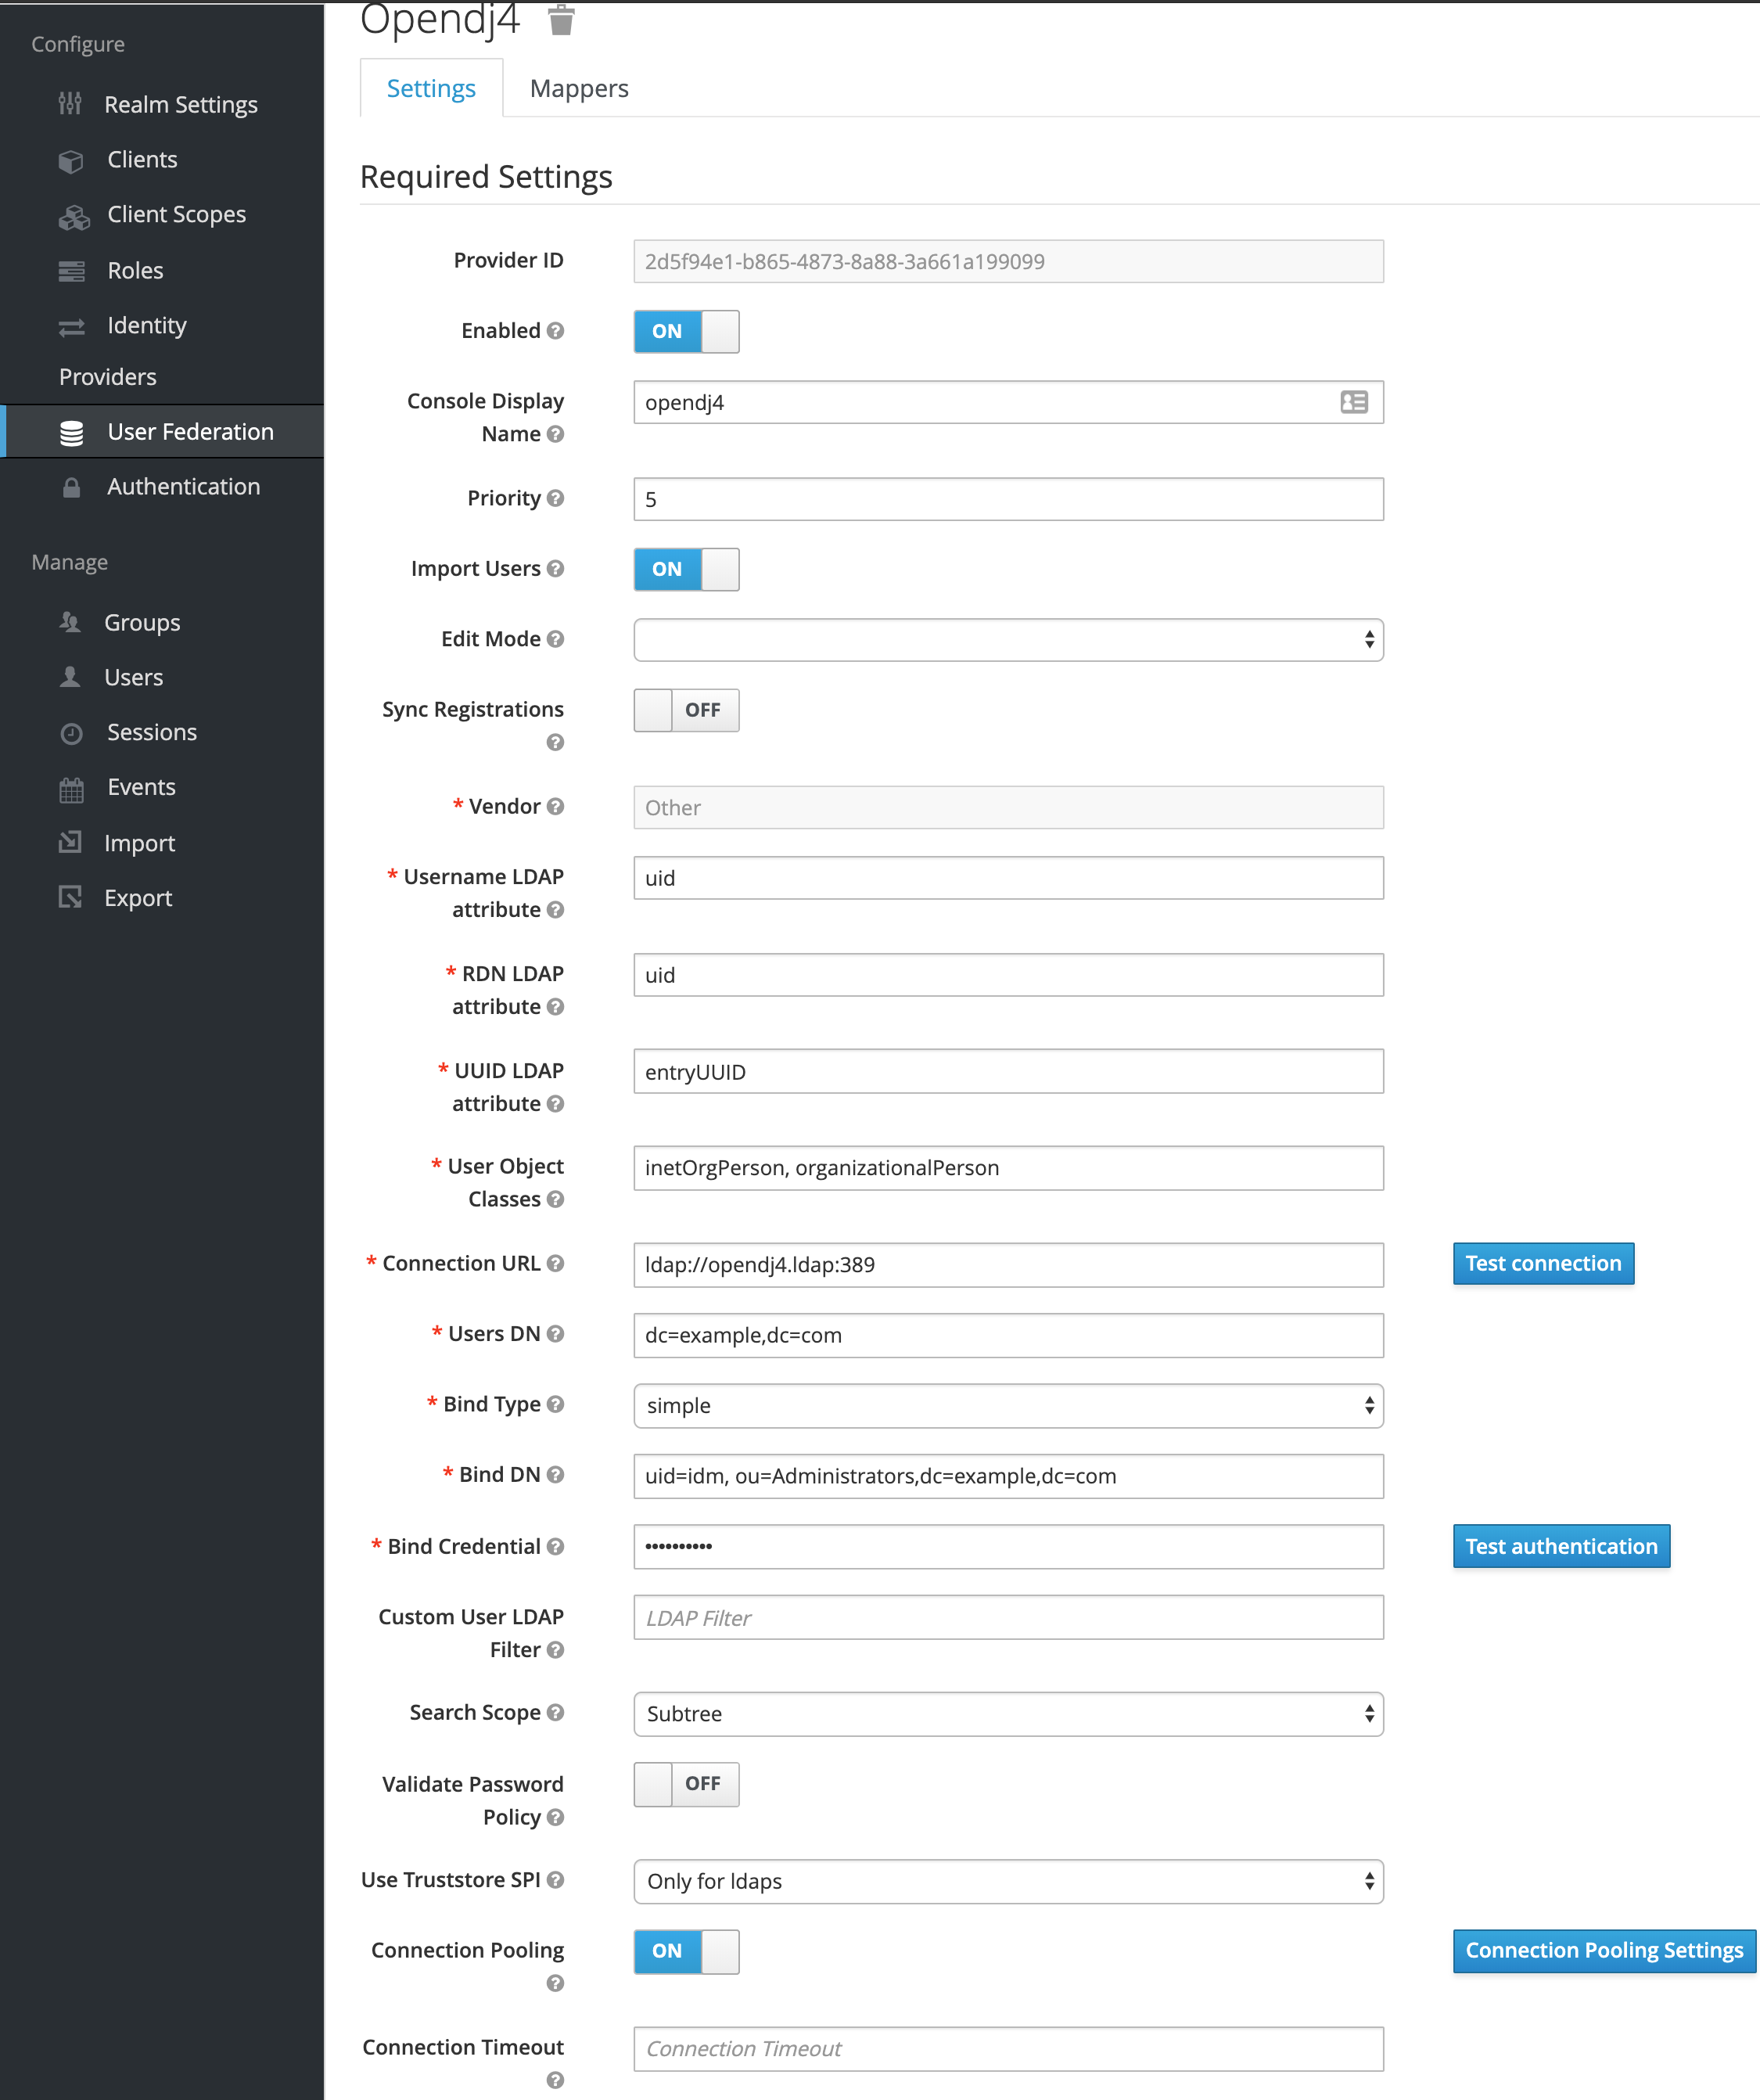
You will now see a whole list of values to fill in, don't worry, many can be kept as default. And to be sure, I will list them all here. For more information, each field has a little question mark, hover over it.
Info
When you've filled in the Connection URL, you should test the configuration with the Test connection button. The same is true for when you've configured the fields Users DN, Bind Type, Bind DN, Bind Credential with the button Test authentication.
- Console Display Name: display name, should be a name that tells you what this provider is
- Priority: the priority of this provider, will be used for the order that the federation is accessed
- Import Users: wether or not to import the users, I just leave this to
Onas to cache the users - Import Users:
READ_ONLY, in this guide we assume the LDAP server is not under your control, so read only - Vendor:
Other - Username LDAP attribute:
uid - RDN LDAP attribute:
uid - UUID LDAP attribute:
entryUUID - User Object Classes:
inetOrgPerson, organizationalPerson - Connection URL:
ldap://opendj4:389 - Users DN:
dc=example,dc=com - Bind Type:
simple - Bind DN:
uid=idm, ou=Administrators,dc=example,dc=com - Bind Credential:
secret-> or what ever you've set it in theexample.diff - Custom User LDAP Filter: ``
- Search Scope:
Subtree - Validate Password Policy:
OFF - Use Truststore SPI:
Only for ldap - Connection Pooling:
ON - Connection Timeout: ``
- Read Timeout: ``
- Pagination:
ON
Sync Settings:
- Cache Policy: 1000
- Periodic Full Sync:
On - Full Sync Period:
604800 - Periodic Changed Users Sync:
On - Changed Users Sync Period:
86400
Cache Settings:
- Cache Policy:
DEFAULT
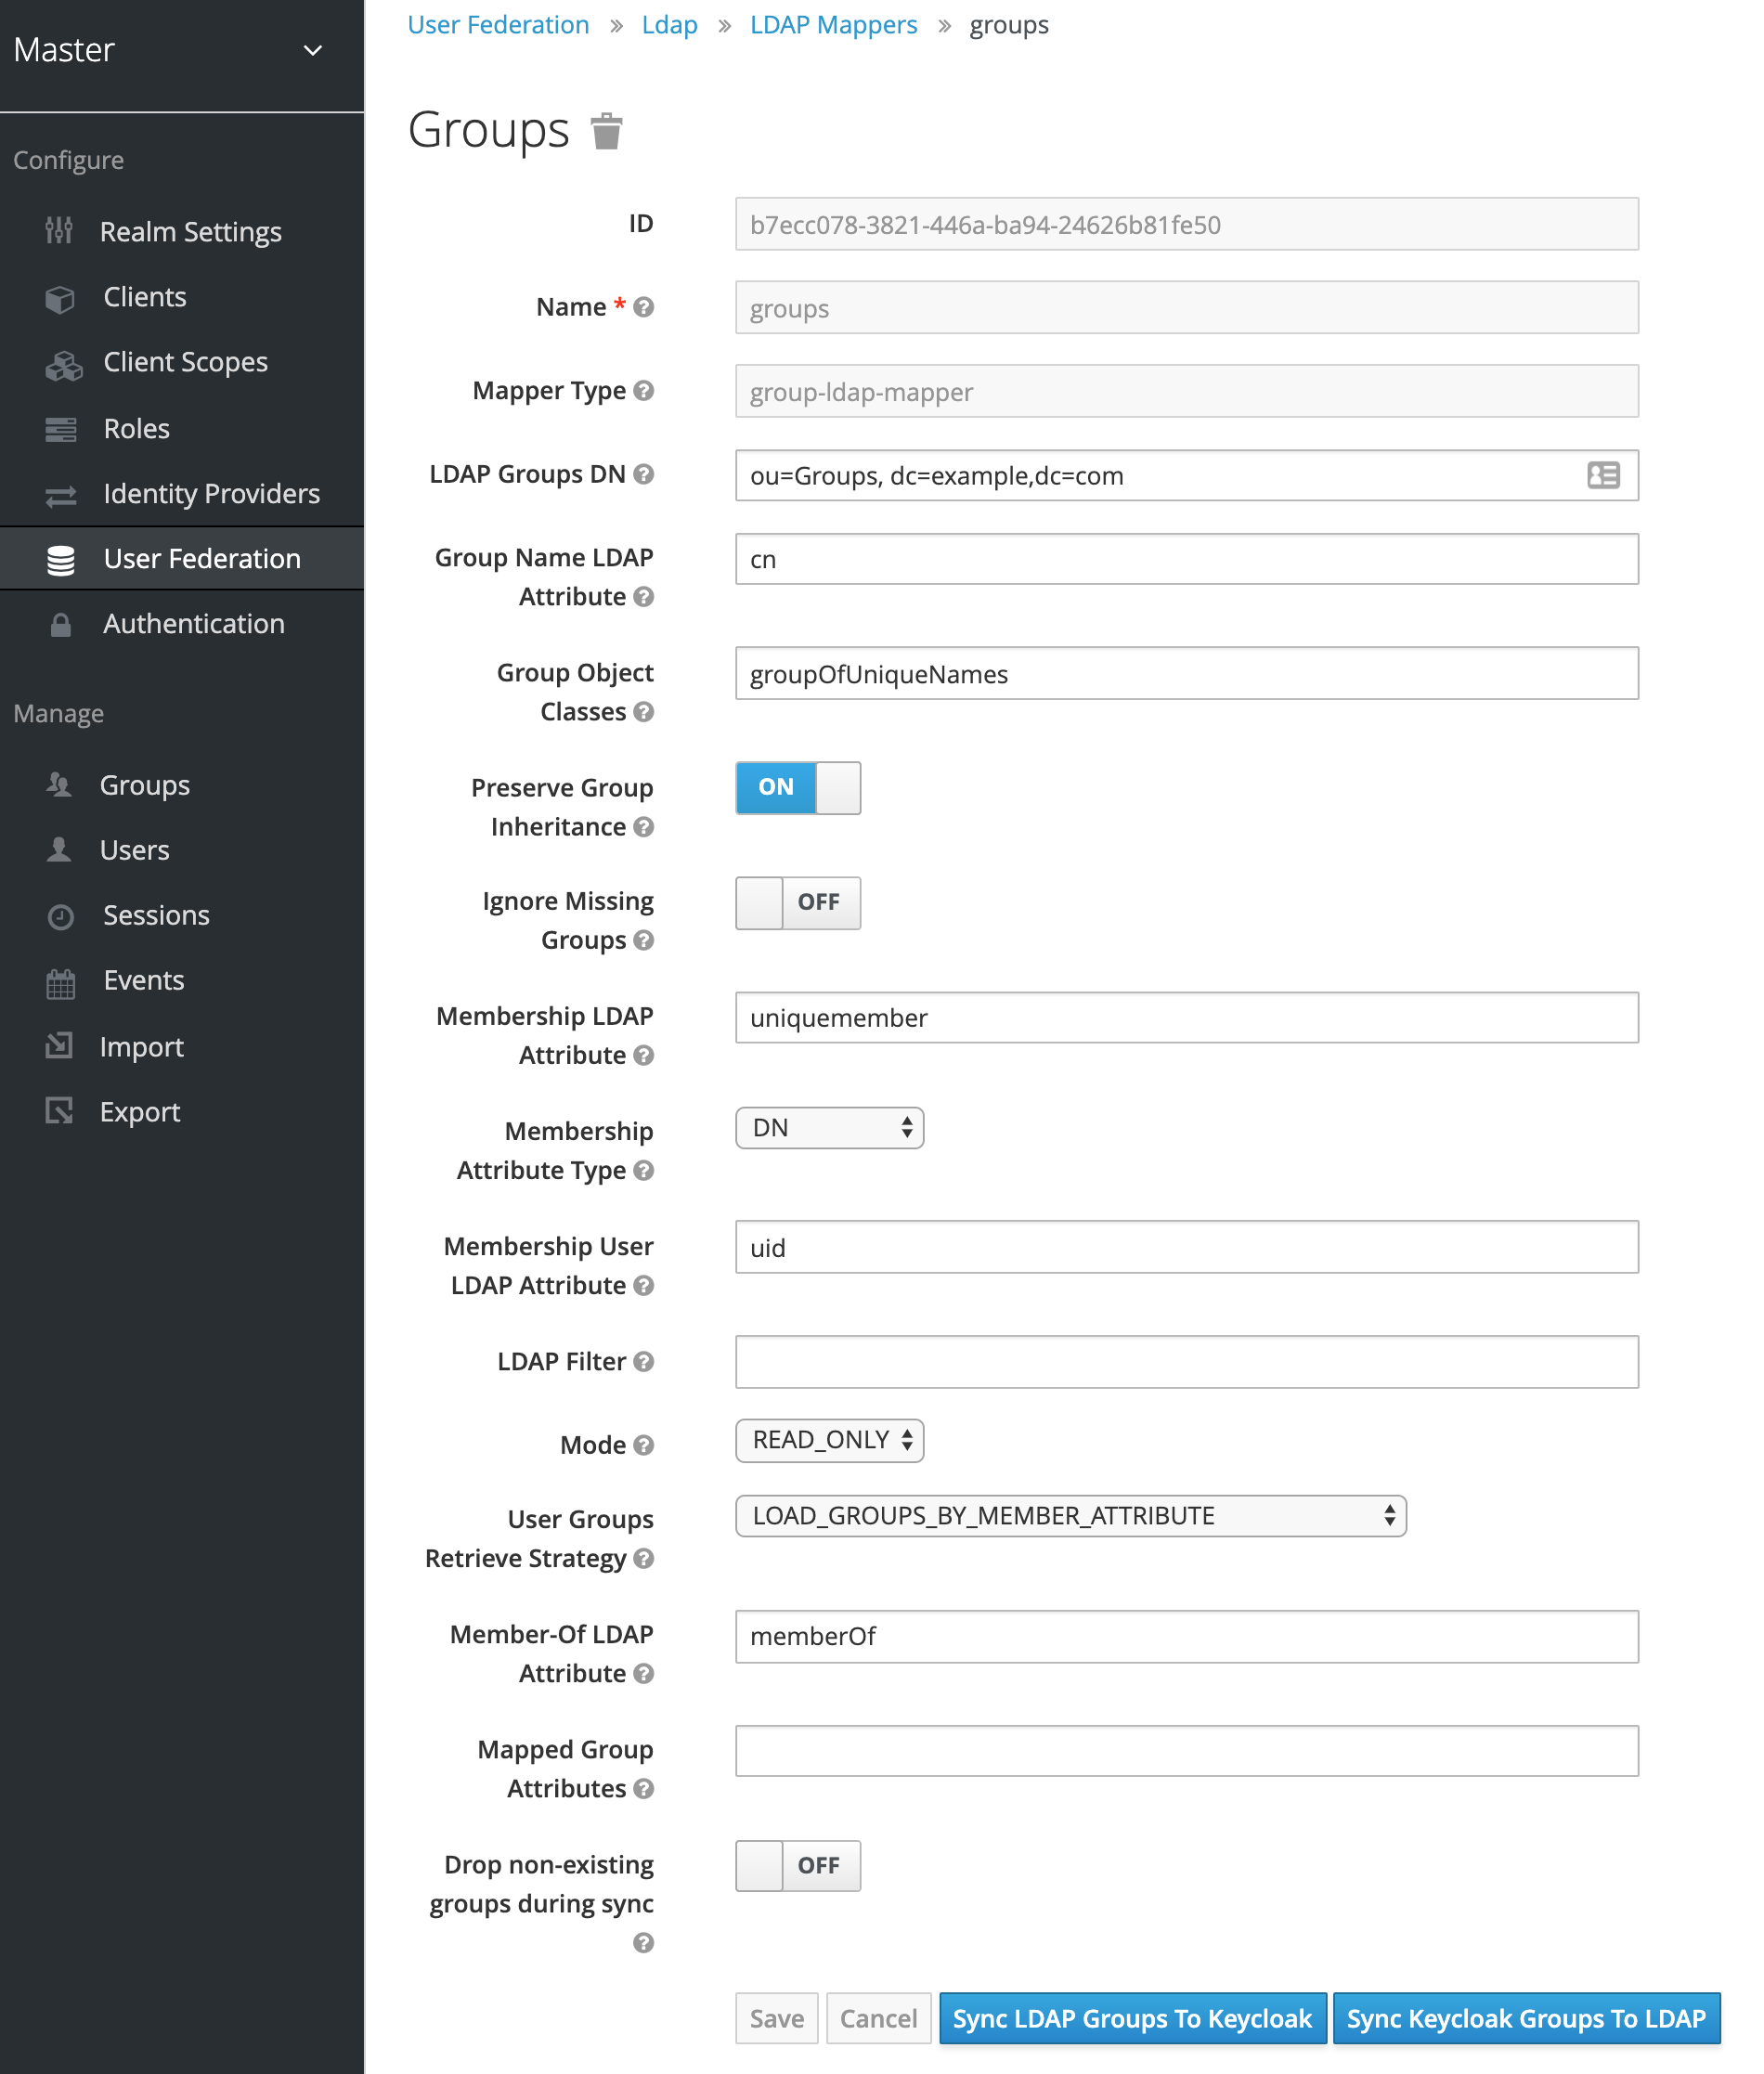
Add Group Mapping
If the value is not mentioned, the default value should be fine.
Some values listed here are default, but listed all the same.
- Name:
groups - Mapper Type:
group-ldap-mapper - LDAP Groups DN:
ou=Groups, dc=example,dc=com - Group Name LDAP Attribute:
cn - Group Object Classes:
groupOfUniqueNames - Membership LDAP Attribute:
uniquemember - User Groups Retrieve Strategy:
LOAD_GROUPS_BY_MEMBER_ATTRIBUTE
When you hit Save, you can synchronize the groups to Keycloak - if you don't need to, it will confirm the configuration works. Hit the Sync LDAP Groups To Keycloak button, and on top there should be a temporary banner stating how many groups were synchronized (if all categories are 0, something is wrong).
Note
Everytime you change a value, you first have to save the page before you can synchronize again.
Mix LDAP Users With Other Sources
One of the reasons for this guide to exist, is to be able to encapsulate an LDAP over which you have no control and add additional accounts and groups. There's multiple ways forward here, you can use Identity Providers and User Federation to create more sources of user accounts.
Perhaps the simplest way is to manage these extra accounts in Keycloak itself. It has its own User database and Groups database. In addition to that, it allows you to assign users created in Keycloak to be a member of a group derived from LDAP - if you've synched them.
UI
We can use the UI in Keycloak to manage Users and Groups.
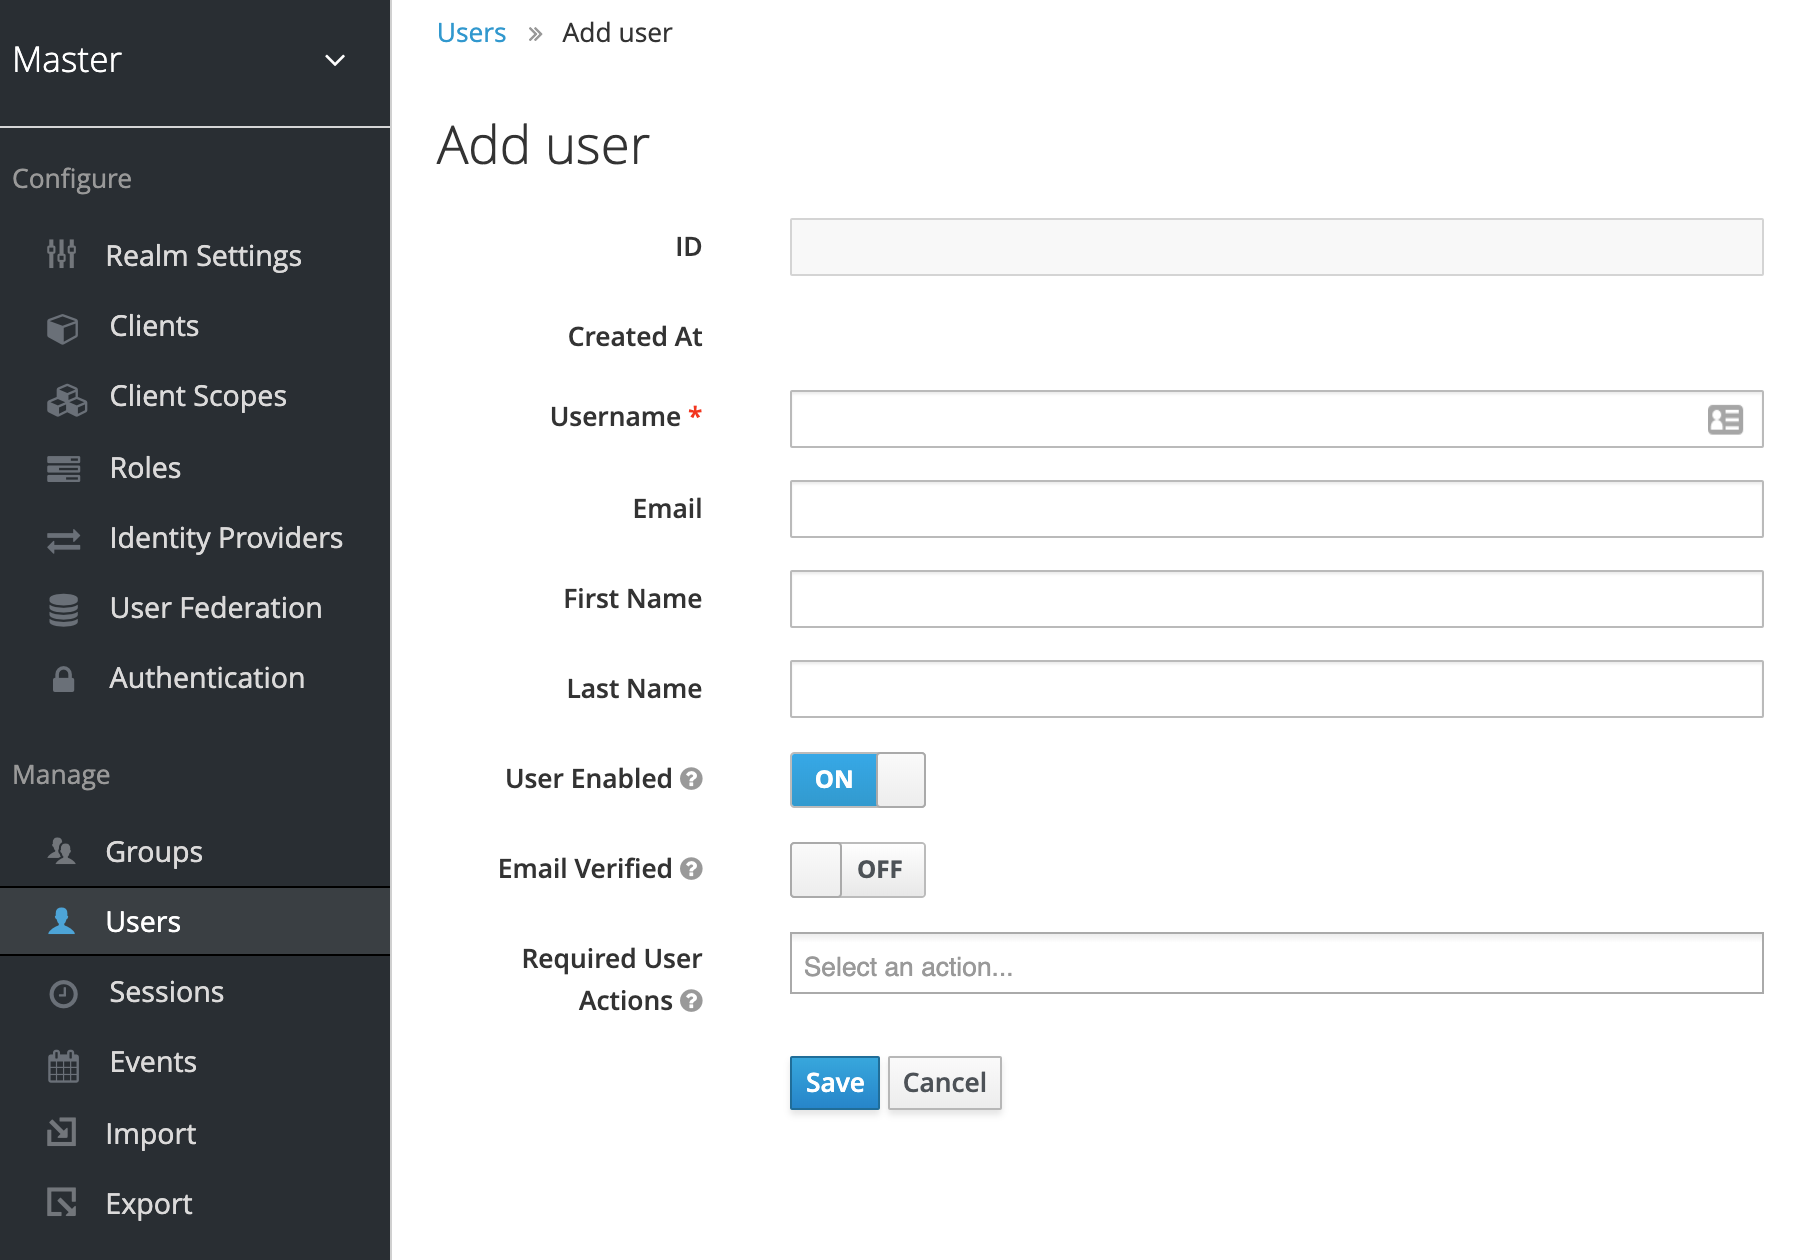
We initiate this by going to the Users view and hit Add user.
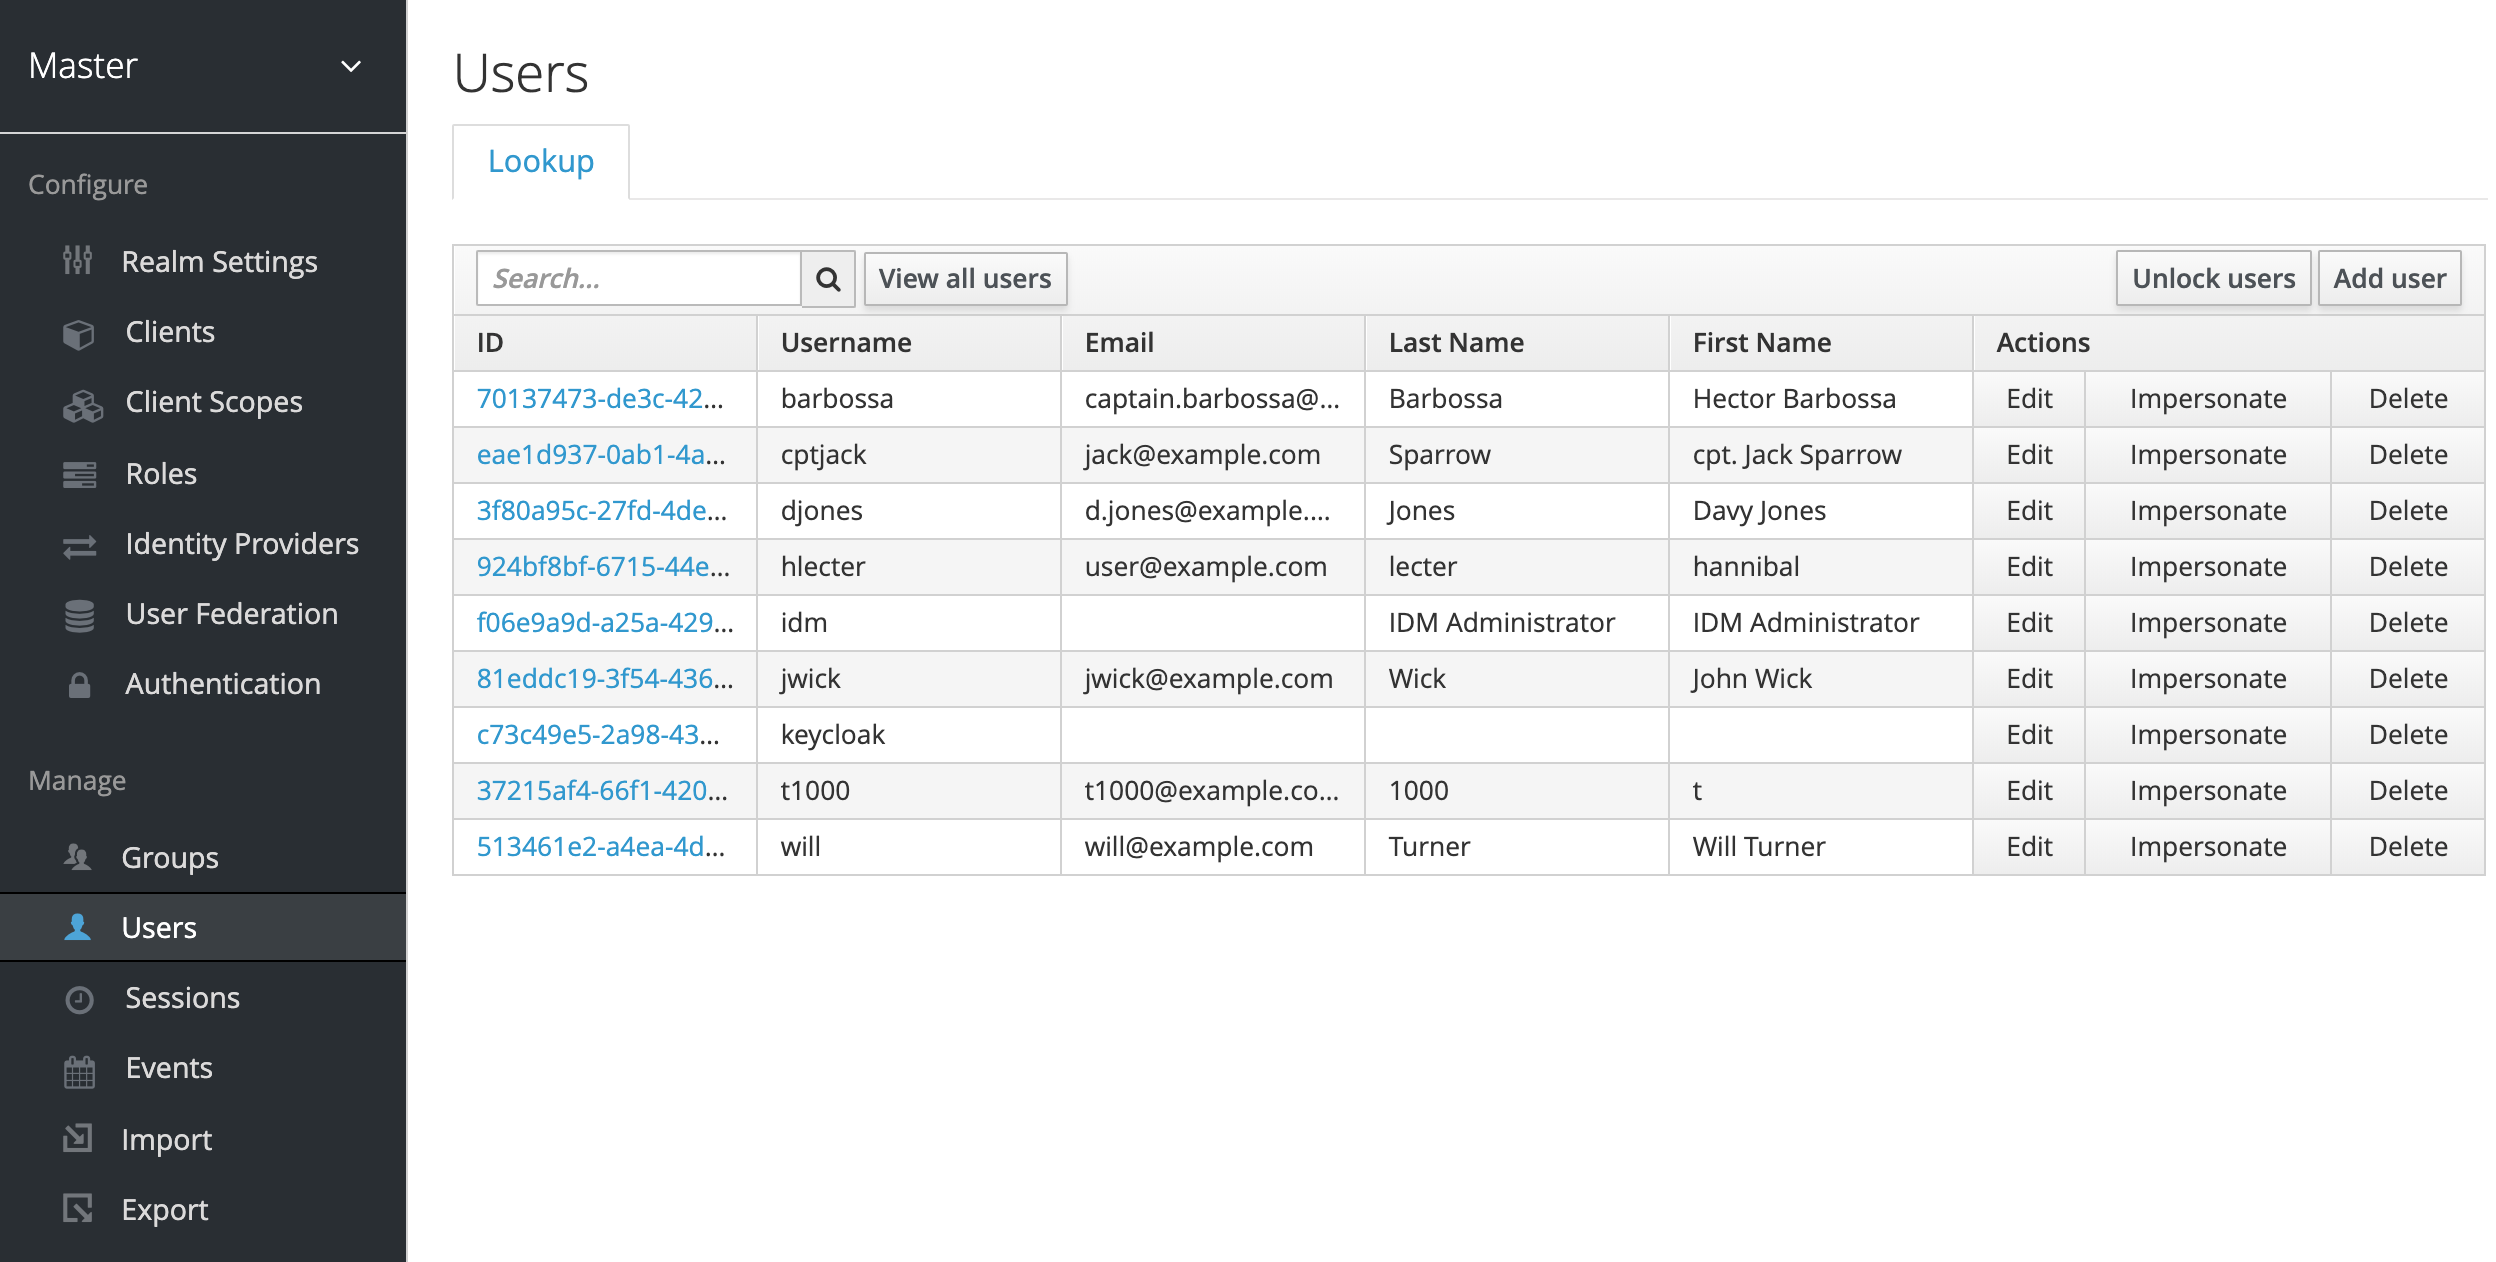
We can then fill in all the details of the User.
REST API
Keycloak has a rich REST API with good decent documentation21. The thing missing is some examples for how to use them correctly.
I recommend using HTTPie28 rather than cUrl, as it is easier to use for these more complex calls.
Get Token
Warning
The Bearer Token is only valid for a short period of time. If you wait too long, you will get 401 unauthorized.
The default REALM is master, and URL is the base URL of Keycloak.
Get Users
Create User
http POST "${KEYCLOAK_URL}/auth/admin/realms/${REALM}/users" \
    "Authorization: Bearer $TOKEN" \
    credentials:="[{\"value\" : \"mypass\", \"type\": \"password\" }]" \
    email="user@example.com" \
    firstName="hannibal" \
    lastName="lecter" \
    username="hlecter" \
    groups:='["Robots"]' \
    emailVerified:=true \
    enabled:=true
Verify
To verify everything is working as it should, you can go to the Groups and Users pages within the Manage menu (left hand side).
With Groups you have View all groups, which should have the groups from LDAP and any group you have created within Keycloak - if not yet, you can do so here as well.
To view details of a Group, double click the name - it's not obvious you can do so - and you will go to the details page. Here you can also see the members of the Group.
You can do the same with the Users menu item. By default the page is empty, if your list of users is not too large, click on View all users. You can view the details page of a user by clicking the link of the User ID. Within the Groups tab you can add the user to more groups, this should contain all the groups known to Keycloak - both Keycloak internal and from LDAP.
SSO with Jenkins
To configure Jenkins to use Keycloak we have two plugins at our disposal, OpenId Connect(oic-auth)22 and Keycloak23. While the Keycloak plugin is easier to configure for authentication, I found it difficult to configure groups. As I feel the group management is mandatory we're going with the OpenId Connect plugin.
You can install plugins in Jenkins via the UI24, via the new Jenkins CLI25, or via the values.yaml when installing via the Helm Chart27.
Important
Install the OpenId Connect plugin before configuring the next parts, and restart your Jenkins instance for best results.
In order to configure OpenId Connect with Jenkins, it is the easiest to use the well-known endpoint url. This endpoint contains all the configuration information the plugin needs to configure itself.
Usually, this is ${KEYCLOAK_URL}/auth/realms/${REALM}/.well-known/openid-configuration.
From Keycloak's perspective we have to register Jenkins as a Client.
Keycloak Client
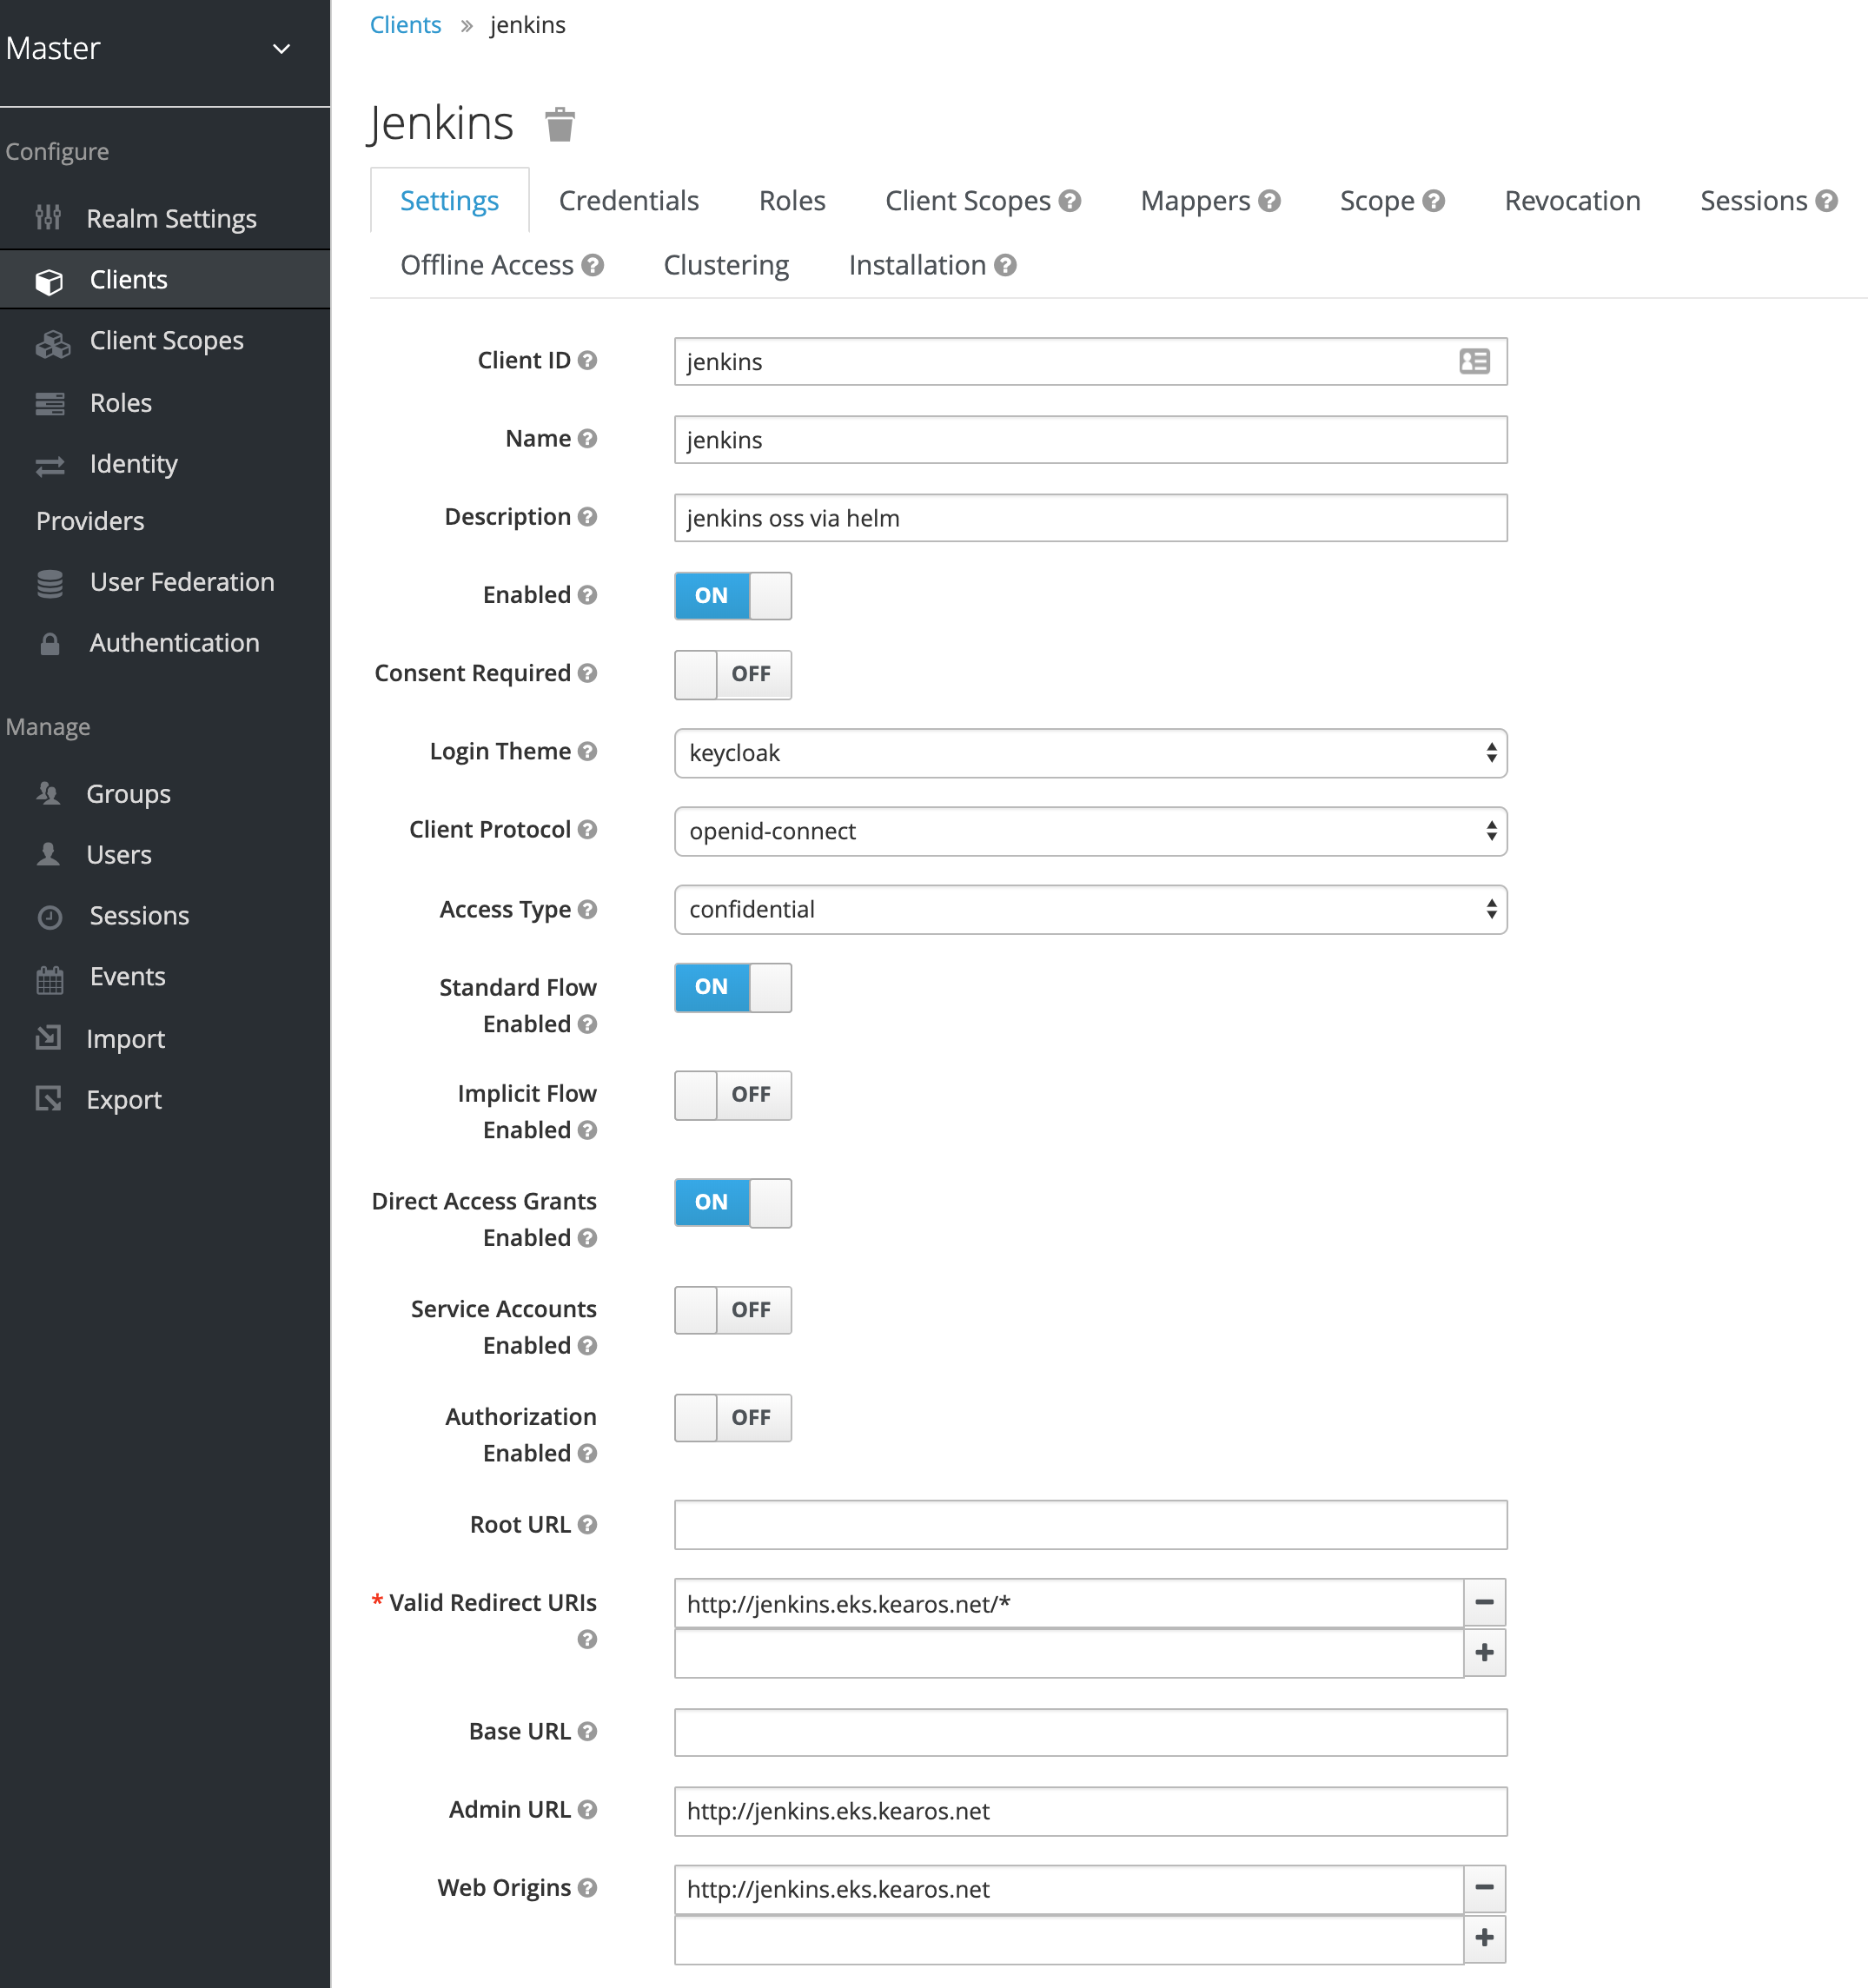
We go to the Clients screen in Keycloak and hit the Create button.
In the next screen, we need to supply three values:
- Client ID: the name of your client,
jenkinswould be good example - Client Protocol:
openid-connectis recommended - Root URL: the main url of your installation, for example
https://jenkins.my.domain.com
Main Settings
Once we hit save, we get a details view.
We have to change some values here.
- Access Type: we need a Client ID and Client Secret, we only get this when we select
confidential - Valid Redirect URIs: confirm this is
${yourJenkinsURL}/*
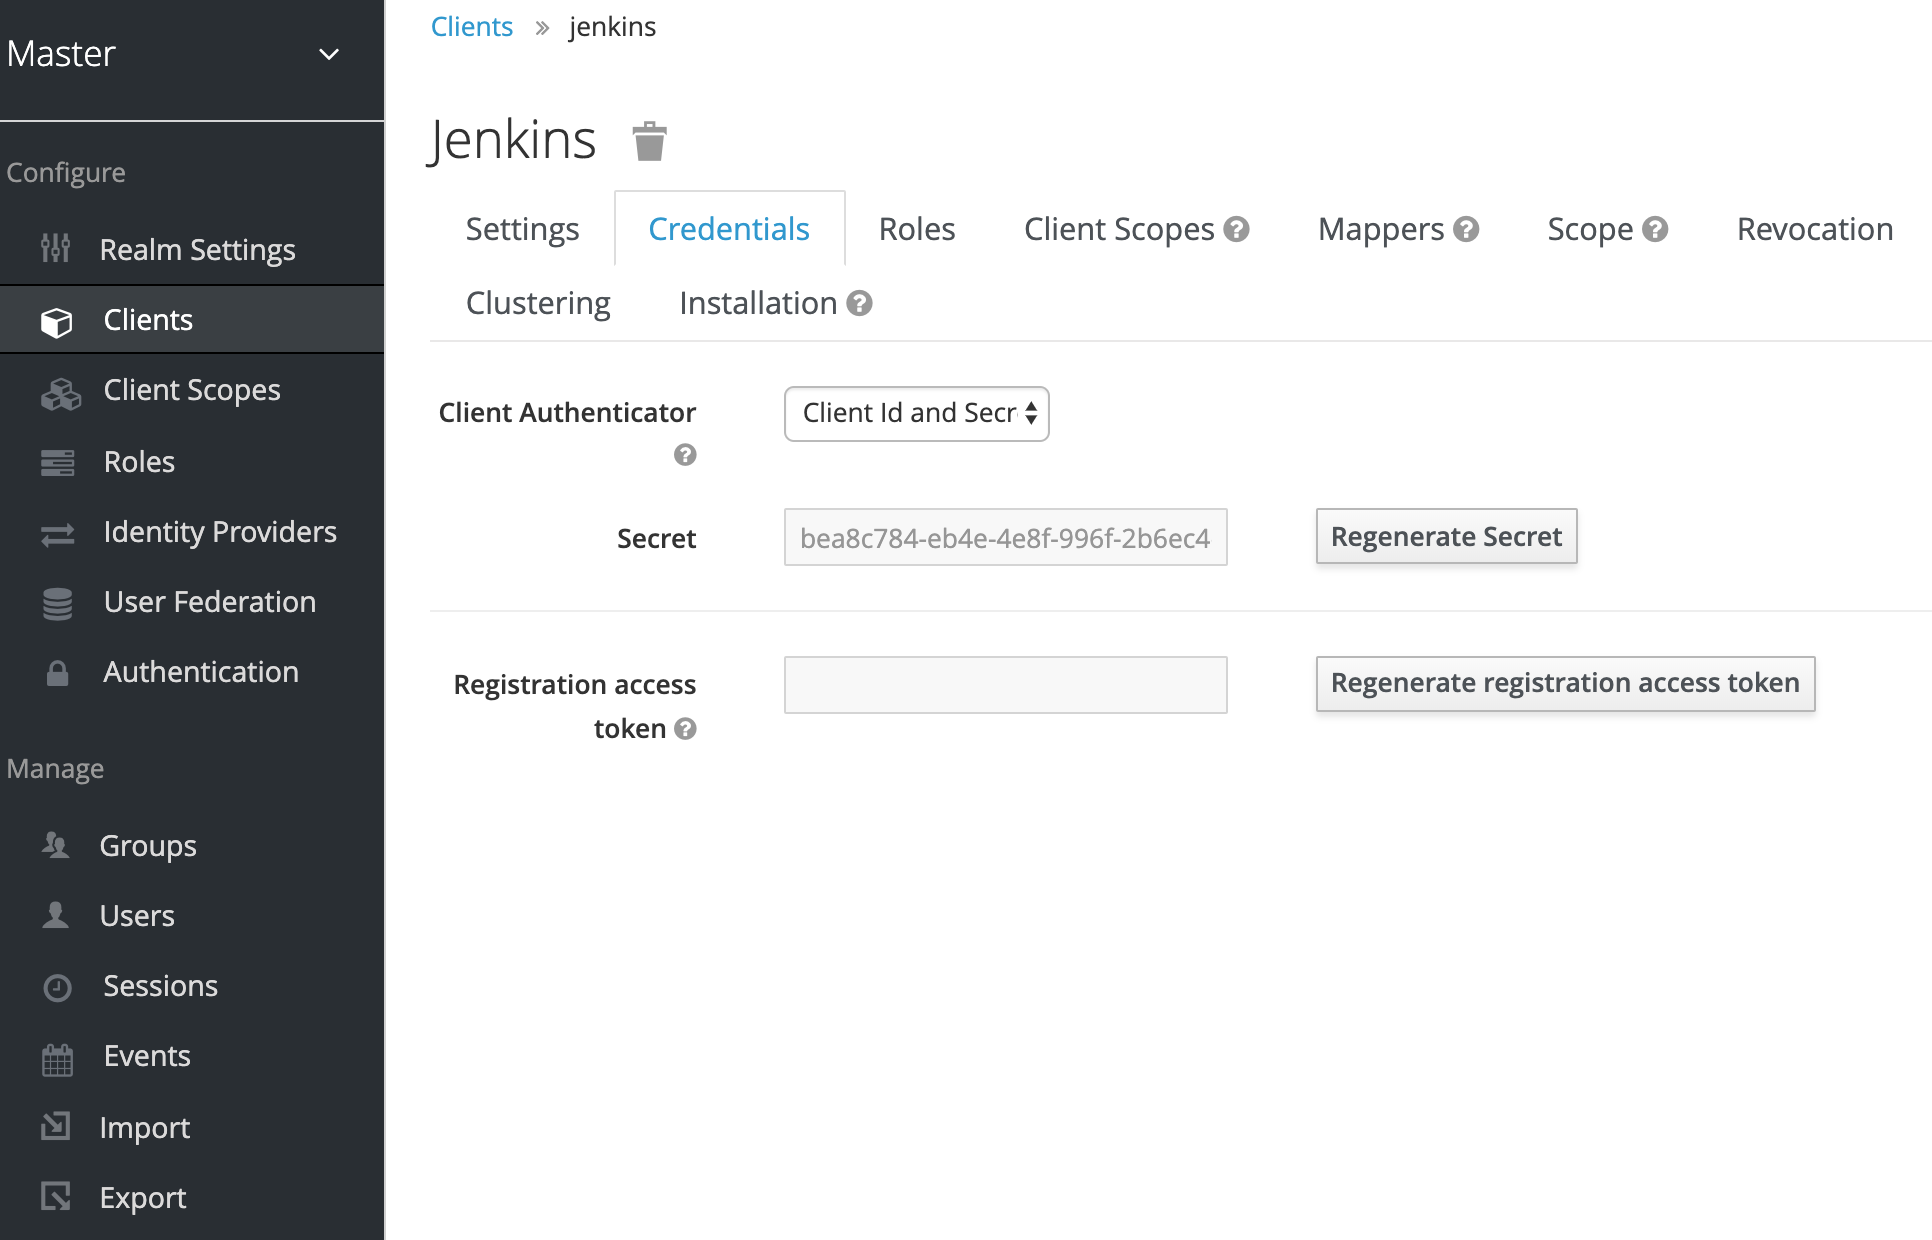
Once you hit save, you get a new Tab in the Details screen of this Client. It is called Credentials, and here you can see the Client Secret which we will need to enter in Jenkins.
Group Mappings
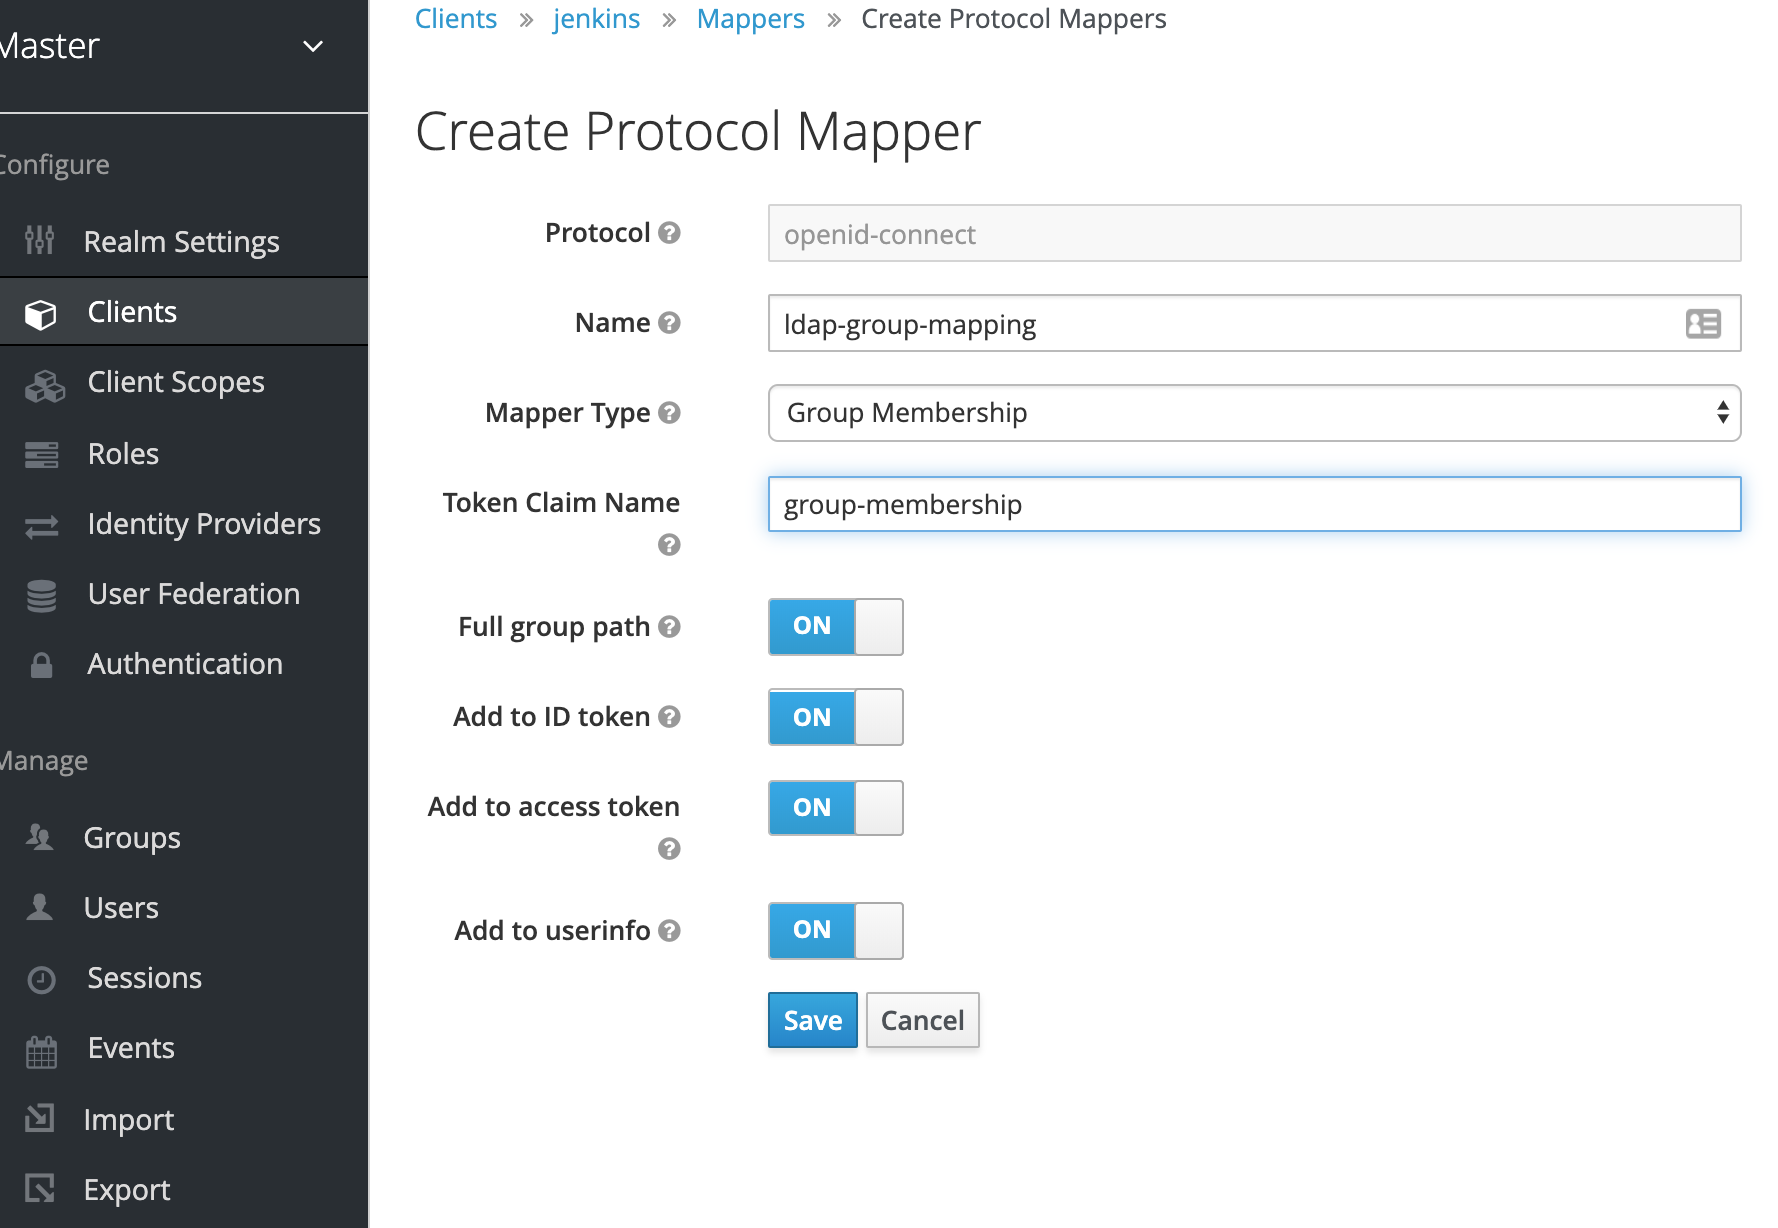
Just as we had to add the Group mapping to the LDAP configuration, we will need to configure the Group mapping in the Client.
If we go into the Client details, we see there's a Tab called Mappers. We create a new Mapping here by hitting the Create button.
Give the mapping a name and then select the Mapper Type Group Membership.
The Token Claim Name is important as well, we use this in our Jenkins configuration, give it a descriptive name such as group-membership.
Configure Via UI
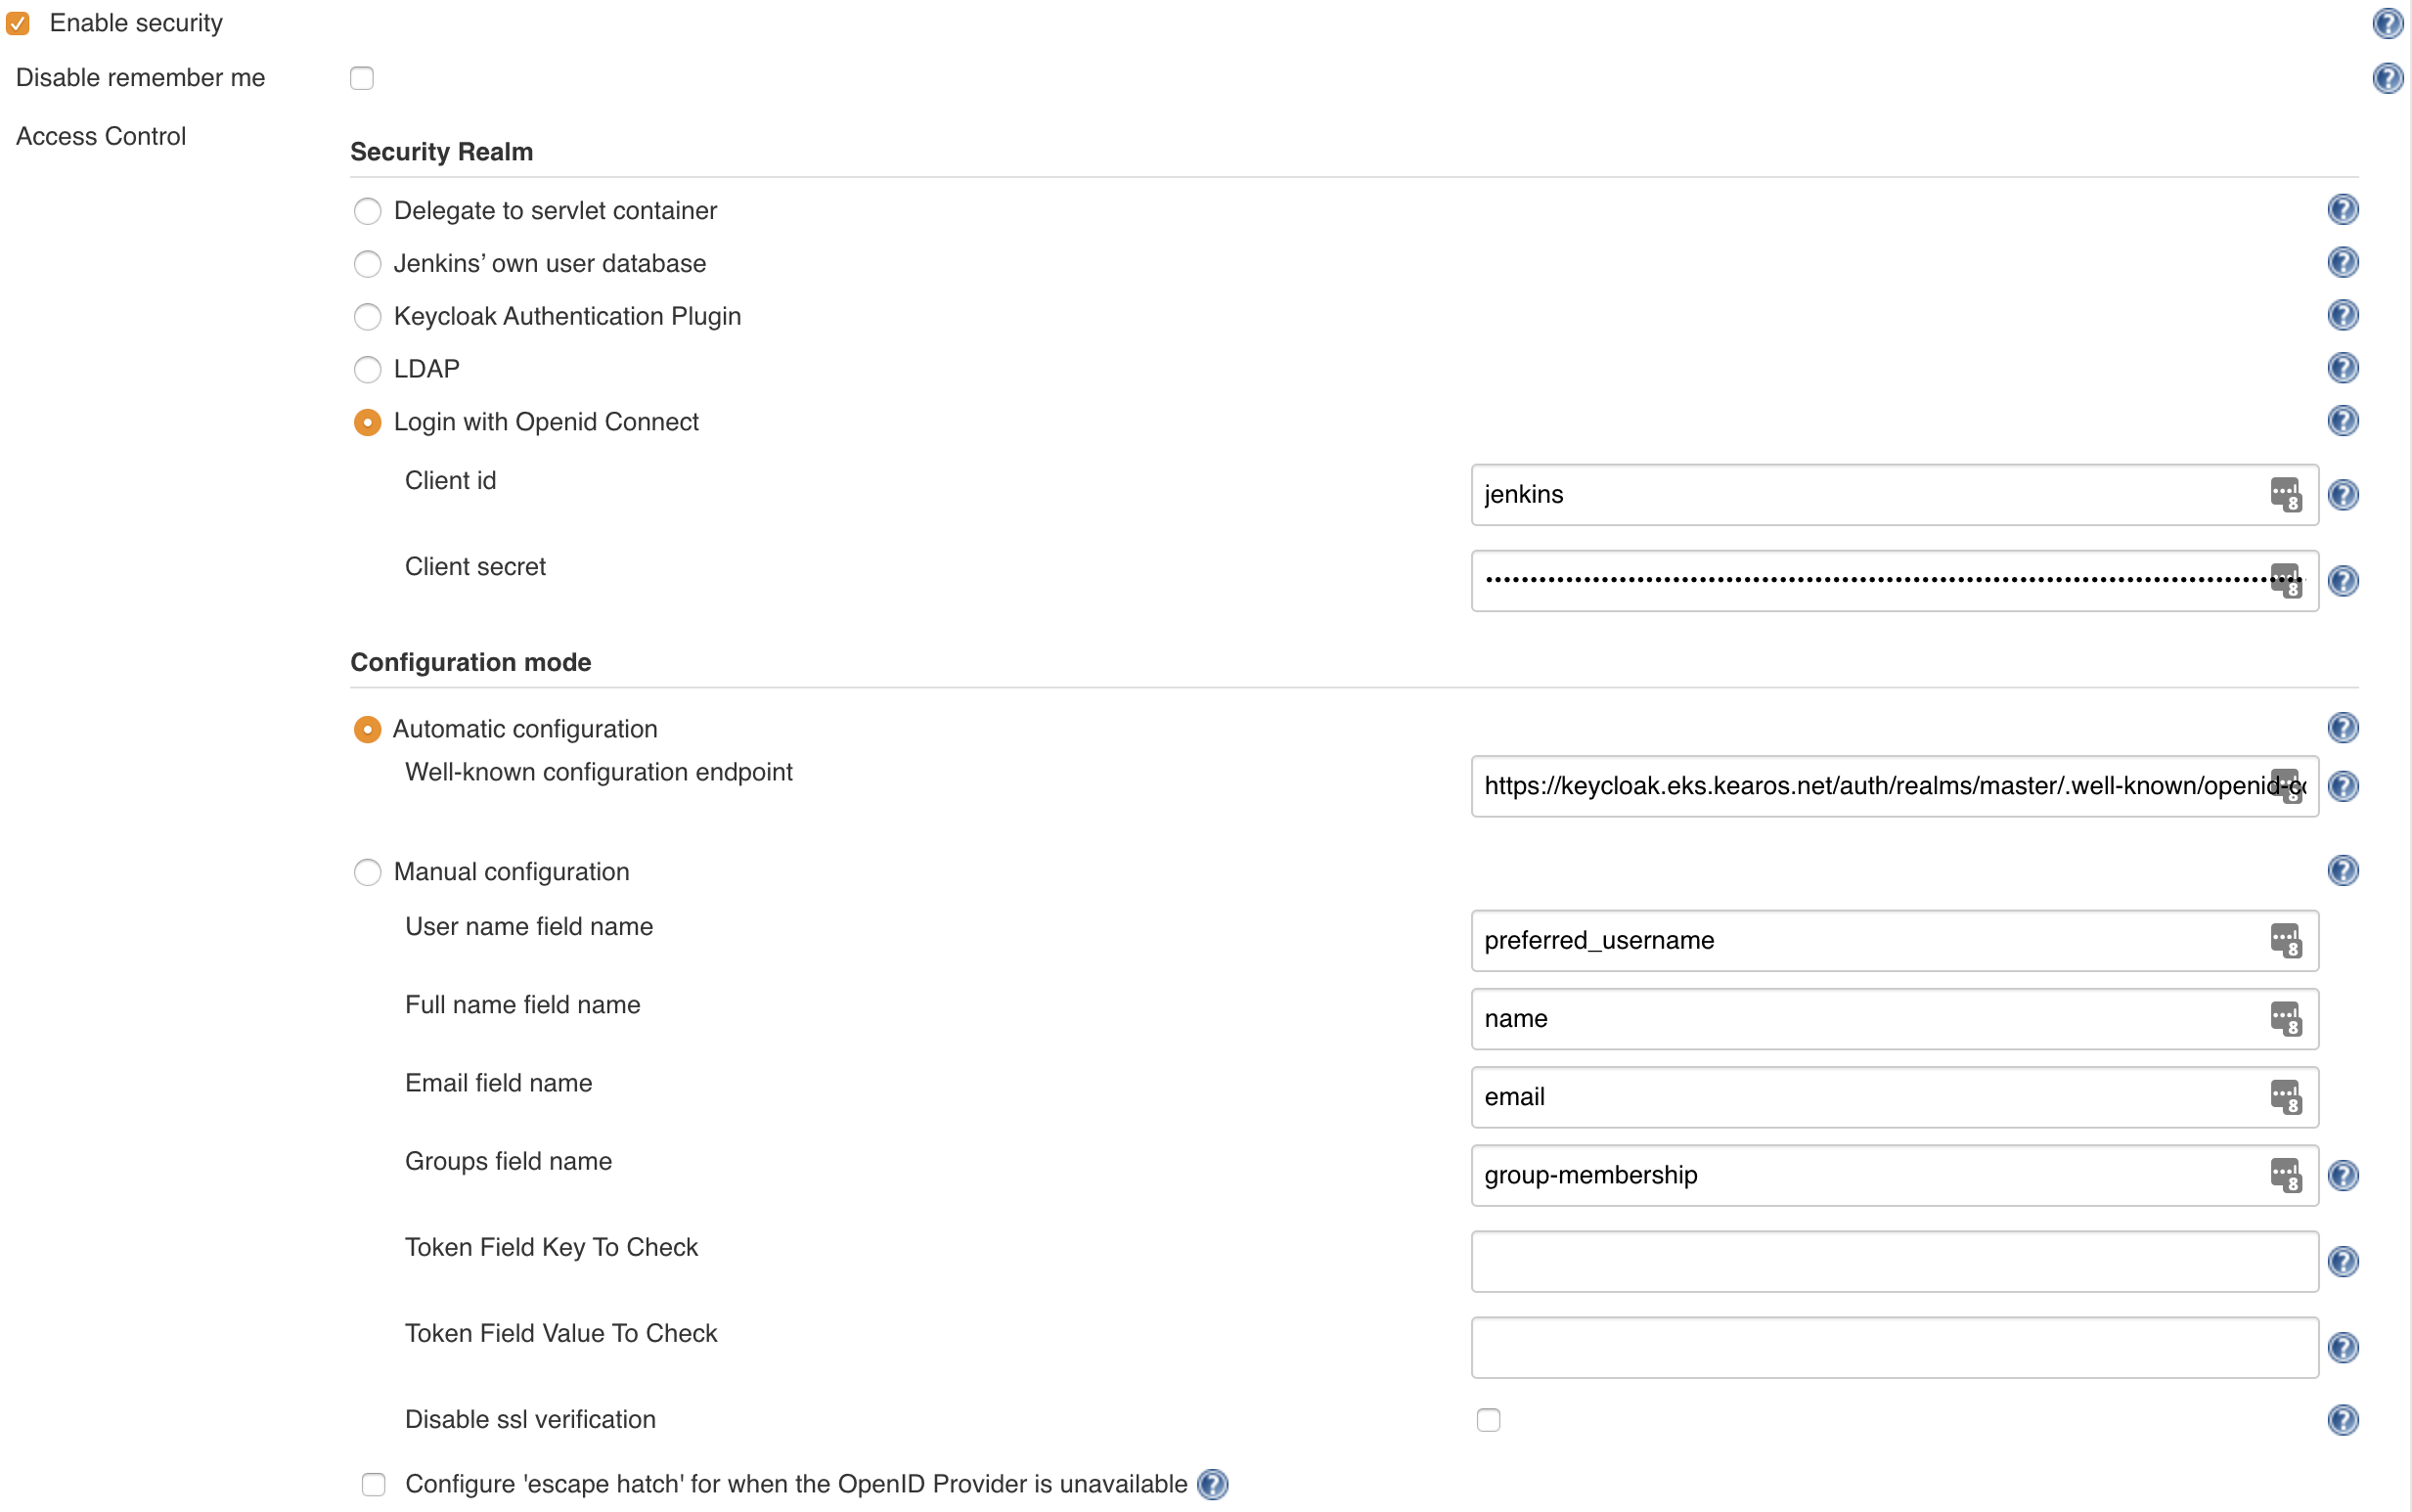
In Jenkins we go to Manage Jenkins -> Configure Global Security and here we select Login with Openid Connect in the Security Realm block.
- Client id: the client we've configured in Keycloak, if you've followed this guide, it should be
jenkins - Client secret: the secret of the client configured in Keycloak, if you've lost it, go back to
Keycloak->Clients->jenkins->Credentialsand copy the value in the fieldSecret.
We now get a Configuration mode block where we can select either Automatic configuration on Manual configuration. We select Automatic and enter our Well-known configuration endpoint URL from Keycloak we've written down earlier. If you don't remember, the format is usually this: ${KEYCLOAK_URL}/auth/realms/${REALM}/.well-known/openid-configuration.
- User name field name:
preferred_username - Full name field name:
name - Email field name:
email - Groups field name:
group-membership
Note
The field Groups field name refers back to the Token Claim Name we configured in Keycloak within our Client's Mapping for Group Membership.
Configure Via Configuration-as-Code
We can use the amazing Jenkins Configuration-as-Code26 to make sure our SSO configuration is configured out-of-the-box!
In order to avoid the having to store the Client ID and Client Secret, we're going to create these as Kubernetes Secrets first.
There's more ways to create these, but this is to keep it simple.
kubectl create secret generic oic-auth \
  --from-literal=clientID="${CLIENT_ID}" \
  --from-literal=clientSecret="${CLIENT_SECRET}" \
  --from-literal=keycloakUrl=${keycloakUrl} \
  --namespace jenkins
JCASC-config.yaml
  jenkins:
    securityRealm:
    oic:
      clientId: "${clientID}"
      clientSecret: "${clientSecret}"
      wellKnownOpenIDConfigurationUrl: "${keycloakUrl}/auth/realms/master/.well-known/openid-configuration"
      tokenServerUrl: "${keycloakUrl}auth/realms/master/protocol/openid-connect/token"
      authorizationServerUrl: "${keycloakUrl}/auth/realms/master/protocol/openid-connect/auth"
      userInfoServerUrl: "${keycloakUrl}/auth/realms/master/protocol/openid-connect/userinfo"
      userNameField: "preferred_username"
      fullNameFieldName: "name"
      emailFieldName: "email"
      groupsFieldName: "group-membership"
      scopes: "web-origins address phone openid offline_access profile roles microprofile-jwt email"
      disableSslVerification: false
      logoutFromOpenidProvider: true
      endSessionUrl: "${keycloakUrl}/auth/realms/master/protocol/openid-connect/logout"
      postLogoutRedirectUrl: ""
      escapeHatchEnabled: false
      escapeHatchSecret: ""
complete-jenkins-helm-values.yaml
master:
  ingress:
    enabled: true
    hostName: jenkins.my.doamain.com
  csrf:
    defaultCrumbIssuer:
      enabled: true
      proxyCompatability: true
  cli: false
  installPlugins:
    - kubernetes:latest
    - kubernetes-credentials:latest
    - workflow-aggregator:latest
    - workflow-job:latest
    - credentials-binding:latest
    - git:latest
    - blueocean:latest
    - prometheus:latest
    - matrix-auth:latest
    - keycloak:latest
    - oic-auth:latest
  JCasC:
    enabled: true
    pluginVersion: "1.30"
    configScripts:
      welcome-message: |
        jenkins:
          systemMessage: Welcome, this Jenkins is configured and managed as code.
      ldap-settings: |
        jenkins:
          securityRealm:
            oic:
              clientId: "${clientID}"
              clientSecret: "${clientSecret}"
              wellKnownOpenIDConfigurationUrl: "${keycloakUrl}/auth/realms/master/.well-known/openid-configuration"
              tokenServerUrl: "${keycloakUrl}/auth/realms/master/protocol/openid-connect/token"
              authorizationServerUrl: "${keycloakUrl}/auth/realms/master/protocol/openid-connect/auth"
              userInfoServerUrl: "${keycloakUrl}/auth/realms/master/protocol/openid-connect/userinfo"
              userNameField: "preferred_username"
              fullNameFieldName: "name"
              emailFieldName: "email"
              groupsFieldName: "group-membership"
              scopes: "web-origins address phone openid offline_access profile roles microprofile-jwt email"
              disableSslVerification: false
              logoutFromOpenidProvider: true
              endSessionUrl: "${keycloakUrl}/auth/realms/master/protocol/openid-connect/logout"
              postLogoutRedirectUrl: ""
              escapeHatchEnabled: false
              escapeHatchSecret: ""
      matrix-auth: |
        jenkins:
          authorizationStrategy:
            globalMatrix:
              permissions:
                - "Overall/Read:authenticated"
                - "Overall/Administer:barbossa"
                - "Overall/Administer:Catmins"
                - "Overall/Administer:Robots"
                - "Overall/Administer:/Catmins"
                - "Overall/Administer:/Robots"
persistence:
  enabled: true
  volumes:
  - name: oic-auth-clientid
    secret:
      secretName: oic-auth
      items:
        - key: clientID
          path: clientID
  - name: oic-auth-clientsecret
    secret:
      secretName: oic-auth
      items:
        - key: clientSecret
          path: clientSecret
  - name: oic-auth-keycloakurl
    secret:
      secretName: oic-auth
      items:
        - key: keycloakUrl
          path: keycloakUrl
  mounts:
    - name: oic-auth-clientid
      mountPath: /run/secrets/clientID
      subPath: clientID
    - name: oic-auth-clientsecret
      mountPath: /run/secrets/clientSecret
      subPath: clientSecret
    - name: oic-auth-keycloakurl
      mountPath: /run/secrets/keycloakUrl
      subPath: keycloakUrl
Use Keycloak Groups In Jenkins
Warning
Unfortuantely, there is one caveat about using Keycloak as intermediary between LDAP and Jenkins.
Groups do not come across the same as before, they're now prefixed with /. I'm sure it is down to a misconfiguration on my end, so please let me know how to resolve that if you figure it out.
This means, that a LDAP group called Catmins will have to be used in Jenkins via /Catmins in Matrix, Project Matrix or other authorization schemes.
Verify
To verify, take the leap of faith to save the configuration, logout (top right) and then log back in. If everything goes well, you will be redirected to Keycloak, once successfully logged in, redirected back to Jenkins!
Note
One thing to remark, that if you're logged into Jenkins and you want to see the Groups, you can select your User (top right, click on your name).
Alternatively, you can go to ${JENKINS_URL}/whoAmI (notice the capital casing of the 'A' and 'I', it is required).